The Intuit Printer Library Error makes it difficult for the QuickBooks users to work effectively. It makes it challenging to print an invoice due to several issues including font or orientation issues. We all are aware that QuickBooks allows to print invoices, forms and other documents within the software. This definitely saves a lot of time but the QuickBooks Printer Library Error disturbs the overall user experience and hampers the productivity. If you are facing printer library error and don’t know what to do? Well, we have a solution for that as well. The error if often seen with an error message that states as:
Warning
The form you are about to print specifies the font, which is not installed on the system. You may wish to install the font. Click on ok to print anyway, or cancel to skip printing this form.
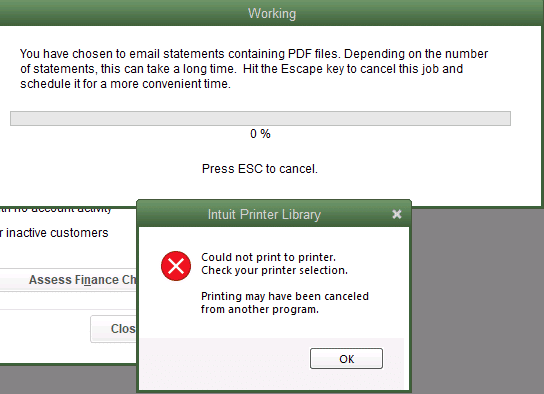
Working
You have chose tp email statements containing PDF file. Depending on the number of statements, this can take a long time. Hit the Escape key to cancel this job and schedule it for a more convenient time.
Intuit Printer Library
Could not print to printer. Check your printer section.
Printer many have canceled from another program.
This is a pretty common error, and hinders the smooth printing process, as it doesn’t let the users to print the invoice. There can be a few different reasons behind the occurrence of this error. In this article, we will be talking about the causes and fixes of this QuickBooks printer library error, in case you are interested, make sure to read this post carefully till the end.
When this error occurs, users are not able to print the invoices or forms because they have not the required font installed in their system. This error appears when a user tries to save the invoice, form or purchase the order as PDF. It is often complained by the users that they are able to see the preview of the print but not able to print. This clearly shows that due to misconfigured printing settings, QuickBooks is showing printing errors. Therefore, users need to resolve this error as quickly as possible so that their work is not hampered.
What causes the QuickBooks printer library error?
The Intuit Printer Library Error can be caused due to the following reasons. Let us have a look:
If the computer RAM is overloaded.
Or if a driver is missing.
Another reason can be if the printer is not supported.
If the fonts in the invoice do not tally.
You can also face such an error if the specified fonts are not installed.
The QBPrint.qbp file that is damaged can be the reason for this error.
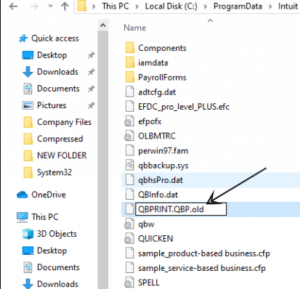
Locate the QBPrint.qbp file
Windows 10, 8.1, 8, 7 and Vista: C:\ProgramData\ Intuit\ QuickBooks 20XXNote: 20XX represents the version of your QuickBooks
Server 2008 and Server 2012: C:\ Program Data\ Intuit\ QuickBooks year and C:\ Users\ **remote user**\ AppData\ Roaming\ Intuit\ YEAR VERSION\ TSPrinterSettings
Once the file has been located, follow the steps given below:
Right-click on the QBprint.qbp file and Rename it.
Add the old word to the file name (QBPrint.qbp.old).
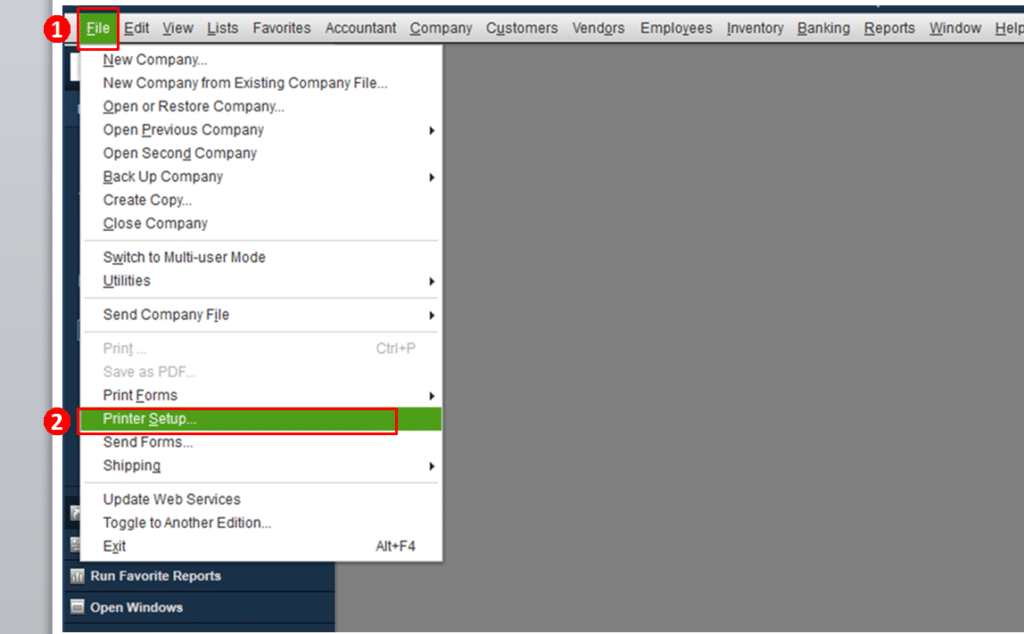
Now, Open QuickBooks Desktop, go to the File Menu and select Printer Setup.
When the Form Name list appears, select any Transaction, and select Ok.
A new file will be created ‘QBprint.qbp’ file.
After this, try to open and print the transaction.
To fix the Printer Library Error in QuickBooks Desktop, follow the steps given below:
Test whether the Printer Setup is accurate.
Choose the Right Printer.
Print to another Printer.
Method 4: Correct the Paper Size for Forms
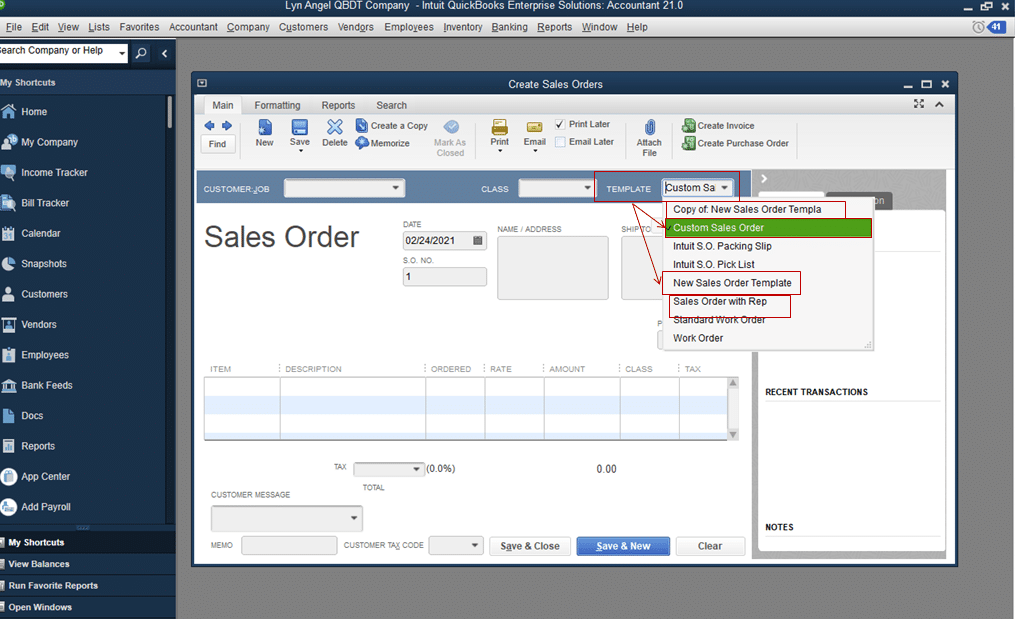
Check the template that you are using for the current transaction.
Go to Lists and then select Templates.
When you double-click on the chosen template, a Basic Customization Windows will appear on the screen.
Now, select the Additional Customization button and click Print.
The layout is then modified from the button specified for Layout Designer.
Check the paper size and see ‘Use specified printer settings below for this (form name)’ is checked. If not, modify the template layout.
If ‘Use (form name) Printer Settings from Printer Setup’ has been marked, then click on see ‘Use specified printer settings below for this (form name)’.
Summing up!
We hope that this article will be useful to help you resolve the Intuit Printer Library Error in QuickBooks. If you are still unable to print the file, then you can contact our XpertBooks Pro professionals. Our team comprises of expert professionals and help you resolve the error in no time.
FAQ's related to Intuit QuickBooks Printer Library Error
Why won't QuickBooks connect to my printer?
QuickBooks may not connect to your printer due to an outdated printer driver or compatibility issues between QuickBooks and your printer.
Updating QuickBooks desktop or payroll becomes very important, as every new update rolls in with tremendous features and functionalities. It is very important for a user to keep the software updated, in order to make the best out of it. While updating QuickBooks desktop or payroll, there are possibilities of encountering certain errors, especially the ones that start with the number 15. In this segment, we will be talking about the process to resolve QuickBooks desktop payroll update errors (15xxx) and also how you can install a digital signature quickly to fix the Internet Explorer problem. So, make sure that you stay connected to this post, or you can also get in touch with our XpertBooks Pro team. Our professionals will be happy to troubleshoot such errors on your behalf.
A Description of Various QuickBooks Payroll Update Errors
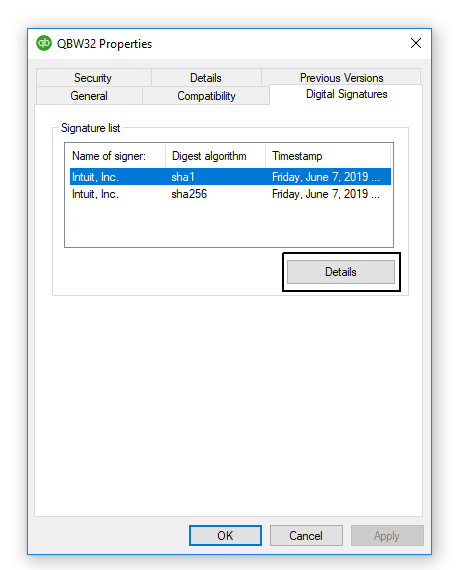
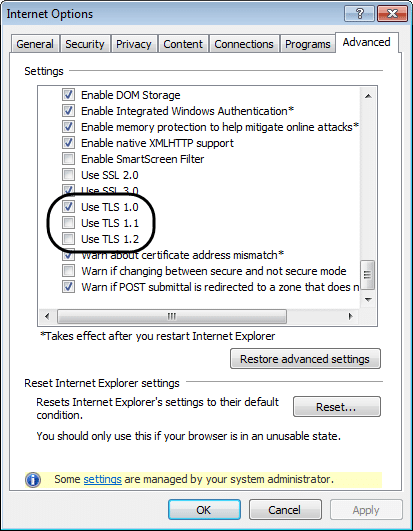
Talking about the origin of this error, incorrect configuration of Microsoft internet explorer might end up in such errors while downloading and installing QuickBooks desktop updates. In order to protect the system and its contents, QuickBooks desktop tries to verify the digital signature of all files downloaded through the program. In case QuickBooks fails to verify the digital signature of a file, then any of the below-mentioned errors could be seen.
Before beginning with the processes to fix the QuickBooks payroll update errors, let us first have a look at the points that the user needs to consider:
Ensure to install the latest version of Internet Explorer from the Microsoft download center.
In case you are having the latest version of Internet Explorer installed currently, or if you continues to receive the error after carrying out the steps below, try consulting an IT professional.
The 15xxx errors can also be caused due to expired windows security certificate. You will have to run Windows update or download an updated certificate from Microsoft.
Method 6: Manually resolve the QuickBooks payroll update errors
It is supposed to run the Reboot.bat file.
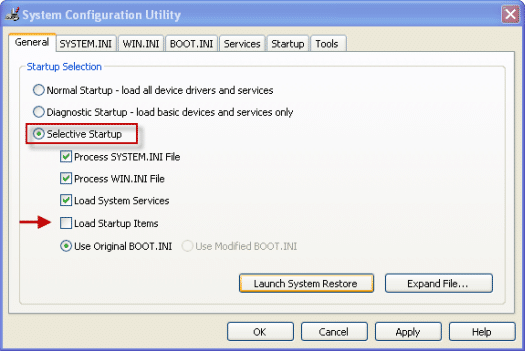
And then restart the system, followed by opening QuickBooks.
The next step is to select the Install now option, in case you are prompted to install an update.
Now, delete and download the update again, if you are unable to install the update.
It is supposed to close QuickBooks desktop.
And then visit the C:\Documents and Settings\ All users\ Application Data\ Intuit\ QuickBooks <versionXX>\ Components.
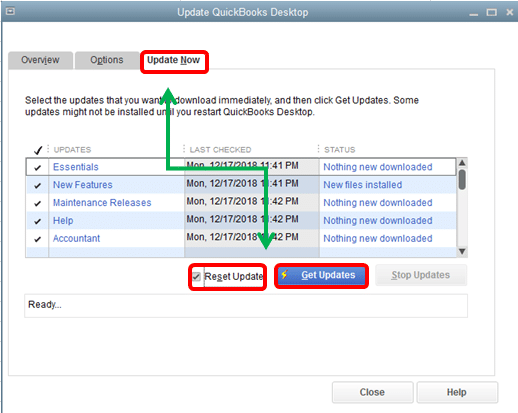
Next step is to open QuickBooks desktop. And then visit the Help menu and also Update QuickBooks desktop.
And then, navigate to the Update now tab. And also, mark the Reset the updates checkbox.
Later on, you need to select Get updates to redownload the updates.
You will then be required to Close and reopen QuickBooks desktop after the download gets complete.
And you will then be required to select Install now, on the QuickBooks desktop update service window.
In case the error persists, you need to follow the methods below:
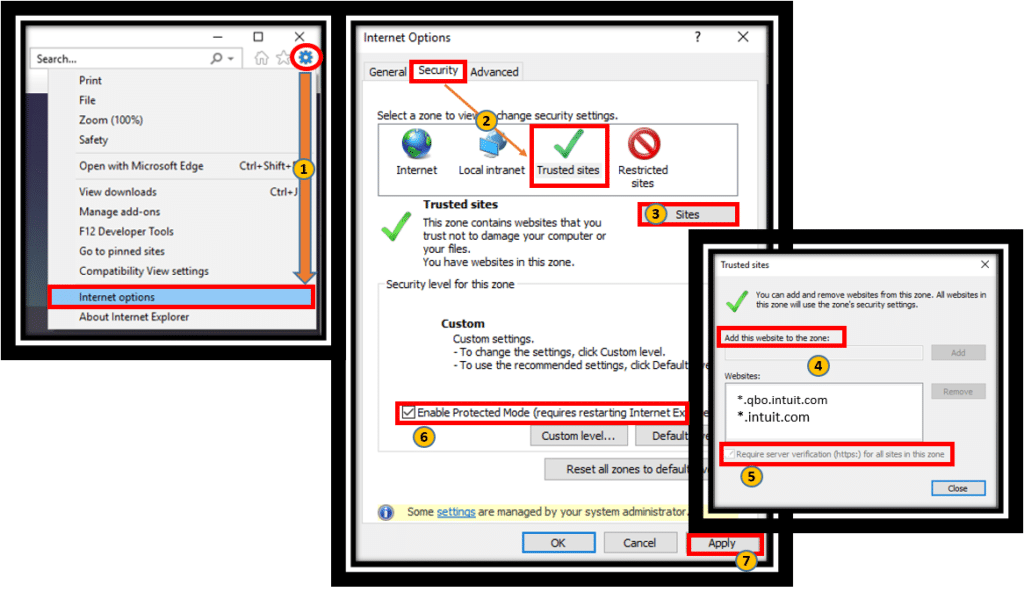
Verifying and troubleshooting QuickBooks desktop and internet explorer settings.
This brings us towards the end of this article, where we hope that the information shared in above might be of some help in getting rid of the QuickBooks payroll update error and problems. However, if you require any technical assistance, feel free to contact XpertBooks Pro. Our independent accounting professionals will be more than happy to help you.
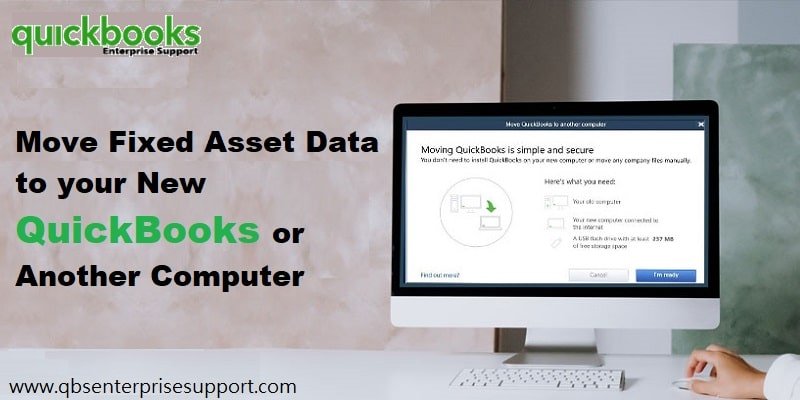
Want to learn the process to move the client’s fixed asset data, if you upgraded the QuickBooks and reinstalled it on another system? If that is the case, then reading the article carefully can be of some assistance. Upgraded the QuickBooks or reinstalled the current version on another system; if yes, then we will help you in moving the clients’ fixed assets, so you can continue managing them with the fixed asset manager. It should be noted that the Fixed Asset Manager is available in QuickBooks Accountant and Enterprise.
In this article, we have provided in-depth information about how a user can move a client’s fixed asset data if they've upgraded QuickBooks desktop or reinstalled it on another computer. If you want professional guidance from our independent accounting professionals, then you may ring us a call at 1.800.761.1787. Without any delay, let us proceed ahead.
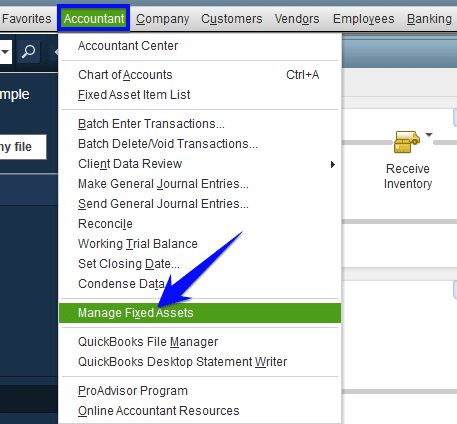
Further, from the Accountant menu, choose the Manage fixed assets option.
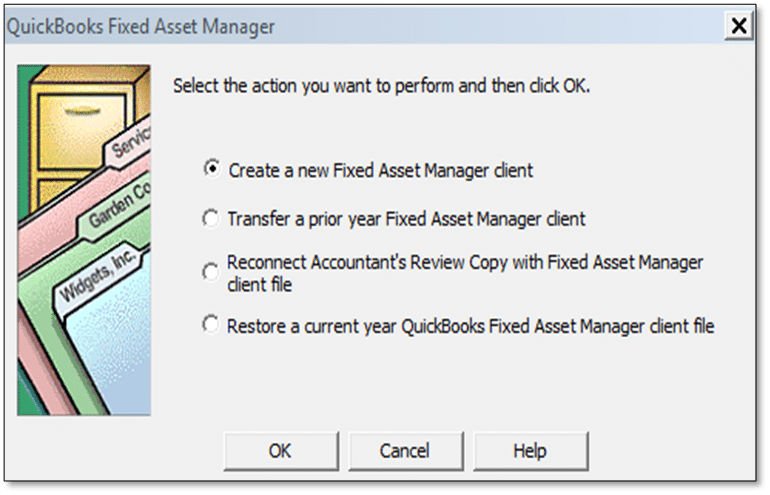
Next step is to select Transfer a prior year fixed asset manager client file.
And also, select the Next tab.
After that, on the transfer client, choose Client window and also go for the Client file you wish to transfer.
Later on, choose the Correct calculation and hit the Next tab.
Also, select the Asset synchronization and hit the Next tab.
Ensure that the transfer summary info is correct. Then choose Finish to start the transfer.
Condition 1: In case the user skipped a version of QuickBooks when upgraded
In case you have jumped from QuickBooks Desktop 2018-2020 and skipped version 2019, then the steps below can be followed:
Ensure that the Clients’ fixed asset files are not compressed.
The option that states “Automatically compress clients” compresses your clients’ fixed asset files into a single file. Ensure that it is not turned on in the previous QuickBooks version. Also note that if you no longer have access to the QuickBooks version you upgraded from.
The first step is to open the Clients’ company file.
And then, Create a backup.
Later on, move to the Accountant and select Manage fixed assets.
Now, on fixed asset manager, move to the Tools and choose Program options.
Also, select the General tab.
Last step if to uncheck the option to Automatically Compress client and hit the OK tab.
You need to now find the clients’ fixed asset folder
In this, you should browse to the Previous QuickBooks clients folder.
And then, open the Folder and find the file.
Right-click the file and choose Open. On the Windows message that comes up, choose select Program from a list and then notepad.
The bottom of the text will look like the file path ending in .qbw file
You should then Copy the folder and save it temporarily in a folder you can quickly access.
After that, open the Folder copied earlier.
This will contain the Client’s fixed asset files.
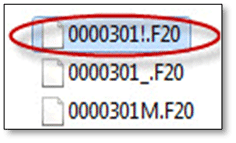
And you should then check if the file with ! is visible or not.
Next step is to change All files extensions and match them with QuickBooks.
And lastly, copy the Client’s fixed asset folder from where it was saved temporarily.
Condition 2: If you skipped a version of QuickBooks when you upgraded
Step 1: Verify that the fixed asset files of your clients are not compressed
For example, if you jumped from QuickBooks Desktop 2018 to 2020, and skipped version 2019.
Choose the 'Automatically compress clients' option to compress your clients' fixed asset files into a single file. You need to ensure that the option is not enabled in the older QB version. Follow the brief procedure enumerated as follows:
Hover over your client's company file and open it.
Next step requires you to make a backup.
Choose 'Manage Fixed Assets' from the 'Accountant' or the 'Company' option.
Subsequently, choose 'Program Options' from the 'Tools' menu in the Fixed Asset Manager.
Afterward, head to the 'General' tab.
Uncheck the box besides the 'Automatically compress client' option.
Hit on 'OK.'
Step 2: Locate the folder containing your client's fixed asset
Every client in QuickBooks has a fixed asset folder attached. The total number of folders depends on the number of clients. Follow the below-provided walkthrough to locate the fixed asset folder of the client:
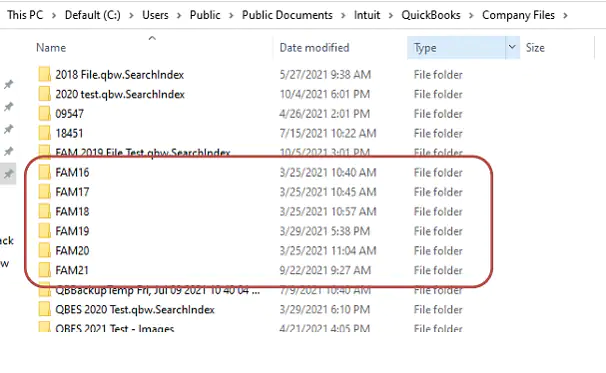
Head to the previous 'Clients folder' by following the below-mentioned path: 'C:\Users\Public\Documents\Intuit\QuickBooks\Company Files\FAMXX\Clients.' (You are required to change 'XX' with the folder number in your older QB version. As a precedent, while upgrading from QuickBooks 2017, browse the folder named 'FAM16').
Now, head to the Location containing your QB files.
QuickBooks Version
FAMXX
QuickBooks Desktop 2022
FAM21
QuickBooks Desktop 2021
FAM20
QuickBooks Desktop 2020
FAM19
QuickBooks Desktop 2019
FAM18
Look for all your FAM folders from this location.
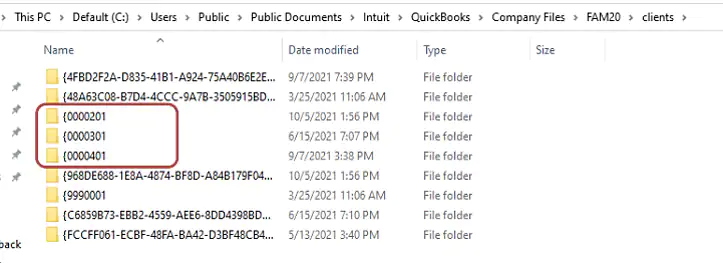
Each subfolder contains the fixed asset files for your clients. (except '{0000101,' '{9990001,' and other folders with long, alphanumeric names).
To make the procedure easy, use the client folder '{0000301' in the subsequent steps.
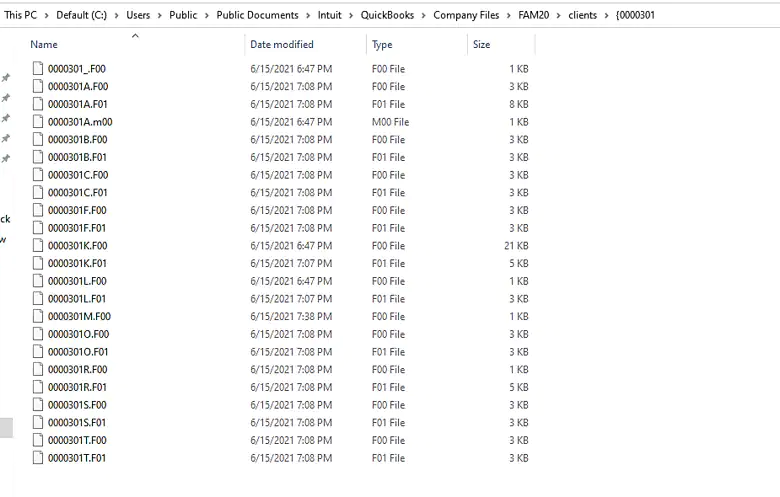
Access the '{0000301' folder, then search for the '0000301M.FX0' file. (The value of X in '0000301M.FX0' depends on what version of QuickBooks software you are upgraded from).
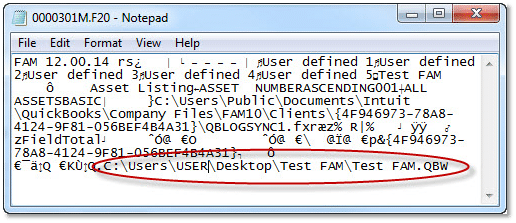
Now, Right-click on the file and subsequently choose 'Open.'
You will then see a message on the screen. Choose 'Select program' from a list, followed by opting for 'Notepad.'
Beneath the text, search for the file path that ends with the '.QBW extension'.
This is a convenient process that allows you to locate the client file that has to be moved.
Proceed to the subsequent steps if this is the client file that you wish to transfer.
However, if this isn't the file, repeat the preceding process for other client folders till you locate the correct file.
Now, you are required to copy the '{0000301' folder and, afterward, save it on the Desktop.
Access the copied folder.
Inspect if you can identify a file with '!' in the file name.
This is how you can decide if you need to utilize a compressor tool (like WinRar) to extract the client's fixed asset file. If the '!' containing file gets identified, extract the file to the folder and then delete the file containing '!' in its filename.
On the contrary, if you do not find '!' in any file name, proceed as follows:
You need the extensions of all the files to match the QuickBooks you are using. Below is provided a list of extensions for different versions of QuickBooks.
Version
File Type 1
File Type 2
File Type 3
QuickBooks Desktop 2022
.F10
.F11
.M10
QuickBooks Desktop 2021
.F00
.F01
.M00
QuickBooks Desktop 2020
.F90
.F91
.M90
QuickBooks Desktop 2019
.F80
.F81
.M80
For example, after updating from QuickBooks 2019 to QuickBooks 2021, we must change the three FAM client file types from version 2019 to version 2021.
You then need to copy the fixed asset folder from the Desktop (where you saved it in the previous steps).
In case you have set up QB software on a different PC, make use of a flash drive to transfer the client folder.
Proceed to Step 3.
Step 3: Transfer the folder containing your client's fixed asset
Navigate to the folder housing the client's fixed asset: C:\Users\Public\Documents\Intuit\QuickBooks\Company Files\FAMXX\Clients
If there exists a folder with the same number, then there is no need to copy it. If that is the case, follow the steps below:
Head to the location where you saved the folder temporarily ('Desktop' in our case).
Subsequently, alter the number associated with the folder that you need to move. Once the number is changed, copy the folder again.
Now, transfer the folder to your new QuickBooks Clients folder.
Proceed to Step 4.
Step 4: Open Fixed Asset Manager
Access the client's desktop file.
Choose 'Manage Fixed Assets' from the 'Accountant' menu.
The correct list of fixed assets should now be visible in the Fixed Asset Manager.
Did you Move or rename the client's company file?
If you see a warning asking you whether to continue to open the fixed assets, choose 'Yes.'
Move the Asset data to the other PC.
Use a flash drive to back up and transfer your client's fixed asset file from your old to your new computer if you reinstalled QuickBooks.
Steps to Move the Fixed Asset Data to Another System
Just in case you have re-installed the QuickBooks, then use a flash drive to backup and move the client’s fixed asset file from the old to the new system.
Step 1: Backing up the client’s fixed asset data
Open your old PC and follow the steps provided below:
Here, you need to open the Client’s company file.
And from the Accountant menu choose Manage fixed assets.
Now, browse to the Drive where you wish to save the file.
Further, ensure to Save the backup in a new folder.
You should then choose OK tab, when ready.
Also, note that the backed up folder might have a different file name, but the format will be similar. (For example:)
Step 2: Restoring the clients’ fixed asset data
At first, connect the Flash drive to the new system.
And further, open the QuickBooks software and also log in to the Client’s company file.
Next step is to move to the Accountant menu and choose Manage fixed assets.
Now, select Restore a current year QuickBooks fixed asset manager client file.
Also, choose Browse tab and move to the Flash drive where you Save the client’s file.
You should also ensure to select the Folder where you saved the backup, and not the file.
Important: Choose the folder where the backup was saved, not the file itself.
By the end of this article, we believe that the steps discussed in above might be of some help in moving the fixed asset data to the new QuickBooks or another system. However, if you are still having any query, then feel free to reach XpertBooks Pro. As an independent service provider, our team offer technical assistance for accounting software related issues. Our professionals can help identify the root cause and guide you through the appropriate troubleshooting process.
FAQ's
Can I move fixed asset data between different versions of QuickBooks Desktop?
Yes! You can easily transfer fixed asset data between different versions of QuickBooks Desktop. The process requires backing up the company file from the original version and subsequently restoring it to the destination version.
How can I transfer fixed asset data to a new computer?
The steps to transfer fixed asset data to a new computer are: 1. Install QuickBooks on the new PC. 2. On the previous system, back up the company file to an external device or a shared network location. 3. Transfer the backup file to the new computer. 4. Restore the backup file on the new computer using QuickBooks. 5. Open the restored company file on the new computer and verify that the fixed asset data is intact.
Can I move fixed asset data from QuickBooks Desktop to QuickBooks Online?
Users cannot move fixed asset data from QuickBooks Desktop to Online through any in-built functionality in QuickBooks.
Are you facing banking errors in your QuickBooks? Well, challenging with banking errors in QuickBooks is not a cakewalk for users. QuickBooks is also prone to many technical glitches and one common banking error is 'QuickBooks Error OL 334'. It is a common banking setup and connection error that can seen due to poor internet connection. This error basically highlights that there is some sort of issue with the user’s bank financial institution that they might have rolled out some of the improvements to their offering related to the admin or the web connector. Getting rid of this error is easy, if you are aware of the steps that need to be followed. In this article, we will be talking about the steps and procedures along with the causes to fix the QuickBooks error OL-334. So keep read on!
What leads to QuickBooks OL-334 bank errors in QuickBooks?
Some of the possible causes are given below:
The very first reason can be a discontinued adaptation of Windows or QuickBooks desktop might lead to this problem.
Another reason - Check with your bank to see if they might have rolled out some improvements.
You might be using an inactive bank account for online banking in QuickBooks.
You might also face this issue with arranging the download or import.
Users also get this issue with the bank servers or with the internet service provider used by them.
Pre-requisites to note before proceeding with the troubleshooting
Before moving ahead with the implementation of the methods to troubleshoot QuickBooks error OL 334, it is important to take the following pointers into consideration.
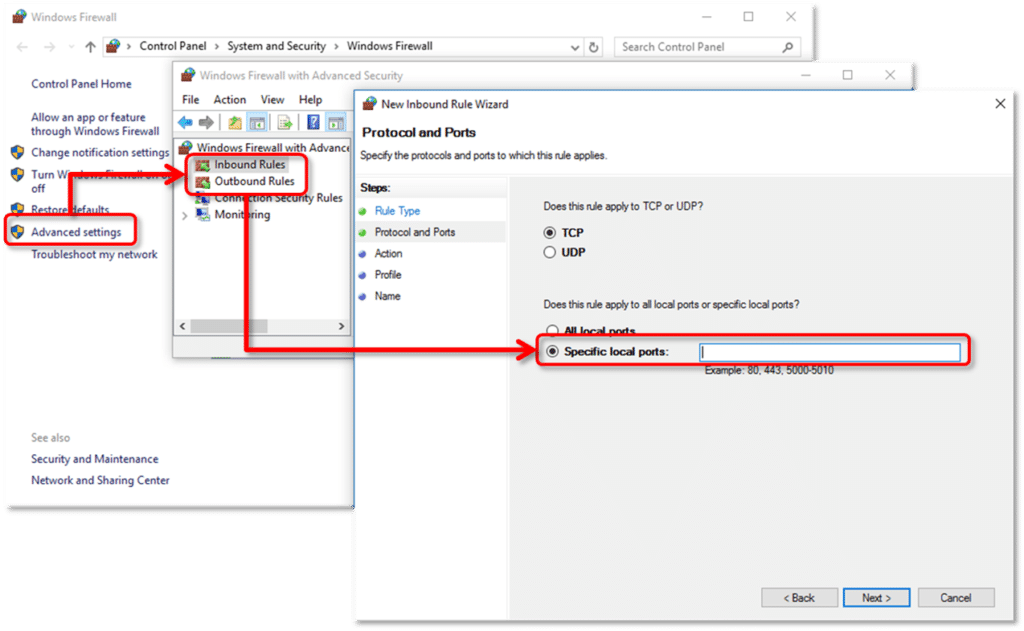
Re-check if there is an active internet connection. In case already connected, then verify the firewall and internet security settings to continue.
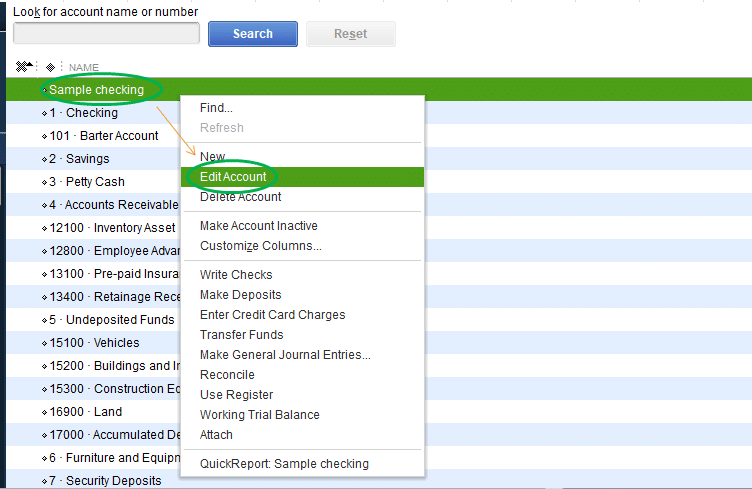
Close and reopen the company file and click on Chart of accounts, then choose Edit account.
Remove the (*)asterisk and right-click the Account to choose, and click on Save and Close.
When asked, click on Yes and Set up an account for bank feeds.
Download transactions to the newly merged account.
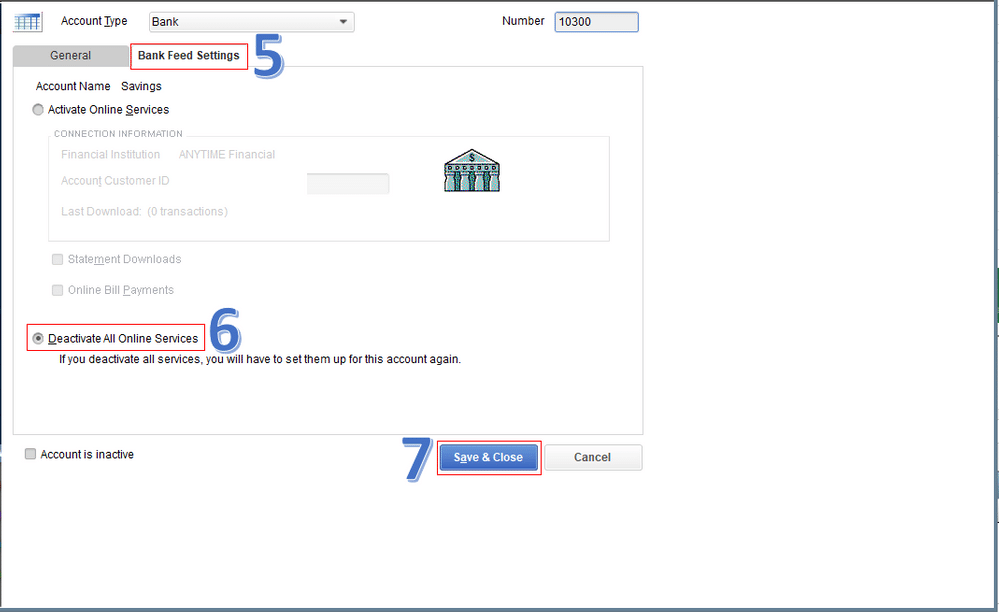
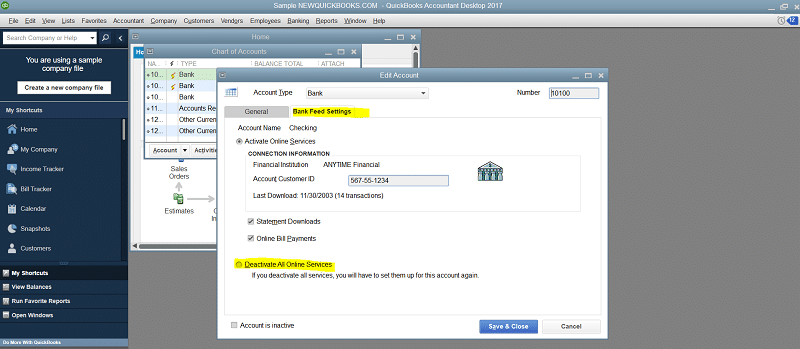
Step 5: Deactivation of all accounts
At the bottom, you will get an option that says chart of accounts. Choose the option to include in the active checkbox and click on deactivate bank feeds.
Summing Up!
After you are thorough with the above steps, you might be able to troubleshoot QuickBooks error OL-334. However, if the error persists even after performing the above given steps, then in that case, connecting with our XpertBooks Pro team is a great option. Our professionals team will ensure to come up with the most effective solutions for you.
FAQs
What is QuickBooks Banking Error OL 334?
Banking Error OL 334 is an error code that occurs when there is an issue with downloading transactions or connecting to your bank while using online banking services in QuickBooks.
Can using a different browser help resolve QuickBooks Banking Error OL 334?
Yes! In some cases, switching to a different browser or clearing the cache and temporary internet files of your current browser can resolve connectivity issues.
Are there any specific settings in QuickBooks that can cause QuickBooks Banking Error OL 334?
Yes, incorrect settings or configurations within QuickBooks can trigger Banking Error OL 334.
Often while creating a new email template and sending emails, QuickBooks might use old template. This would result in custom email template issues in QuickBooks desktop. Well, if you are also facing the same situation, then need not to worry anymore. There can be two ways to apply the new template, which will be discussed later in this article.
Thus, if you are interested in knowing that, make sure to read this article thoroughly, or an alternative for the same can be to get in touch with a team of professionals, who can guide you with the processes to fix custom email template issues in QuickBooks desktop. You can simply get in touch with our XpertBooks Pro team directly and they will guide you throughout the journey to fix this issue successfully.
Quick Solutions to Fix Custom Email Template Issues in QuickBooks
As we said above, there can be two ways to apply new template and fix the custom email template issues in QuickBooks desktop. Let us have a look:
Solution 1: Copying and Pasting the correct message before sending the email
The very first method is to copy and paste the appropriate message before sending the email. This process involves a couple of steps listed below:
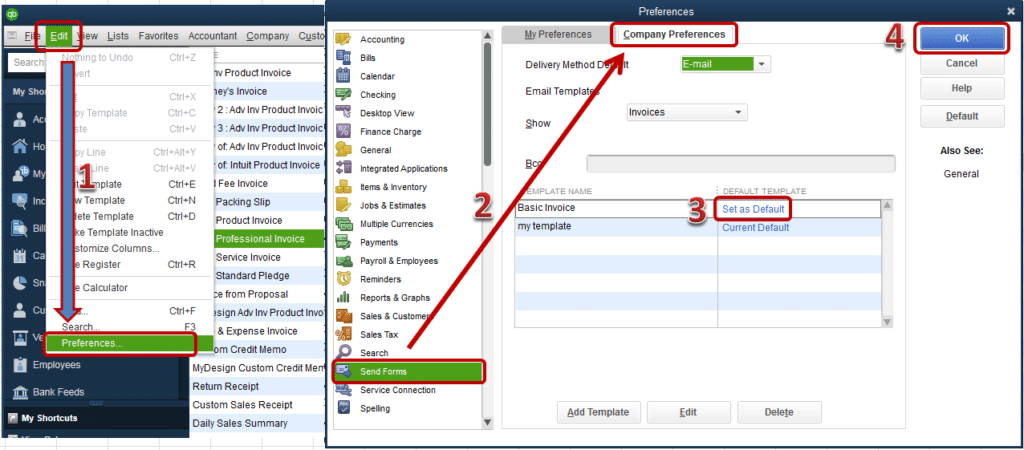
Initially, navigate to the Edit menu and then choose Preferences tab.
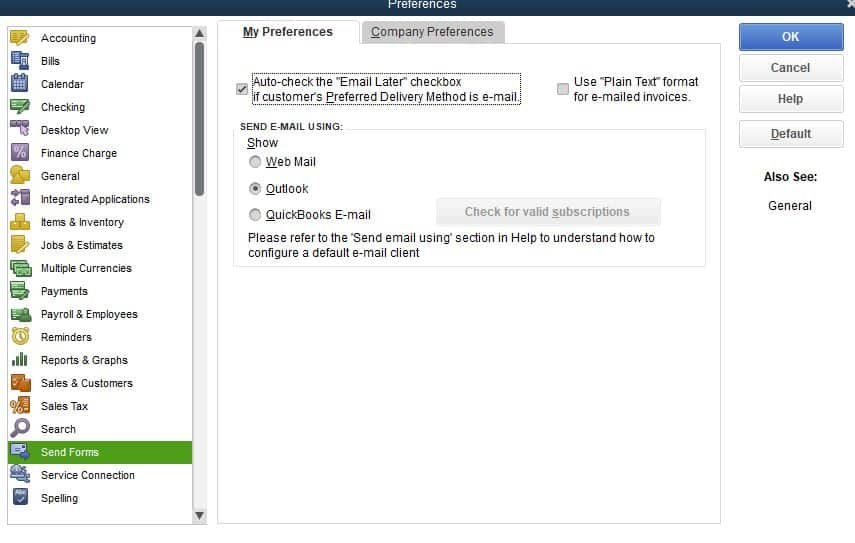
Followed by selecting the Send forms menu and also go for the Company preferences tab.
Next step is to highlight the template that you want to use and also click on Edit option.
Now, copy the message Body text.
And then, navigate to the File menu and opt for the Send forms.
Once done with that, select the Email that is to be sent. Along with that paste the copied text into the body section. It should be noted that, in case you are making use of QuickBooks desktop enterprise, then you should select the Edit email first.
The last step in this process is to select the Send now tab.
Solution 2: Resetting the email later settings
In case the first method failed in resolving the issue, you can simply jump on to another method, which is resetting the email later settings. The steps to be followed in this case are:
At first, you need to spot and open the Transaction to be sent.
And then, ensure to uncheck the email later box. You will also have to select Save and Close.
Last step is to reopen the transaction. And also choose to Check email later box.
Towards the end, click on Save and Close and you are good to go.
This will put the transaction back to the email queue. This will now use the new default template.
To wrap it up!
Well, above listed two solutions are expected to be enough to resolve the custom email template issues in QuickBooks desktop. However, a situation might arise when even after following the above solutions, the error might continue to trouble you. In such a scenario, we recommend you to immediately consult a team of professionals. You can simply make a call to our accounting software specialists who will help you with the best possible accounting services.
Frequently Asked Questions
What to do if emails aren't using a template?
If emails aren't using a template in QuickBooks, make sure that the template is selected as the default template, and that the correct form style is selected in the transaction.
Where are all the templates in QuickBooks?
In QuickBooks, templates can be found by going to the Gear icon, selecting "Custom Form Styles," and then selecting "New Style" to create a new template or "Edit" to modify an existing one.
How do I make a custom template the default in QuickBooks?
To make a custom template the default in QuickBooks, go to the Gear icon, select "Custom Form Styles," find the form you want to use as the default, click the drop-down arrow next to "Edit," select "Make Default," and then click "Yes" to confirm.