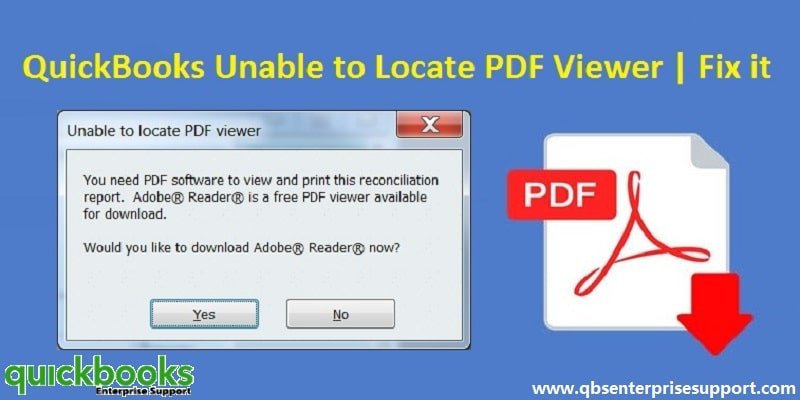
QuickBooks requires some Windows applications and components to print documents. Inappropriate Windows print components or QuickBooks Desktop setup may cause errors while printing payroll tax forms, statements, and other documents. A common error that users face when printing documents from QuickBooks is “Unable to locate the PDF file” and through this article, we will discuss about possible causes, and DIY solutions of this error. Thus, keep reading ahead!
Fixing this error requires some information of Windows print components such as Adobe and XPS viewer. We have created this article after consulting our QB experts and have tried to keep the steps as easy to perform as possible. However, if in case the users have any queries regarding the solutions provided in this segment, or they want a quick solution of the QuickBooks Unable to Locate PDF Viewer error, then feel free to contact our XpertBooks Pro team.
“Unable to locate the PDF file” error in QuickBooks – Possible Causes
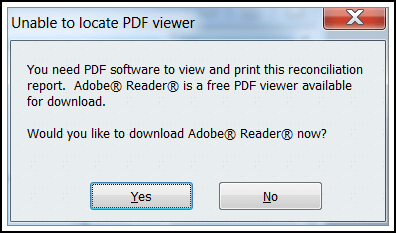
QuickBooks desktop printing errors usually appears when the Windows print components are outdated or damaged. Another cause is an incorrect or incomplete configuration of the QuickBooks Desktop app that refrains the software from locating the PDF Viewer and therefore, the error message “QuickBooks Unable to Locate PDF Viewer” appears on the screen.
The message also reflects that PDF software is necessary to view and print this reconciliation report. The following are some of the common reasons behind to this error.
The error can cause if the Adobe Reader version installed on Windows is outdated.
Also, QuickBooks doesn’t have Adobe Reader set up as the default PDF viewer app may also lead to such error.
Another trigger can be if QuickBooks Desktop is missing the latest updates.
Qbprint.qbp file is either damaged or missing from the installation directory.
Solutions to Fix Unable to Locate the PDF Viewer Error in QuickBooks Desktop
Follow these quick methods to troubleshoot the QuickBooks Unable to Locate PDF Viewer or You do not have a PDF viewer installed on your computer problem:
Solution 1: Set Adobe Reader as the default PDF viewer
For Windows 7, 8, and 8.1
The steps for Windows 7, 8, and 8.1 users are as under:
Begin with, you need to click on the Windows Start menu or the Windows key on the keyboard.
And then, select Control Panel and then tap on Programs and Features option.
Next, hit a click on Set default programs.
Find and select Adobe Reader.
Now select Set this program as default.
Windows 10
Windows 10 users can follow the guidelines given below:
You need to first, click on the Windows Start button.
After that click on the settings icon and select Apps.
On the left pane, hit a click on the Default apps.
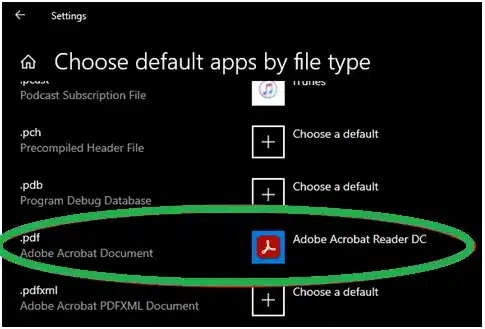
Moving ahead, now scroll down to .pdf and select its default program.
Followed by, select Adobe Acrobat Reader and click on Switch anyway.
Try to open the PDF file; if the issue persists – move on to the next step.
Solution 2: Run QuickBooks PDF and Print Repair Tool from Tool Hub Program
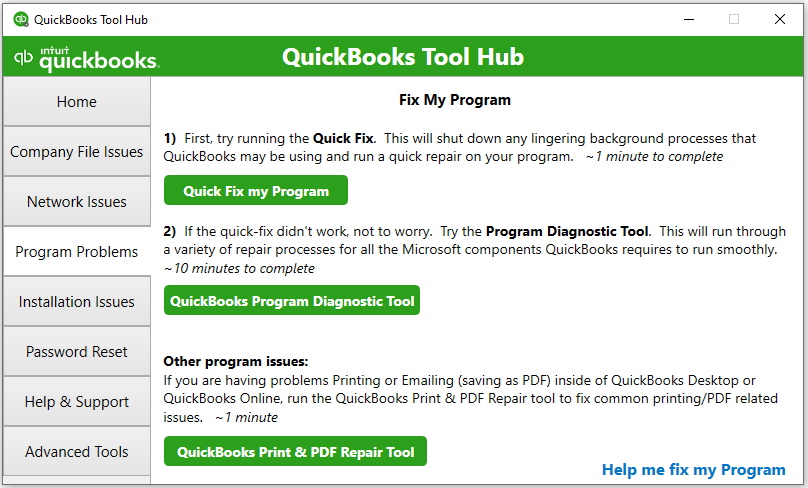
QuickBooks Tool Hub holds a wide range of useful utilities that can resolve a vast array of accounting errors. One such utility is the QuickBooks PDF and Print Repair Tool.
At the very start, you need to close the QuickBooks desktop program and then download the latest version of the QuickBooks tool hub on the computer.
However, if the users have already installed the tool hub, then open the program.
After that, choose Program Problems from the Tool Hub menu.
Abd select the QuickBooks PDF & Print Repair Tool option from here. (Note that this tool will take about one minute to open and run.)
Once this scan process finishes, you need to check that the issue with the PDF viewer got fixed.
Lastly, retry to view, print, email, or save as a PDF from QuickBooks Desktop.
Solution 3: Repair, Update, and Reinstall Adobe Reader
If users are unable to open PDF document after selecting Adobe as their default program, there may be an issue with the PDF reader software. Users can perform the following steps to fix it.
Step 1: Update Adobe Reader
The step-by-step procedure for updating Adobe Reader is given below:
Therein, take note of the version shown on the page and open the Adobe Reader app.
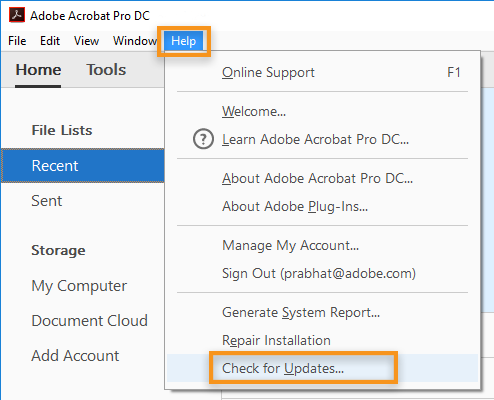
Moreover, you need to visit to the Help tab and select About Adobe Reader.
Now check if the Adobe version shown on the page and on Adobe’s website is the same.
In case the versions don’t match, then click on the Help tab and select the Check for Updates button.
Follow the on-screen prompts to update the PDF Viewer.
Repair Adobe Reader
Repairing the Adobe reader involves the steps given below:
Under this process, firstly you need to Close all the running applications and programs and open Adobe Acrobat Reader.
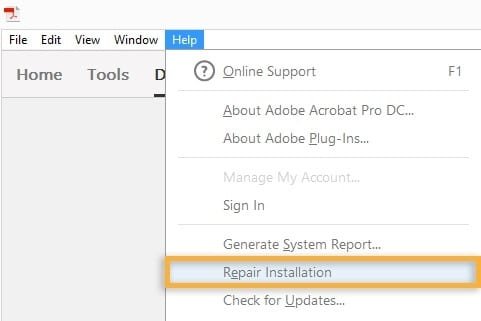
And further, go to the Help tab and hit a click on Repair Acrobat Installation.
Now allow the application to repair itself, and after the repair is complete, you need to restart the system once and check if users can print the document using QuickBooks.
Reinstall Adobe PDF viewer
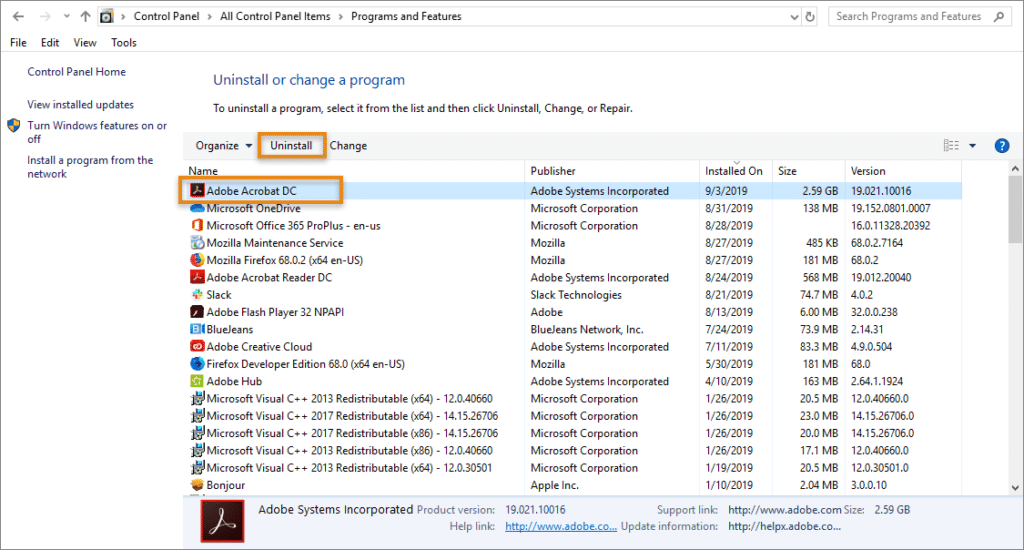
Users can use the Program and Features option in the Control Panel to uninstall Adobe PDF viewer. The same can be reinstalled later on.
Initially, open the Run command using Windows+R keys.
And type the appwiz.cpl command to open the Program and Features window.
Once done with that, you need to select the opt to View Installed Updates.
Therein,hit a right-click on Adobe and select Uninstall.
Now go to the web page for Adobe Acrobat Reader download.
Later on, hit a click on Install Now and select the correct Windows version from the drop-down list.
After the update file is downloaded, you need Run it.
To conclude the process hit on Finish.
Rename Qbprint.qbp File
If the “unable to locate the PDF file” issue still persists, perform the following steps.
At first, open Windows File Manager and tap on the Organize option in the top left corner.
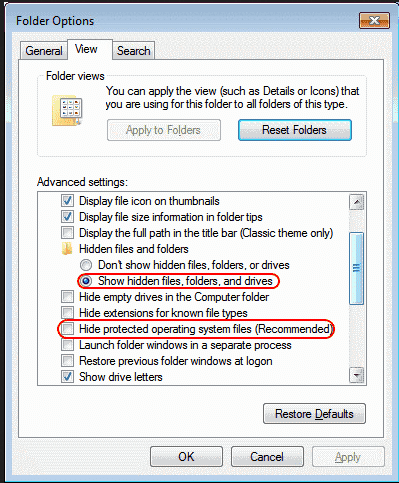
After that, select the Folder and Search opt.
Under the View tab, uncheck Show Hidden Files, Folders, or Drives option.
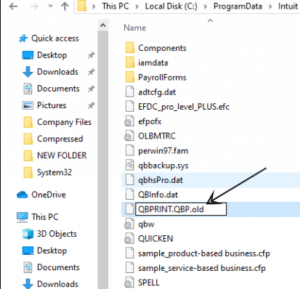
You now have to go to the Program Data folder in the C Drive and then open Intuit Folder.
Followed by, double-click the QB folder and right-click on the Qbprint.qbp file to open it.
In the next step, select Rename option and add .old instead of .qbp (Qbprint.old).
Lastly, save the file and see if the ongoing error still exists.
We hope that the solutions provided in this article are helpful in fixing QuickBooks Unable to Locate PDF Viewer problem. However, if users need further assistance or have issues related to other printing related problem's, then they can contact our independent accounting professionals. Our goal is to help users resolve problems efficiently while minimizing disruptions to their daily workflow.
Did you stop using QuickBooks Payroll for some period and now want to reactivate the same? There is no need to worry as this article shall apprise you with reliable walkways for reactivating QuickBooks Payroll Subscription. Reactivation of the Payroll Subscription is deemed indispensable for Small and medium businesses considering the myriad of assorted features and benefits offered by it. The process of reactivation is quite easy and requires your utmost attention to this article.
However, before proceeding with reactivating payroll subscriptions, make sure that you have the latest version of QuickBooks Desktop Payroll installed on your computer system. Follow this article till the very end to reactivate your QuickBooks payroll subscription.
Methods to Reactivate QuickBooks Payroll Subscription
There are several walkways to reactivate your QuickBooks payroll subscription. Conform to any of the below-mentioned methods to get your QuickBooks Payroll reactivated within a few minutes. You can reactivate through:
Official Intuit website.
Through the Company file
From a cancellation email
Method 1: Official Intuit Website
You can directly renew your QuickBooks Payroll Subscription from the official website of Intuit. This method of reactivation is the most sought-after and is quite easy to implement. Follow the directions given below to reactivate from the official website:
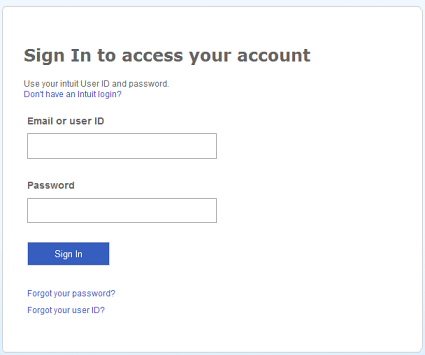
The initial step requires you to sign in to Intuit by using your login credentials.
After signing in, from the Manage your QuickBooks page, you need to head to the product or service.
Then, head forward to choose the Payroll Subscription available below the Products & Services option.
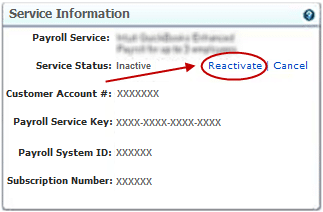
Follow the previous step by clicking on the Reactivatelink provided in the Service Information section.
Thereafter, review your Payroll service details.
After reviewing, hit on the Proceed option.
Then, choose a suitable payment mode at your convenience.
Proceeding ahead with the payment, provide your CVV Number to proceed ahead with the transaction process.
After entering your CVV Number, hit click on the Submit button.
After that, choose the Continue button.
The last step is to place the order and hit on the Next tab.
You will see a pop-up message on the screen that says your payroll subscription got reactivated.
Method 2: Through the Company file
There are several roundabouts to reactivating QuickBooks payroll subscription. Reactivation of QuickBooks Payroll can also be done through the Company file. Follow the directions given below to reactivate using the QuickBooks Desktop Company file:
Initially, head to your QuickBooks desktop Company file.
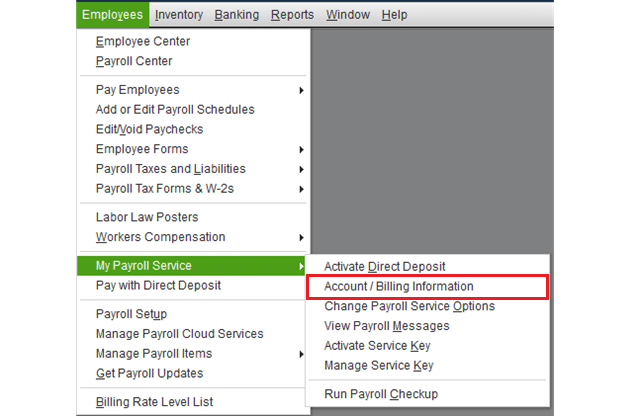
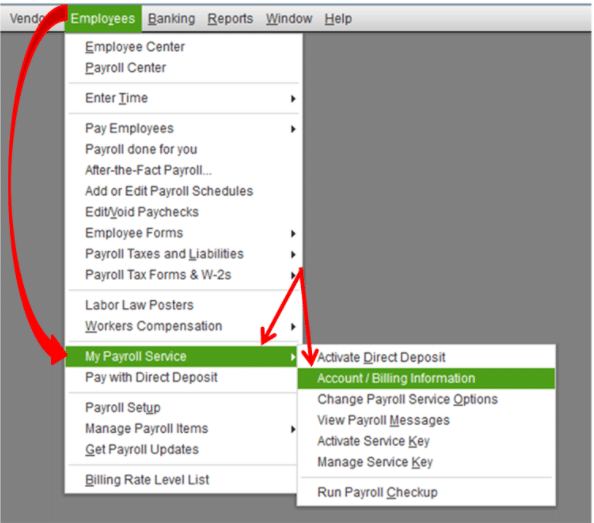
After that, move to the Employees tab.
Herein, you should opt for the My Payroll Service option, which shall reveal a drop-down.
From the option available in the drop-down menu, proceed to the Account/Billing Information.
Next, you need to Sign in using your Intuit Account login.
Your QuickBooks Account page will open now.
Hit a click on the Reactivate link under the Service Information section.
Choose Payroll service and click on Proceed.
And then choose the Payment method.
Now, select the Submit tab to proceed ahead.
Go to Place Order and tap on it.
After placing the order, you are required to choose the Next tab.
Follow the on-page instructions to conclude the reactivation process.
To reactivate the QuickBooks Desktop Payroll subscription directly from the cancellation email, implement the steps provided below:
In your email, opt for the Re-subscribe option. It will take you to the Intuit QuickBooks My Account page.
Use your Intuit Login credentials to log in (username and password).
You then need to update the necessary payment information.
Hit on Save and Continue to proceed ahead with the reactivation process.
Make sure that all of the information you entered previously is valid.
Then, click Reactivate to start the reactivation process.
Now you see a notice on your screen that says, ‘Your Subscription has been Reactivated.’
It may take a considerable time (even up to 24 hours) to complete the reactivation process.
Check the Status of Reactivation
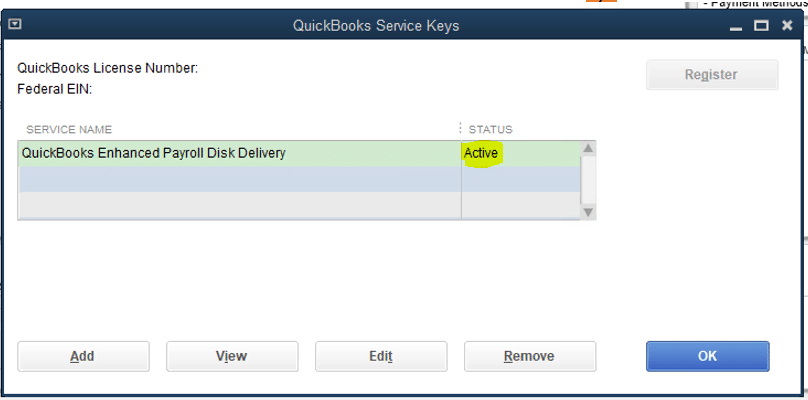
You can sign in again to your Intuit account and check the status of your account. Your subscription status will be Active once the reactivation process is complete. To check the status of your subscription, you need to follow the steps below:
The first step in the process of checking the reactivation status is to click on the Employees.
After doing that, head to Payroll Service
Now, head to Account/billing information option.
Check the Service status and verify if the account status shows Active.
Method 4: Review your payroll data
You may need to go through the payroll setup again after you've returned to your payroll service. Review your payroll data, including tax setup and employees.
On QuickBooks Payroll
Initially, select Employees from Payroll.
Each employee should be reviewed. Check each employee's information, including W-4, deductions, vacation, sick, and other details.
To review your tax rates, go to Settings and choose Payroll Settings
QuickBooks Desktop Payroll
Head to Employers and choose the Employee Centre option.
Each employee can be reviewed under the Employees tab. Check their information, including W-4, deductions, vacation, sick/vacation, and more.
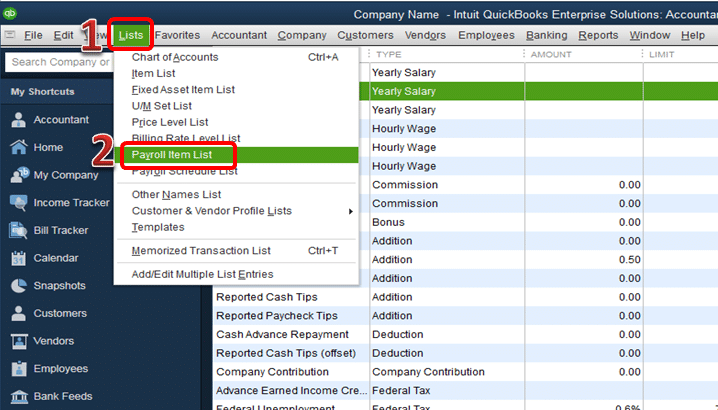
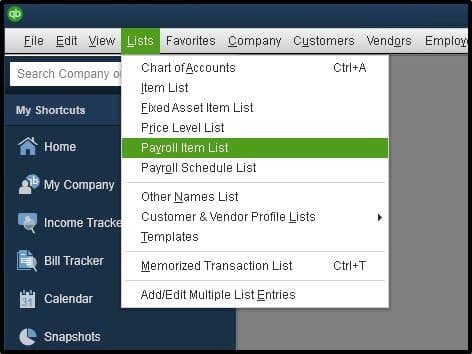
To review your tax payroll items, proceed to Lists and Payroll Item List.
Intuit Online Payroll Enhanced
Firstly, you need to visit the Employees tab and review each employee.
Confirm their information, including any deductions, W-4s, sick/vacation, etc.
That’s it from this article! I hope you find this article helpful in understanding how to renew your QuickBooks payroll subscription. For supplementary information, you may contact us and get thorough guidance from our XpertBooks Pro team. Our team shall leave no stone unturned in addressing all of your QB-related queries.
Frequently Asked Questions
Can I reactivate my QuickBooks Payroll subscription online?
Yes! You have full authority to go for the reactivation of the Payroll subscription through the Online mode by navigating to the website of QuickBooks Payroll Service. You just need to provide your credentials for logging in, and subsequent to that, click on the option to reactivate the subscription.
How long does it take for the Payroll subscription to reactivate?
The time for the reactivation of the QuickBooks Payroll subscription may vary depending on a plethora of factors including the Internet connectivity and system specifications. The process usually takes a few minutes to complete.
Can I reactivate my QuickBooks Payroll subscription if I missed the renewal deadline?
If you missed out on the deadline of the Payroll subscription renewal, you can still proceed with the reactivation, though, an additional fee might be required.
Can I reactivate my QB Payroll subscription if I switched to a different version of QuickBooks Desktop?
QuickBooks is multifaceted accounting software that has revolutionized accounting and business sectors by enhancing productivity and efficiency. This program has provided businesses with different avenues of boosting efficiency while making no compromise on quality standards. It has transpired as one of the notable accounting payroll software globally. Among the noteworthy QuickBooks features to leverage, the automatic tax calculations, instant transactions, and e-payment services stand distinct. However, while availing benefits that this holistic software offers, you may come across many technical issues. One of such unexpected issues are as 'Unable to calculate payroll items on the paycheck accurately' or 'Payroll taxes not calculating properly'.
If your QuickBooks payroll operations are hindered due to some paychecks are calculating incorrectly in QuickBooks, you need not feel irked. Follow the brief yet important walkthrough provided in this post with utmost attention to troubleshooting the issue.
Important considerations to be noted before rectifying QuickBooks desktop calculates payroll taxes incorrectly
Before we jump on the process of changing payroll items on paychecks, you need to necessitate the following prerequisites:
Solutions to Rectify QuickBooks Payroll is Not Calculating Payroll Taxes Problem
Follow the tried and tested troubleshooting methods provided below to correct QuickBooks not calculating employees payroll taxes correctly problem. Make sure that you follow all the steps with utmost observance.
Solution 1: Check if the payroll item is calculated based on the amount, hours, or neither
Payroll items can be calculated on the basis of quantity, hours, or neither. Once users choose to configure the payroll item based on quantity or hours, provide the quantity or number of hours in the Quantity column of the Preview Paycheck window. In order to change the calculation settings of the payroll item, checkout the steps given below:
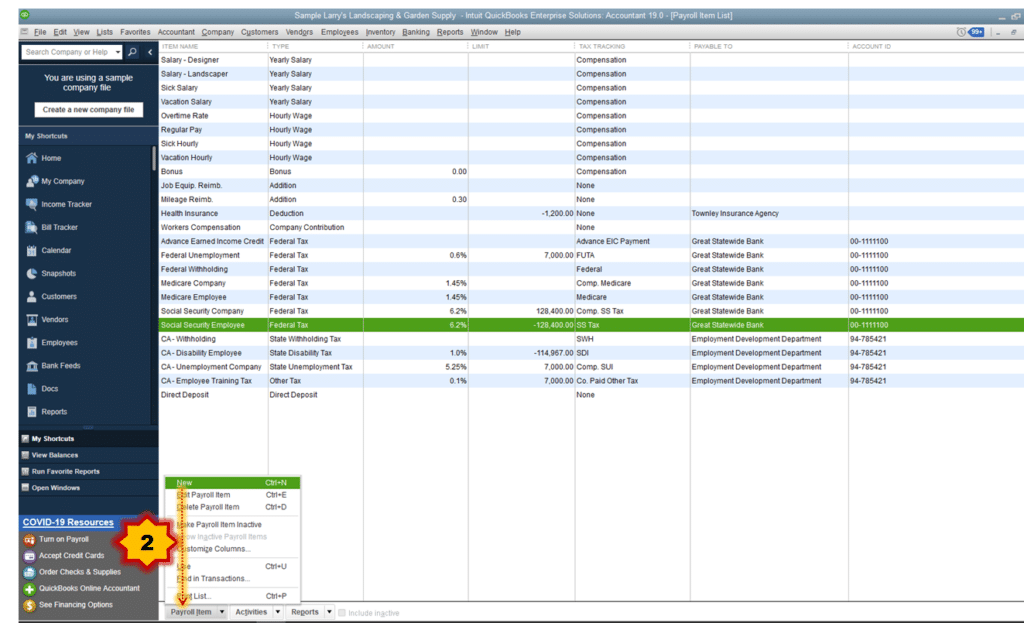
Kick start the process by choosing Lists from the top menu bar.
After that navigate to Payroll Item List.
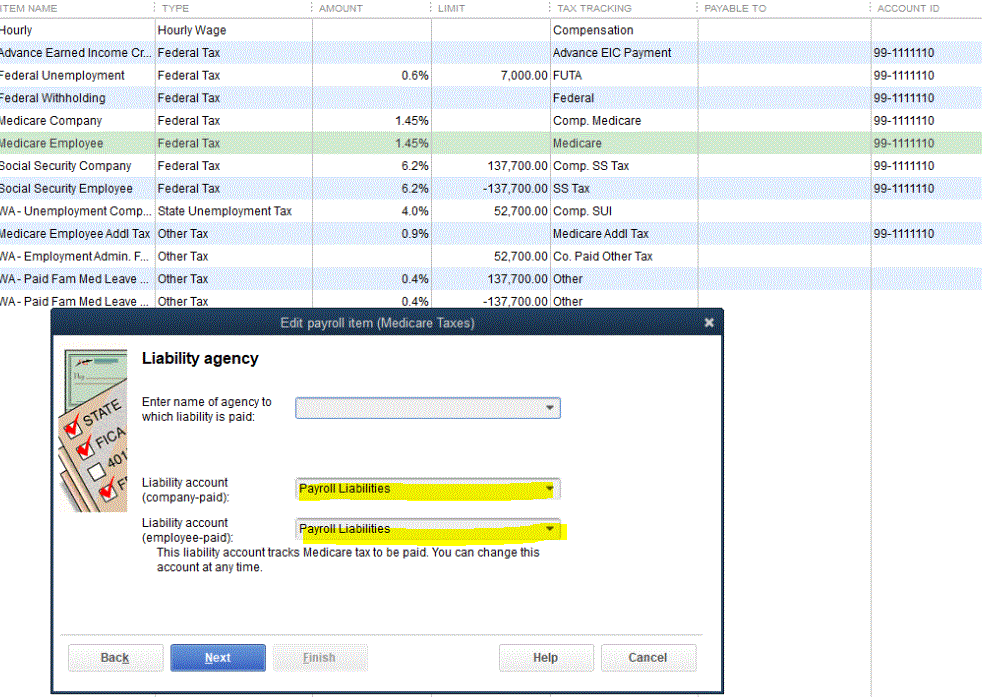
Once done with that, hit a right-click on the item which requires alteration and then click on Edit Payroll Item.
Now select Next button until the Calculate Based on Quantity screen.
If the current payroll item does not need hours or quantity for calculation, then users need to change the setting to Neither.
Followed by choose Next.
And lastly, hit a click on Finish button to close the window.
Solution 2: Check if the annual limit has been set or exceeded
If there is a limit set for the payroll item calculation, then users may see incorrect calculations all of a sudden. Suppose a payroll item has been calculated accurately in the past but encounters interruptions while calculating on a paycheck. In such case, the user may have accidentally check-marked the 'This is an annual limit' checkbox. As such, the user may have crossed the default limit. In order to check whether the annual limit has been reached, the user need to follow the below-mentioned steps:
The very initial step is to navigate to the Lists menu in the top menu bar.
And then, go to Payroll Item List.
Later on, hit a right-click on the Payroll item which you want to change.
And further, move to Edit Payroll Item and hit on Next button.
Once the Limit Type screen appears, the user need to verify whether the limit in the bottom box is correct.
If it is correct, then the Employee's payroll item should stop calculating at this limit.
If you identify an incorrect limit, then change the Amount.
Now under Limit Type, the user needs to verify that the following options are selected:
Annual – Restart each year
Monthly – Restart each month
One-time limit
Moreover, the user need to alter the following selections:
Default limit
Limit Type
To complete and close the window, hit a click on Finish button.
Solution 3: Check if the Deduction Item is Set accurately
You need to examine that how the payroll item for tax deduction is being set for both the gross and net-based calculations. The final calculations on the paycheck significantly depend on the deduction item. In order to verify the deduction item in payroll, follow the steps given below:
Initially, open QuickBooks and from under the Lists opt, the user need to select Payroll Item Lists.
After that, right-click on Deduction and hit on Edit Payroll Items.
And further, hit a click on Next tab, and it will open the Net/Gross window.
Now inspect, if the deduction item has been set accurately.
Once done with that, the user now have to opt Next button and then click on Finish tab to get the job done.
There can be different criteria for calculating every item, so you can reach the authority to confirm how a deduction item should be calculated.
Solution 4: Check the Ordering Of the Payroll Items
It is also important to check how payroll items are ordered for the calculation. Check the below-given points:
Under this, the user needs to go to the Other Payroll Items section first to ensure that Employee's earnings-based payroll items are on the top.
Other alterations (additions or subtractions) to be made in the payroll items should come subsequent to the earnings-based payroll items.
This informative post is an summary of the consistent efforts of our accounting experts. Now we are hopeful that the steps mentioned above in this article assisted you in rectifying QuickBooks calculates wages or payroll taxes incorrectly error. However, if the same problem continue to trouble you or in case you face any difficulty while performing the solution steps, then feel free to contact XpertBooks Pro. Our team consist of accounting professionals who work selflessly towards providing you with 24/7 unmatched accounting services.
QuickBooks is considered to be a phenomenal accounting software, and it successfully has marked its presence in the entire accounting arena. The only drawback of this software is the handful of errors that the users might end up in. Users might often come across various errors that might require them to update QuickBooks desktop software for Windows. A few of the errors might lead to blocking some of the important features and functions. In case the user ends up in an error while using the software or while installing or updating it, running a repair tool is often recommended. This tool can help users in fixing the issue right away. In this segment, we will be discussing in detail the entire process to Repair QuickBooks Desktop for Windows. Thus, make sure that you read this post carefully till the end.
As we said earlier, if you are facing an issue while using, installing, or at the time of updating the software, then in this case, running the repair tool is the best. QuickBooks repair tool will help you fix the software by following the steps below:
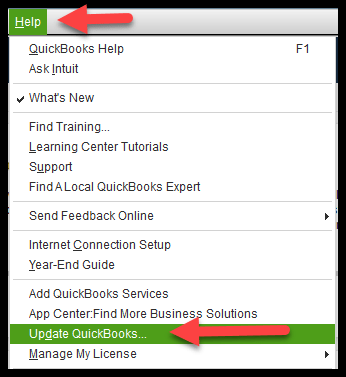
By simply moving to the QuickBooks menu and opting for help and update QuickBooks options, respectively.
You will have to ensure in the end that you have the recent fixes and security updates.
Installing QuickBooks Install Diagnostic Tool to Repair QuickBooks
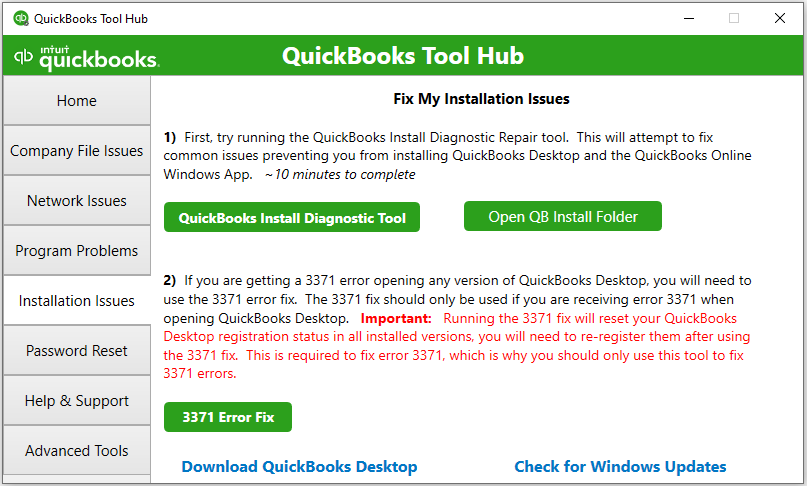
An alternate for the above method to Repair QuickBooks Desktop is to install and run the QuickBooks install diagnostic tool. This tool helps in fixing the errors that QB users might face while installing QuickBooks desktop. The below steps would definitely work in repairing the QuickBooks desktop software:
First of all, close all the QuickBooks-related programs.
Steps to follow if the error is received during a repair
In certain scenarios, you might end up with this error while repairing the software. Well, in such a situation, all you have to do is to carry out the steps below:
Quick fix for “File in use” bug
At the time of fixing the QuickBooks software, you might land into the file in use error message or any related software. In such a situation, the steps below should be opted for:
First of all, you need to hit click on Ignore option.
In case there is any pop-up message stating reboot, then, in that case, clicking on OK to reboot is recommended.
And then, select ignore a few times, if needed.
Now, select close.
After the repair process ends, make sure to restart the system.
Fixing QuickBooks error 1628
The error 1628 might come with an error message “Failed to complete script-based install”. It is usually seen if the Windows service called “Windows installer” isn’t working in a proper manner. When this error is seen, You are recommended to simply look for an IT expert or a specialist from Microsoft.
How to fix issues while opening the QuickBooks Tool Hub?
At first, press the Windows + R keys to open Run window.
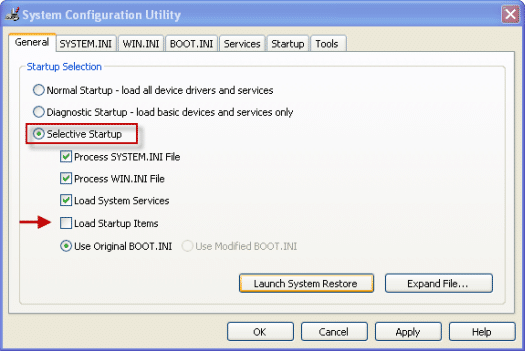
After that type in MSConfig and press Enter to start up the System configuration window.
You need to select Selective startup mode here.
Reboot your system and then try to run the QuickBooks tool hub program again to ensure if the tool functions without any problem.
Also, you should temporarily disable the antivirus program before using the tool hub program.
Conclusion!
Repairing the QuickBooks accounting software is not a task, the above-mentioned procedures are enough to fix or repair the QuickBooks desktop for Windows. However, if you face any difficulty in repairing the software or if you have any query related to the same, then in that case reaching out to our XpertBooks Pro professionals is recommended. We are a hub of independent accounting professionals who work round the clock to provide the best possible support services.
FAQs
How to repair QuickBooks Desktop?
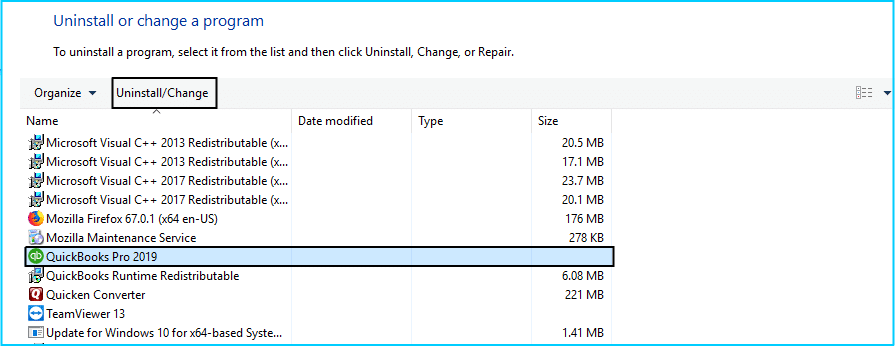
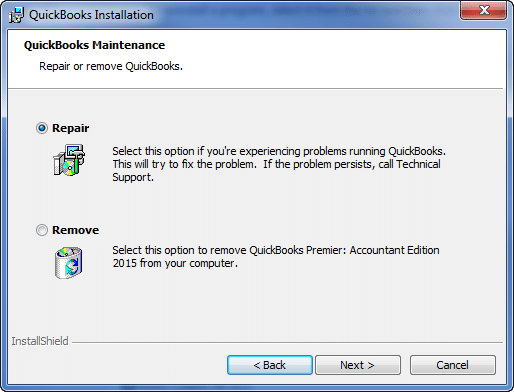
Go to Control Panel, then Programs and Features, select QuickBooks. Click Uninstall/Change, then Repair.
Why to repair QuickBooks Desktop?
QuickBooks repair fixes sudden technical errors and glitches.
How to Clean Install QuickBooks?
Open Control Panel, go to Programs and Features, then select QuickBooks. Choose Uninstall/Change and select uninstall. Now, reinstall QuickBooks.
Is Clean Install possible using tool?
Clean Install Tool can be used or Clean install process.
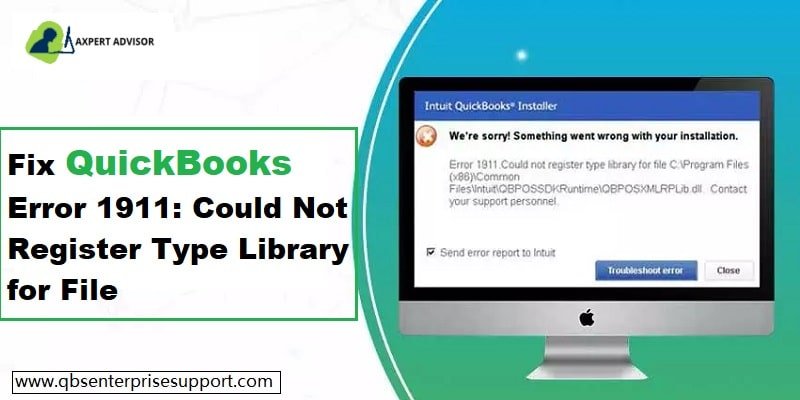
Trying to make the best use of QuickBooks accounting software, but unable to do so, as you encountered an error 1911. This is a common installation error that usually encounters when Windows is unable to register or access a required system component at the time of QuickBooks installation process. Due to this error, the installation gets stop unexpectedly and prevent QuickBooks from being installed successfully. You might come across such an error with an error message that states:
Error Message:
Error 1911. Could not register type library for file C:\Program Files (x86) CommonFiles\Intuit\QBPOSXMLRPLib.dll. Contact your support personnel.
This error could be seen when you try to install the QuickBooks Pro 2016 on a Windows Server 2012 R2 system. Furthermore, when you upgrade the operating system, you might face this problem. To get a better insight into QuickBooks error code 1911, you would have to go through this segment with much care.
Methods that would work in tackling QuickBooks Error Code 1911
Well, the QuickBooks error 1911: Couldn't register type library for file can be easily tackled with the help of the methods and procedures that we have discussed below. Let us check them out one by one:
Method 1: Modify the setup editor settings
Under this method, you would have to perform the steps to configure setup editor settings. The steps include the following:
Start off with selecting the tables when you don’t have to Register your type library file.
Furthermore, you need to click on type Lib table.
The next step would be to put the row along with the File specified particularly.
You need to now Delete the row.
And check if the error 1911 is fixed.
Method 2: Download and review the PESxec directory
The steps for downloading and reviewing the PESxec directory are stated as under:
Herein, you are supposed to download and install the PESxec directory.
And look for the QuickBooks installer in the installed directory.
Further, you need to open the Command prompt CMD.
And run PSExec. It is basically the QuickBooks installer to Install QuickBooks on the system.
In this particular method, you would have to uninstall and install adobe flash by first downloading and installing the QuickBooks install diagnostic tool.
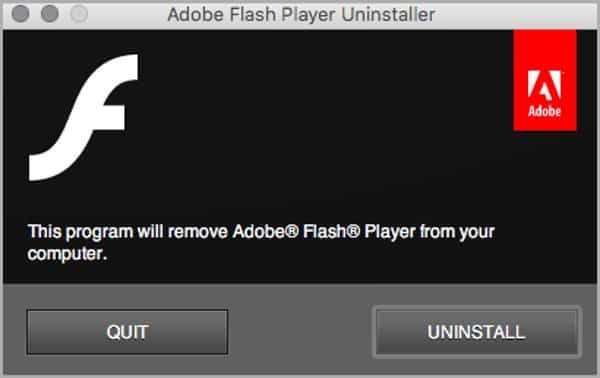
Uninstall the Adobe Flash player.
You are then required to press Windows + R keys, and Run Window will be seen.
Furthermore, type in Control panel and press OK tab.
You are then supposed to choose the Uninstall a program.
Click on the Adobe Flash player in the list of software.
Choose the Uninstall tab and perform the steps to complete the uninstallation.
Pay heed to on-screen prompts.
And reboot the system and re-install Adobe Flash player.
Method 4: Check the built-in admin settings
If none of the above methods worked for you, in that case, you can perform the below steps:
Steps for activating built-in admin
At first, you would have to activate the built-in admin, which involves the following steps:
Press Windows + R, and the Run window will appear on the screen.
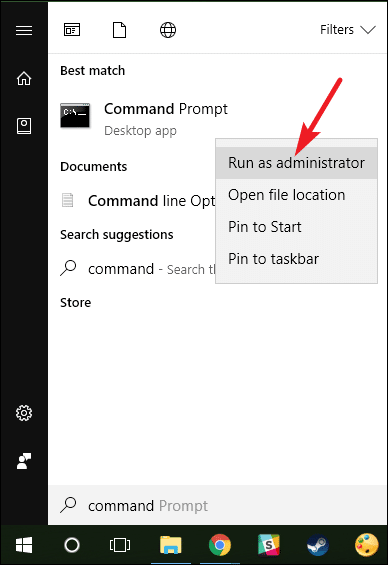
You further need to type in CMD in the box to search and hit OK tab.
Right-click the CMD.exe and choose to Run as an admin.
You are then required to open the prompt window and put in the net user admin active Yes tab.
Hit Enter key.
Lastly, open the system in Safe mode.
Steps for adjusting the built in admin account
Herein, you need to press Ctrl + Alt + Del keys.
And choose the second option for Switching user.
Later on, press the Windows key if you are Windows 8 user.
Click on the screen to choose the User icon.
Press Ctrl + Alt + Del tab again, and choose the default admin account.
Steps to hide built in admin account
You are supposed to press Windows + R tab and Run Windows.
Type in command prompt CMD.
And right-click the Cmd.exe.
You need to then choose Run as admin.
Type in no in Net user admin active and hit Enter tab in the command window.
Latest steps to edit the security settings of the installation directory
Under this process, you would have to follow the path C:\Porgram files\common files.
You need to find the Common files folders and right-click on them.
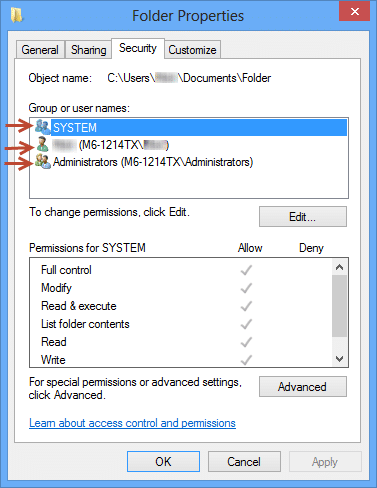
Select the Properties from the drop-down.
And hit Enter under the Security tab.
You need to then select the Users in the group or Users name.
Open the permissions for users and tap on Allow that offers permission: update/read and execute, list folder contents.
Now choose Apply and OK tab.
Sum up!
That was all you need to know about QuickBooks error code 1911. As always, in case you have any queries, comments, or concerns, reach out to our XpertBooks Pro. Don’t get panic about anything because everything is possible with the help of our accounting consultants, and the work they do for you will be the best. Our team works to identify the root cause and help you restore normal operations as quickly as possible.
FAQs
What is Error 1911 in QuickBooks?
The Error message 1911 in QuickBooks occurs when users try to install specific versions of QuickBooks. It is an installation error that may also be encountered while updating QuickBooks to newer versions.
What causes QuickBooks Error codes?
The error can be caused due to damage in the installation files of QuickBooks. It may also occur due to poor internet connectivity, version incompatibility, damaged .dll files, or erroneous internet configuration.
How does Error 1911 appear?
QuickBooks Error 1911 appears in the form of an error message stating:
''Error 1911. Could not register type library for file C:\Program Files (x86) CommonFiles\Intuit\QBPOSXMLRPLib.dll. Contact your support personnel.''