Manufacturing businesses face a unique challenge: turning raw materials, labor, and overhead into finished goods while maintaining profitability.
Without a rigorous accounting framework, hidden costs can quietly erode your margins, making it difficult to pinpoint inefficiencies or make data-driven pricing decisions.
That’s where manufacturing accounting comes in — a specialized system designed to track production costs, measure true profitability, and give manufacturers complete financial control.
In this guide, we’ll explain how to track production costs effectively, value your inventory accurately, manage cost of goods sold (COGS), and improve margins through smarter accounting practices.
What Is Manufacturing Accounting?
Manufacturing accounting is a specialized branch of cost accounting that focuses on capturing every financial aspect of production — from sourcing materials to assembling finished goods.
Unlike general financial accounting, which looks at overall business results, manufacturing accounting dives deeper into operations, providing insight into production efficiency and cost control.
Key elements include:
Direct Materials: The raw components and parts used to create finished goods.
Direct Labor: The wages paid to employees directly involved in manufacturing.
Manufacturing Overhead: Indirect costs such as electricity, maintenance, equipment depreciation, and factory rent.
A well-designed manufacturing accounting system allows you to:
Set accurate product pricing based on true costs.
Manage inventory efficiently at every production stage.
Measure profitability per unit, batch, or product line.
In short — it’s the financial backbone of a manufacturing business.
Key Concepts & Cost Classifications
Understanding cost classification is essential to building a transparent accounting structure.
Direct Costs
Expenses directly linked to a specific product — such as raw materials, packaging, or assembly labor.
Indirect Costs (Overhead)
These are necessary for production but can’t be directly traced to a single product. Examples include equipment depreciation, rent, factory insurance, and maintenance.
Pre-Determined Overhead Rate
A formula used to allocate overhead to each product:
Estimated Overhead ÷ Activity Base (e.g., machine hours or labor hours).
This ensures that all costs are fairly distributed across units produced.
Costing Methods
Absorption Costing: Includes all manufacturing costs (direct + indirect). Required under GAAP for external reporting.
Variable Costing: Considers only variable production costs (for internal decision-making).
Process vs. Job Costing
Process Costing applies to continuous, large-scale production (e.g., chemicals, food, textiles).
Job Costing is for customized, project-based manufacturing (e.g., machinery, furniture, or prototypes).
Choosing the right method ensures that your financial reports reflect the true cost structure of your production line.
Inventory is often one of the largest assets on a manufacturer’s balance sheet — and mismanaging it can distort profitability.
You’ll typically manage three types of inventory:
Raw Materials: Unused components and supplies.
Work-in-Process (WIP): Items in production that aren’t yet finished.
Finished Goods: Completed products ready for sale.
Valuing WIP
Work-in-process includes materials, labor, and overhead that have been incurred up to the current stage of production.
An accurate valuation ensures your balance sheet reflects the true asset value of partially completed goods.
Common Inventory Valuation Methods
FIFO (First In, First Out): Oldest costs are recognized first.
LIFO (Last In, First Out): Most recent costs are recognized first.
Weighted Average Cost: Smooths fluctuations over time.
Regular inventory reconciliations, supported by real-time tracking systems, help prevent shrinkage, obsolescence, or stock discrepancies.
Allocating Overhead & Controlling Costs
Overhead allocation is the process of assigning indirect costs (like electricity or machine maintenance) to individual products or jobs.
Fair Overhead Allocation
Use appropriate cost drivers (e.g., machine hours, labor hours, material costs) instead of spreading overhead evenly.
Update cost drivers periodically as your production processes evolve.
Variance Analysis
Compare standard costs (expected) to actual costs to identify inefficiencies. For instance:
Higher-than-expected material usage might signal wastage.
Increased labor hours could indicate production bottlenecks.
Continuous Cost Control
Review cost reports regularly — monthly or per production cycle.
Automate data collection to reduce manual entry errors.
Empower production teams to take responsibility for cost targets.
With consistent monitoring, you can uncover hidden inefficiencies and improve gross margins over time.
Revenue Recognition & Reporting
Revenue recognition in manufacturing can be tricky, especially if your business involves long production cycles or contract-based manufacturing.
Best Practices
Recognize revenue over time if goods are produced specifically for a customer under a binding contract.
Use percentage-of-completion or milestone billing for long-term projects.
Integrate your accounting system with production software to ensure seamless synchronization of:
Inventory levels
COGS (Cost of Goods Sold)
Work-in-process balances
Sales and revenue reporting
When production, inventory, and accounting data align, your financial statements accurately represent true profitability.
Best Practices & Automation Tips
Automation is the key to scalability and precision in manufacturing accounting.
Best Practices for Efficient Manufacturing Accounting
Implement an integrated ERP or manufacturing accounting platform to unify data from finance, production, and inventory.
Automate shop-floor data capture (time clocks, machine sensors, barcodes) to eliminate manual errors.
Update standard cost structures regularly as material or labor prices change.
Monitor key cost metrics (unit cost, labor productivity, margin trends) at least monthly.
Strengthen internal controls to safeguard against inventory theft, data entry errors, or fraud.
Encourage cross-functional collaboration — production, operations, and finance teams should work from the same data set.
Automation Tip:
Modern manufacturing systems can automatically feed production data into your accounting software, drastically reducing reconciliation time and errors.
Common Pitfalls & How to Avoid Them
Even experienced manufacturers make accounting errors that distort their profitability reports.
Here are the most common pitfalls — and how to prevent them:
Pitfall
Impact
Prevention
Misclassifying overhead as direct costs
Skewed product pricing
Define cost categories clearly and review periodically
Ignoring WIP adjustments
Inflated profits or losses
Adjust WIP balances monthly
Overreliance on uniform overhead allocation
Misstated cost of production
Use activity-based costing for accuracy
Not validating cost assumptions
Incorrect forecasts and budgets
Conduct regular cost audits
Disconnected systems
Delayed or inaccurate reporting
Integrate production, inventory, and finance platforms
Proactive monitoring and integration are the foundation of accurate manufacturing accounting.
Manufacturing accounting is far more than a bookkeeping exercise — it’s a strategic tool for improving margins, forecasting with accuracy, and making smarter operational decisions.
By tracking production costs meticulously, valuing inventory correctly, and integrating your systems, you can transform accounting from a compliance function into a competitive advantage.
Next Step: Let’s Optimize Your Factory’s Accounting System
At XpertBooks Pro, we specialize in manufacturing accounting solutions tailored to your production model.
Our experts help manufacturers:
Streamline cost tracking and reporting
Set up automated WIP and inventory systems
Analyze cost drivers to improve profit margins
📞 Book a free consultation today to get your cost accounting audit and uncover hidden opportunities to increase efficiency and profitability.
The issues when you work on QuickBooks online software can be endless, and every error that you experience brings in a whole new challenge for you to tackle through. And for a smooth experience with your QuickBooks accounting software, clearing cache and cookies timely is something you cannot avoid at all. We believe that your experience with QuickBooks software should be smooth and productive and so we do not leave any stone unturned to give you the smoothest experience and remove all sorts of technical glitches that might trouble you with your software presently or in the coming future. Thus, we have prepared this segment sharing the nitty-gritties of clearing cache and cookies to fix errors while you use QuickBooks online.
What are the uses of caches and cookies in QuickBooks Online?
QuickBooks Online demands browser cache and cookies, so as to load pages smoother, faster and improve performance. However, in some cases this stored data can become outdated or corrupted and start blocking certain pages from loading properly. Whereas, even though these files are much needed, at some point in time, they might create hindrances in smooth loading website and thus, removing them is the only solution. Here are a few major issues that you might come across when working on QuickBooks online due to caches and cookies.
You might not be able to login your QuickBooks online and QuickBooks keeps asking you to sign in repeatedly, even after entering correct login details.
Your browser is taking too much time to download forms and fails to access forms.
You have issues with the data exporting, such as reports to Excel or transactions to another software.
Not just that, many pages in QuickBooks that are not loading properly or getting stuck repeatedly.
Effective Steps for Clearing Cache and Cookies in QuickBooks Online
You can definitely get done with the caches and cookies that are occupying space and hindering the functioning of QuickBooks online by simply using the steps discussed below:
Step 1: Removing cache from browser’s history
When you have cache files stored in your browser, it might take too long for loading your sites, and removing it can cut down a lot of extra load time. As at some point in time, the files might get outdated and this would further trigger issues. Here are the steps that you need to follow for your browser.
Windows
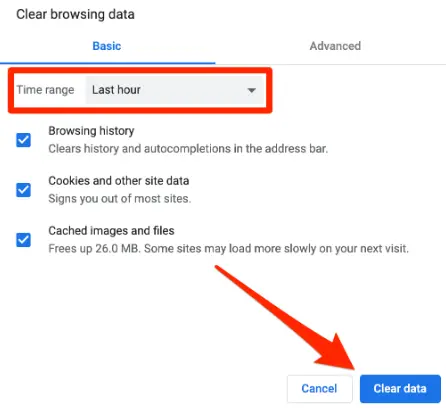
Tap on to Control + shift + Delete keys when you try using the browser.
Post that, pick the range to all time and further mark the checkboxes that have cache images, cache files, and cookies.
Next step is to go for the Delete data or Clear now tab.
Mac IOS
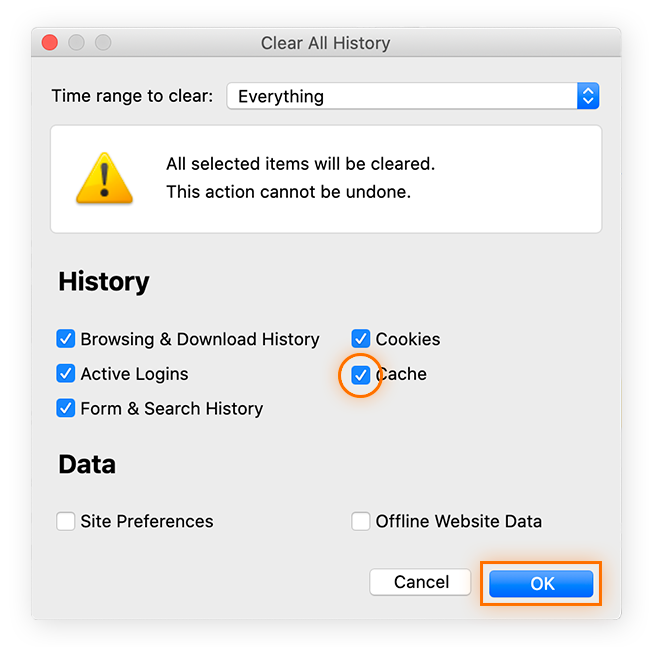
Go for Command and shift keys along with Delete on your MacBook.
Once done, pick the checkboxes that have Cache files, cache images and cookies.
Now tap on the option that has Clear data or delete data.
Do not skip a restart after you have successfully cleared the caches files and cookies.
Microsoft Edge
To clear cache and cookies in Microsoft Edge, follow these steps:
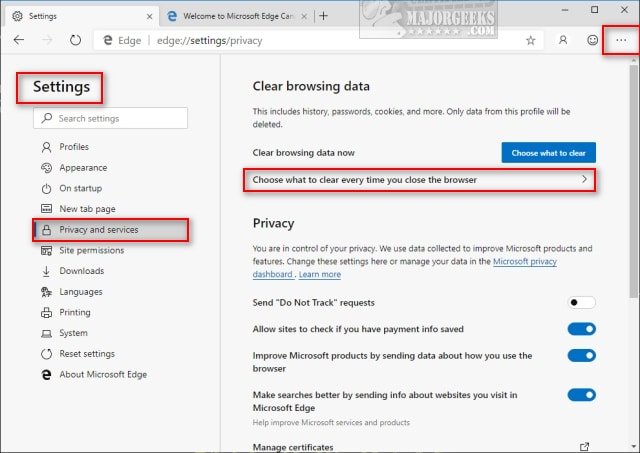
Open Microsoft Edge browser and click on Settings and more (three dots).
Go to Settings and select Privacy, search, and services.
Now scroll down and select Clear browsing data, then click on Choose what to clear.
Under the time range option, select All time to pick all browsing data and cookies.
Select Cookies and cached files.
Once done, click on Clear now to remove all cache and cookies.
After clearing the data, restart the browser and open QuickBooks again to check if the issue is resolved.
Step 2: Remove browser’s intuit-specific cookies
At times just clearing the browser cookies aren’t enough, you have to remove the Intuit specific cookies that might trigger problems. After the cookies are eliminated, you would have to opt for website preferences to be refreshed. Ascertain that you are removing only the Intuit-specific cookies.
Mozilla Firefox
From the Top right, select the Menu icon.
Further, select Settings tab.
Now choose Privacy and security.
Pick Manage data that is present under the Cookies and site data.
Type and enter Intuit in the Search bar and find Intuit cookies by hitting on Enter tab.
Now choose Remove all displayed.
Once done, click on Save changes.
The last step is to reboot Mozilla Firefox to save the changes take effect.
Google Chrome
From the Top right bar, choose More Icon and then go for Settings tab.
Then , choose Privacy and security option.
Now go for Cookies and other Site data.
Also, select See all cookies and site data.
Once done, find the Intuit cookies and then go for Intuit into the search field.
Simply tap on Trash can option or Remove all shown.
The last step is to reboot Google chrome to apply the changes you have done.
Safari
First step is to open Safari browser, then select Safari beside the apple icon to the top left.
And then proceed to Preferences or Settings tab.
Next step is to go for Privacy and select Manage data for websites.
Later on, find Intuit into the search bar to find the Intuit cooking.
To Remove All of them, select Remove now option.
Now select Done tab.
And towards the end, restart safari to save the changes and you are good to go.
Conclusion!
Isn’t clearing cache and cookies extremely easy with the right steps in handy? Well, we know how important it is for you to make the most of your QuickBooks online and so this segment carried all the essential information that would make your QuickBooks experience smooth and uninterrupted. However, if you have some glitches showing up on your screen or if you have some queries unanswered, then XpertBooks Pro is available to assist you. Our experienced accounting software specialists can help review the issue, identify the underlying cause and guide you through the troubleshooting process.
QuickBooks is an accounting software which needs to be updated every year or when the new update comes. Using its latest version helps to avoid unwanted errors and automatically optimize the software performance leading to your improved performance and productivity. Updating QuickBooks desktop to the latest version has its own significance and helps you to function seamlessly with the new version. It ensures better security and is free of bugs which you might have faced or been facing in the outdated version. Thus, we have crafted this informative post where you will get the updated easy methods to update older QuickBooks desktop versions to latest release. Go through this post and find out the benefits of updated version.
Why to update QuickBooks desktop to the latest available version?
If you want to experience a smooth, usage of QuickBooks, devoid of any technical glitches. We will provide you the ways in which you can solve your problems of getting interruptions amidst work. QuickBooks needs to be updated to the latest of versions for error-free and smooth functioning without any interruptions. The Intuit Developer releases latest updates of the QuickBooks software at set time intervals. Every update comes with new features and technicalities. These timely updates also protect the system from malware attacks. As mentioned above, updating older QuickBooks desktop versions to the latest available version comes with a lot of benefits. To be more precise, some of the benefits are as follows:
New updates of QuickBooks provide security of data.
It protects the system from malware attacks.
It brings in the features of real-time status-tracking of invoices and lot more.
Also, it helps to ensure error-free knowledge of user.
Why New Updates? What comes with the latest updates of QuickBooks?
The latest version of QuickBooks desktop available is the 2024 release. In this particular update, you would get the following new features and functionalities.
State of the Art User Management feature
Managing the user roles, and permissions according to the requirement is now possible. Further with this particular feature, you an restrict the users to do a particular activity.
Enhancement of RFA
The QuickBooks update allows the new users to send requests to QuickBooks for another admin.
Tax 1099 NEC and MISC
Unlike earlier, QuickBooks support with the 1099 MISC and 1099 NEC and to print and E-filing. It also allows the third-party applications to use the software developer kit for the e-filing.
Advanced Inventory Aging Report
Talking about the inventory report, it will inform you the value, quality, age, and acquisition of the stocks. By this, you can ensure about the details of the stock product.
Enhancements in Online Banking
This particular feature will let you to save the customization of columns and create rules for both running money out transactions and money in transactions. You can assign a customer in QuickBooks job to their expenses in their banking transactions table.
Steps to check whether QuickBooks is up-to-dated or not
Before attempting the update, make sure that you have checked whether your software is updated or not. This helps save time and energy.
Open QuickBooks Desktop.
Press F2 key. This will open the Product Information Window.
Now check your current version and check online whether any version or QuickBooks release is available.
Verify the QuickBooks release which is available.
How to Update QuickBooks older versions to latest release (2024)?
Before proceeding to the update of your QuickBooks desktop, make sure that you back up the current version to avoid any loss of data. This will keep your data safe in case of any technical error.
Back up the current version
Open the Current version of QuickBooks Desktop.
Login to it as Admin.
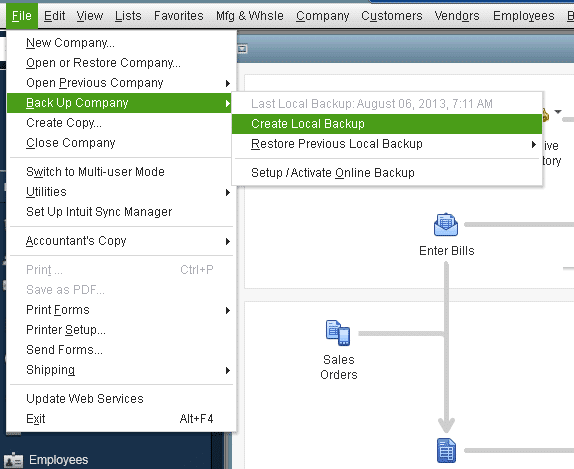
In the left side of the tab, click on File menu.
Go to Backup Company Option, and click on it.
Once it opens, click on the Create Local Backup option.
Options will open for you to choose for Company File Backup. Choose the desired option and save your backup.
Now that the backup is done, we will move to the next step.
Steps to update the new QuickBooks desktop to latest release
When you open the QuickBooks desktop and receive a prompt to update it to latest version. Then you can proceed with the below steps. Before moving ahead, make sure that you are logged out from QuickBooks current version.
Step 1: Download and Install automatic updates
First of all, open QuickBooks.
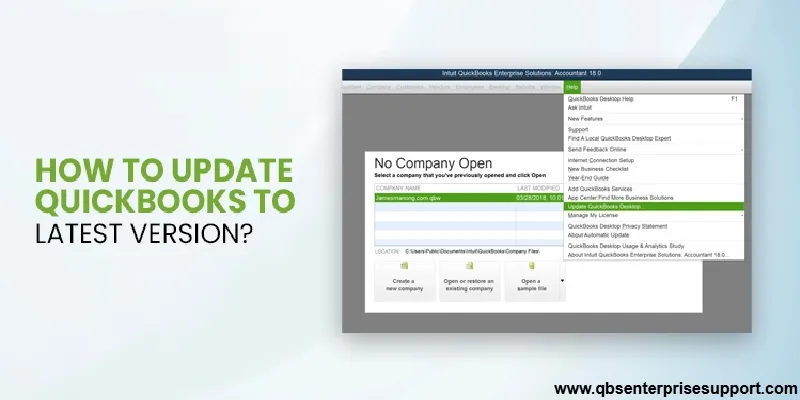
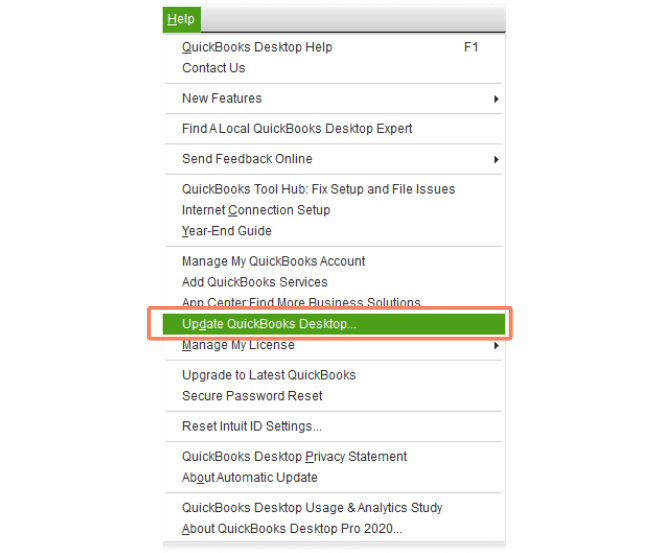
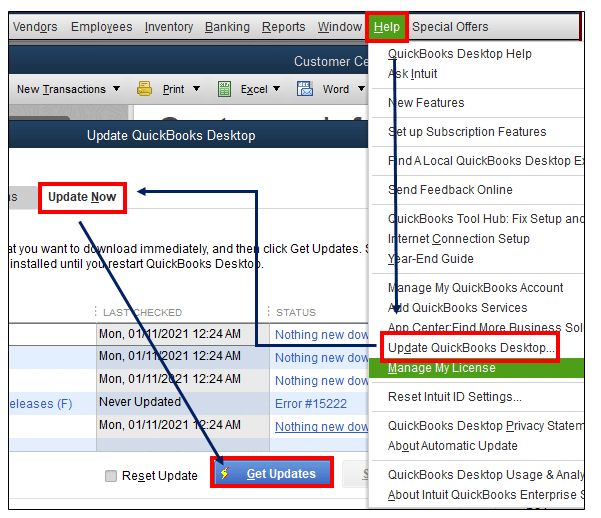
Then go to the Help menu.
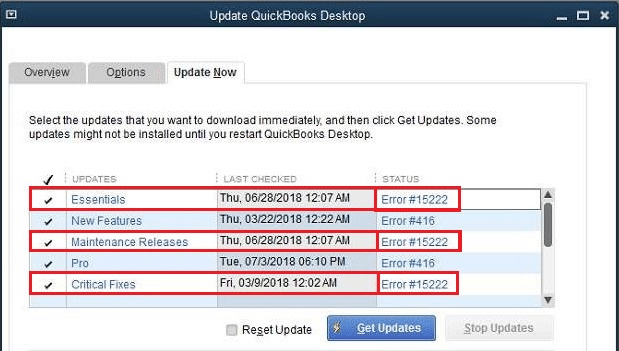
Hit a click on the Update QuickBooks desktop tab.
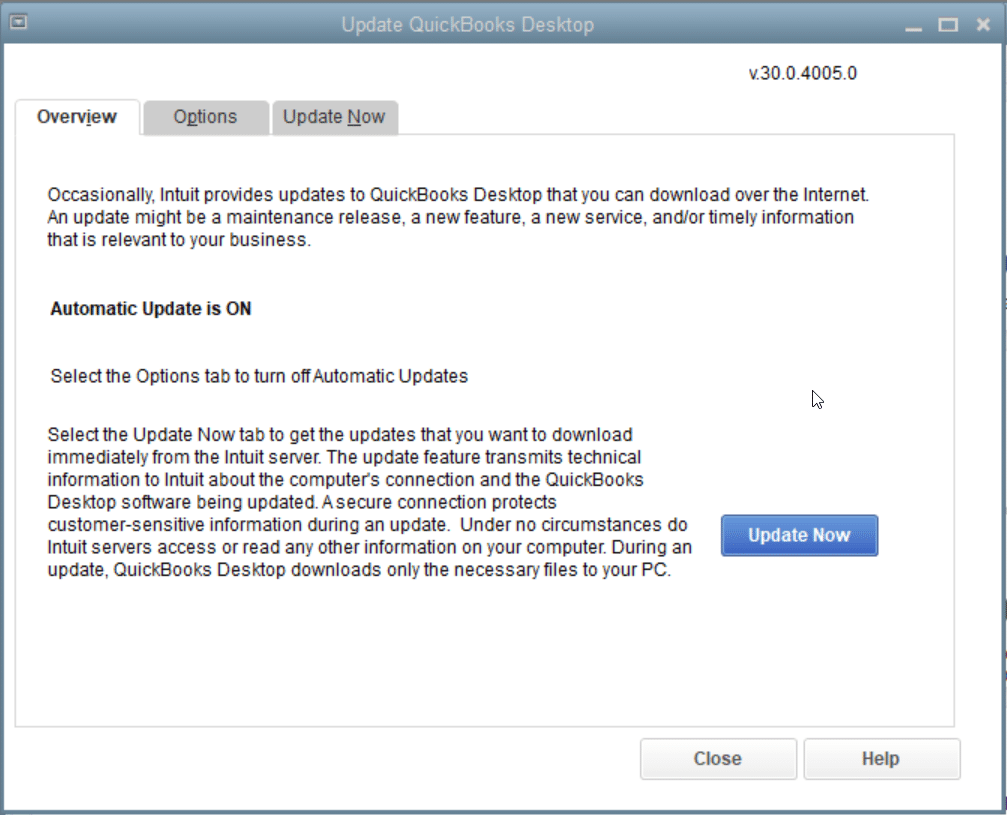
On the update QuickBooks screen, click on Update Now.
Then all the previously downloaded updates need to be removed.
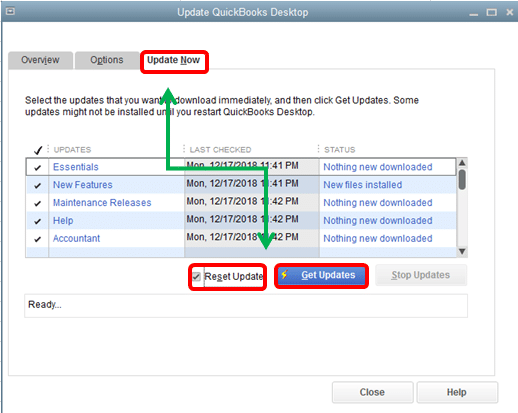
Hit a click on Reset updates.
At last click on Get updates and reboot QuickBooks.
Step 2: Try the Immediate Update Method
Open QuickBooks and go to the Help menu.
After that choose Update QuickBooks desktop.
Navigate to the Update Now tab and choose the desired updates and click on Get Updates.
On the Maintenance Releases link, find the changes / improvements in the update.
After all the updates, you are required to restart the computer and check for the installation.
Step 3: Update QuickBooks within the Application
Note: If you are facing any trouble with the update feature or getting glitches while installing updates, you may install updates through the update feature.
Open QuickBooks.
Go to File tab and click on Close Company/Logoff.
Then close it.
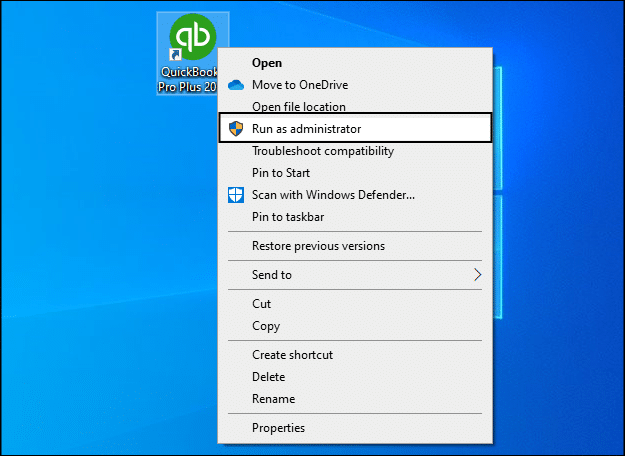
After that go to Desktop and right-click on QuickBooks and choose Run as Administrator.
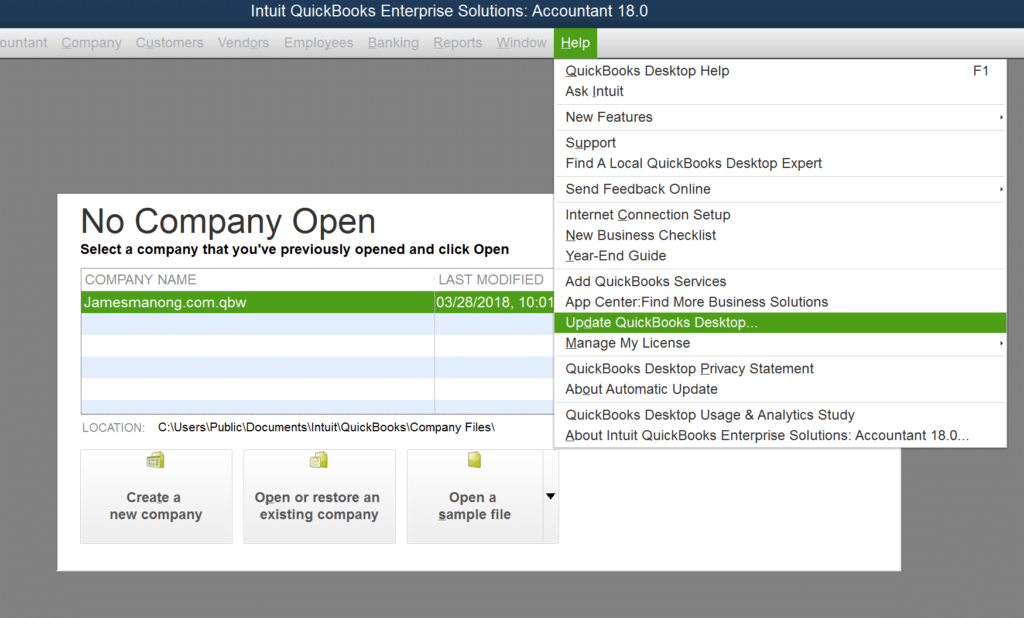
The dialog box saying No Company Open will appear. Click on Help and then choose Update QuickBooks.
In the Options menu, choose Mark All. Save it.
In the Update Now menu, mark the Reset Updates.
Click on Get Updated and Once the dialog box appears, exit the application.
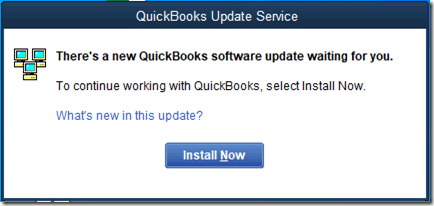
Open QuickBooks Again, and the pop will appear. On that pop-up, click on Install Updates.
Once updates are done, restart your system.
You can also turn on the automatic updates in your QuickBooks but for that make sure that you timely update your QuickBooks desktop.
Step 4: Manual Updates
You are required to shut down the company file along with the QuickBooks desktop.
Then hit a single right-click on QuickBooks icon.
Also, click on Run as administrator option.
Now go to the Help menu > Mark All. These options will be available on the No Company Open.
Then go to the Options tab and select Mark All.
Then, choose Save.
After that, select the Reset Update option from Update Now.
Then, select the Get Update.
Once the update is done, you need to close the software and select Install updates by clicking on Yes.
At last, you need to restart the computer.
Step 5: Try ULIP – Ultralight Patch
First of all, download the latest release.
It is required to move all the Company files.
After that navigate to the Start menu and search for Desktop.
Now hit a right click and select Run as Admin option.
Navigate to the No Company open screen. Click on Help.
Then you need to click on Update QuickBooks.
Along with it, select on Mark All.
Then select Save.
Hit a click on Update Now and Reset Update.
At last click on Get Updates.
What are the features in latest versions of QuickBooks?
Intuit provides the new software versions and patches for QuickBooks desktop update. This QuickBooks accounting software helps to boost privacy features, security patches and feature additions along with many other benefits. Once these updates are done, they impart several benefits which are given below:
Features are enhanced
To cater to the evolving basic needs, the new version is equipped with new features or you may find that existing ones have been enhanced. This will help you streamline your work and be more efficient.
Security Updates
This update provides you protection against potential threats and vulnerabilities that become important to run a successful business by keeping your data safe.
Fixes Bugs
Any type of error, bug or glitch that your QuickBooks desktop is facing, is resolved or eliminated when it’s updated to the latest release.
Conclusion
The article above, provides all the necessary steps and procedures to update the older versions of QuickBooks desktop to the latest release. In case you are not able to preform the steps by your own, then you can reach out to XpertBooks Pro. Our professionals can help identify the root cause and guide you through the appropriate troubleshooting process.
How exactly do you imagine your QuickBooks experience? Smooth and productive, right? But this whole experience is interrupted by random errors, which no one is prepared for. When you come across an error in QuickBooks that isn’t just an error, it brings down the software functionalities, risks your crucial data and what not. And so, these errors need to be taken down immediately, especially when it comes to errors like the "QuickBooks error 6138 1005". This error generally occurs when a user try to open or access a company file in QuickBooks but it failed to open due to damaged company files, incorrect hosting configuration or network-related issues. When this error appears, QuickBooks may fail to open the company file properly and users may temporarily lose access to important accounting data. This segment is going to be all about the this error, its causes, fixes, and much more.
We understand the struggle of tackling through the random errors that usually pop up when trying to access the company file locally or over a network, just like this one, and so our accounting consultants has curated this guide touching upon the sensitive yet helpful information about such errors in QuickBooks.
What is QuickBooks error code 6138, -1005?
QuickBooks error code 6138 1005 is basically a technical glitch that falls under the category of 6xxx series. It is one of the most common error in QuickBooks accounting software. These errors are company file related issue and usually occurs when QuickBooks desktop cannot access or communicate with the company file properly. These errors are commonly seen in multi-user environments where multiple workstations are try to attempt to access the same company file that is stored on a server. The fixation of such issues are much similar, but as they are associated with the company file, they need to be taken care of well. As you experience the issue at the time of accessing company file, it gives us a hint that the company file might be hosted by a system other than the server.
What are the factors triggering to QuickBooks error 6138 1005?
While the possible triggers can be many, but here we have tried to cover the most common ones to help you understand the issue better:
Your folders might show signs of corruption ultimately causing such issues.
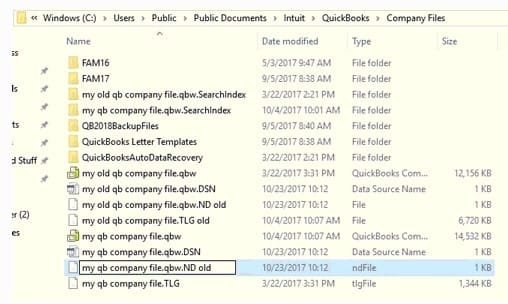
If your .nd and .tlg files are showing signs of damage.
In case of long company file path exceeding character limits, this can also lead to this error.
If you haven’t followed the correct procedure to install QuickBooks desktop and it turned out to be a failure, then such errors are quite possible to show up.
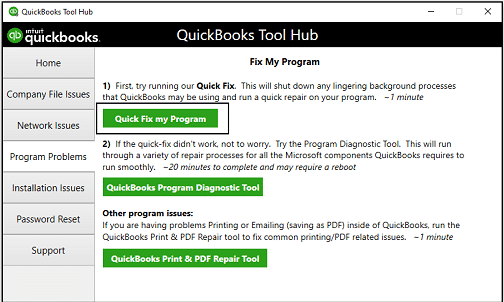
Once the installation completes, launch the Tool Hub.
After that head to Program Problems tab.
Select Quick Fix My Program option and let the tool run properly.
This process might take a couple of minutes depending upon your system performance.
Once the tool finishes the repair process, reopen QuickBooks desktop and check whether the issue gets fixed successfully or not.
Solution 4: Try to run a sample company file
Under this procedure, double click the QuickBooks accounting software.
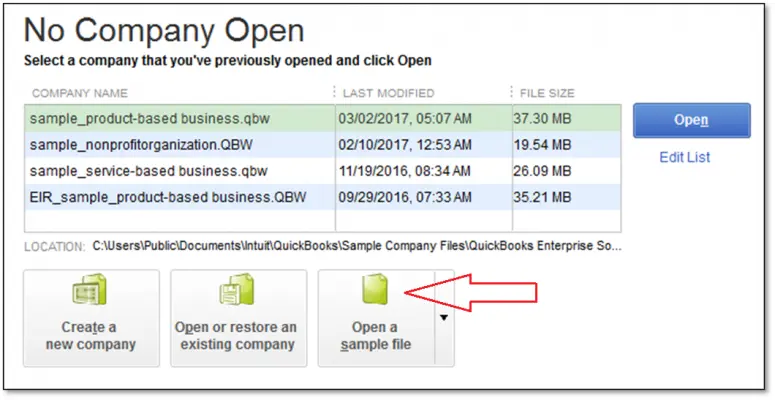
Followed by proceeding to the No company open window and there pick the Open a Sample file tab.
Opt for the File from the list of sample company files.
If you still come across the same error message, then you definitely require to repair your software installation.
Whereas, if the file opens smoothly, then you probably are facing issues with the company file, which can be resolved using a bunch of other methods.
Solution 5: Getting QuickBooks company file backup restored
Your current company file might face issues, in case you have made any recent changes that aren’t working according to the plan, and so you can get access to your company file backup, as it might help you to get a company file without any error.
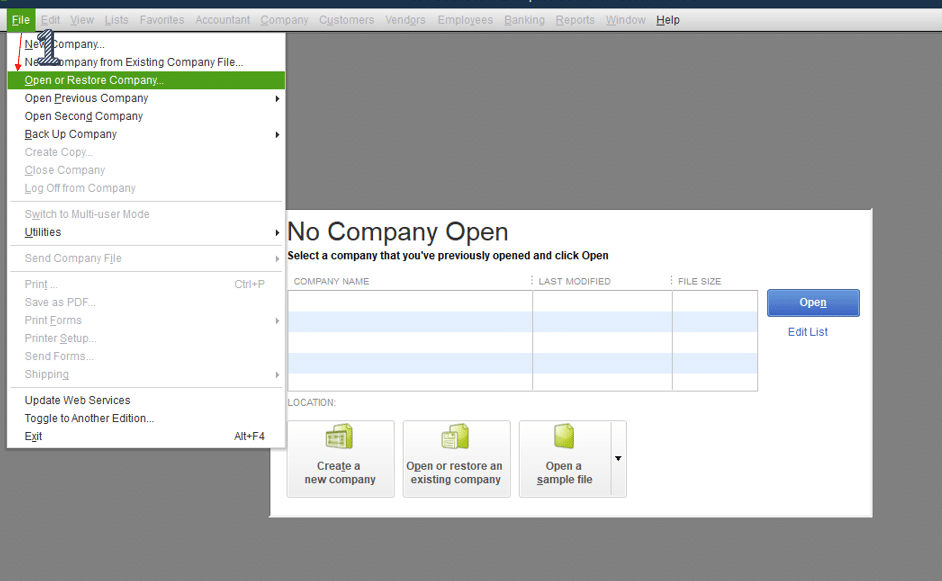
Start the process by moving to the QuickBooks File menu.
Then go to the Open or restore company option.
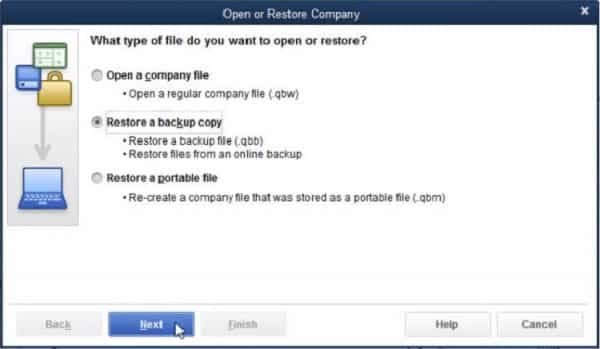
You would also have to tap on to Restore a backup copy option.
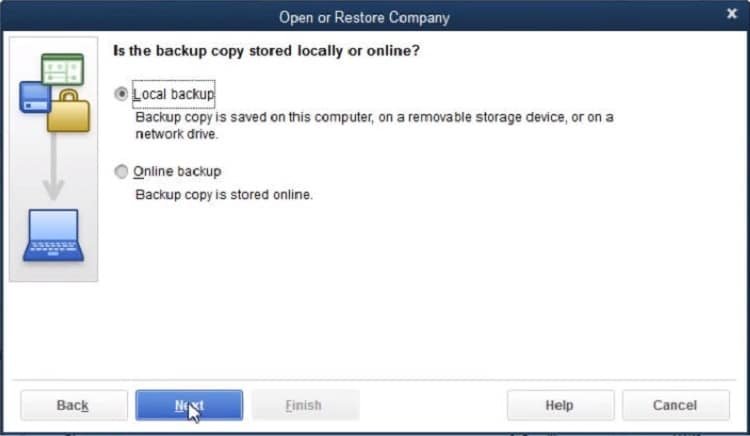
Now tap on Next and find the Local backup option.
Pick the Next tab.
Later on search for the system to identify the backup version of the company file.
The last step is to pick a folder that you wish to save the file you just restored.
Solution 6: Turn off the hosting
This process is something that you can opt for the file over a network. In such case, you are supposed to simply turn off the hosting using the process shared below:
Simply press the F2 key to open the Product Information window.
After that, head to the Local Server Information section.
Then check the hosting status carefully to verify whether hosting is turned on or not.
If hosting is enabled on the workstation, then make sure to turn it OFF immediately. To do, follow these steps:
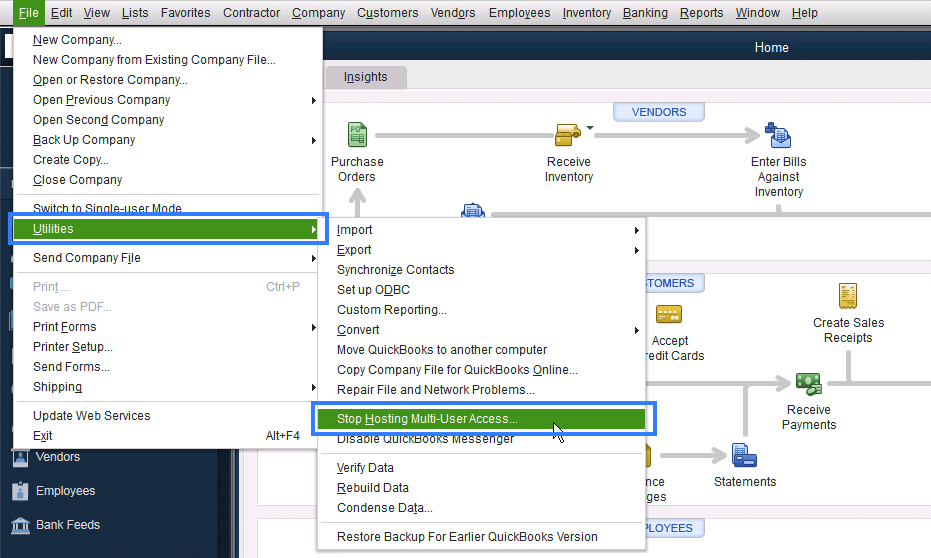
Hit a click on File menu.
Go to Utilities option.
Now hover over the Stop hosting multi-user access option.
Solution 7: Close all QuickBooks processes
If none of the methods above helped you in rectifying the error 6138 1005 in QuickBooks, you probably need to turn down all QuickBooks background processes.
To begin with, sign in to the server computer using administrator credentials.
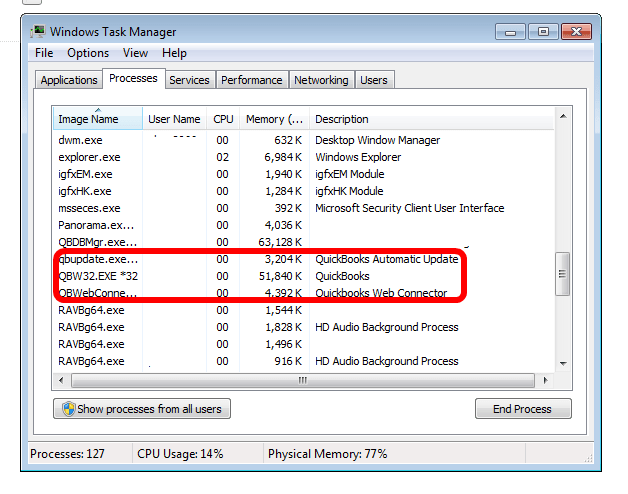
After that press the Ctrl + Shift + Esc keys together to open the Task Manager.
Now head to the Users tab.
Then look for all QB related processes running in the background.
After that hit a right-click on each QuickBooks process one by one and select the End Task/ End Process option.
Once all the QuickBooks processes are closed successfully, reopen QuickBooks desktop.
Then try opening the company file again in Multi-User Mode.
Conclusion!
Fixing QuickBooks error code 6138 1005 might seem a bit challenging for users, but the solutions discussed above are usually enough to get the issue resolved successfully. We hope that this guide has helped you to understand the causes behind the error along with the most effective troubleshooting methods to eliminate it. However, there are situations when you fail to fix the error and experience the same issue even after performing all the solutions carefully, then in that case technical guidance might be required. In such a scenario, feel free to connect with our accounting consultants by dialing i.e., 1.800.761.1787 and get immediate assistance for resolving all your accounting related issues.
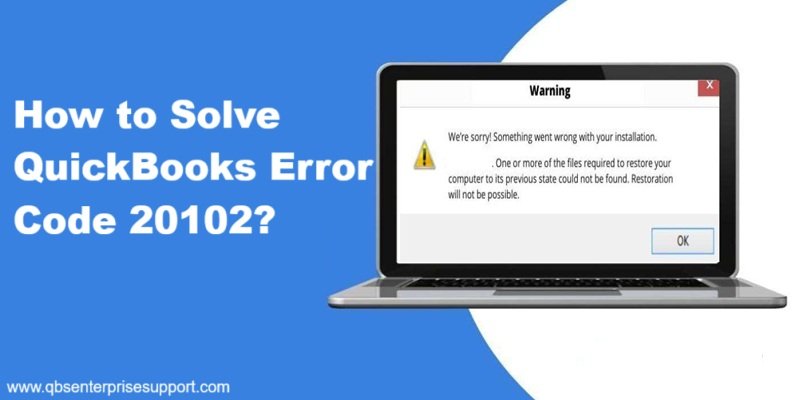
Are you getting error codes or error messages in your QuickBooks? Well, most of these errors are related to the payroll in QuickBooks, due to which employees face difficulties in creating payroll invoices. Today in this segment, we will learn about one such common error i.e. QuickBooks error code 20102 which is usually seen by the users when your company file is unable to connect to the Intuit payroll service. This error often indicates a missing or incorrect employer identification number (EIN), a mismatch between the payroll subscription and the company file, or incomplete payroll setup.
Possible causes behind QuickBooks Payroll error 20102
There are many reasons by which QuickBooks payroll error 20102 trigger, which are follows:
Sometimes incorrect network settings causes QuickBooks to unable to access the Internet which leads to such error.
An unstable or weak Internet connection may prevent QuickBooks from downloading updates.
Security apps or Windows firewall may prevent QuickBooks from connecting to Intuit's servers.
You may also face problems if QB-related files are deleted mistakenly.
What are the Solutions to resolve the QuickBooks Error 20102?
If you are facing the QuickBooks Error 20102 then you need to apply the below solutions to fix it.
Solution 1: Update QuickBooks in selective startup mode
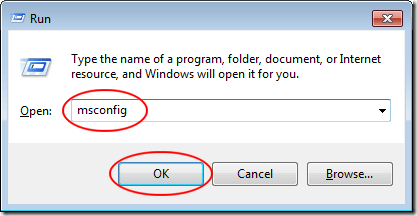
At first, press Windows + R keys on your keyboard to open the Run window.
In the searching tab, type Msconfig and click on OK.
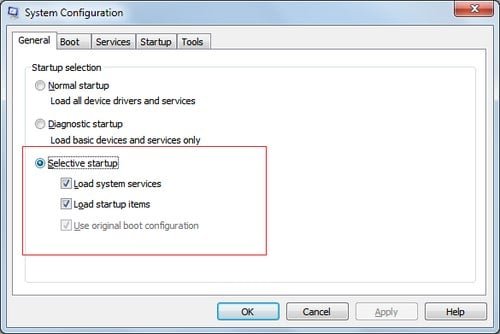
After that System Configuration window will appear. Click on the General tab.
Select Selective startup and check mark on Load system services.
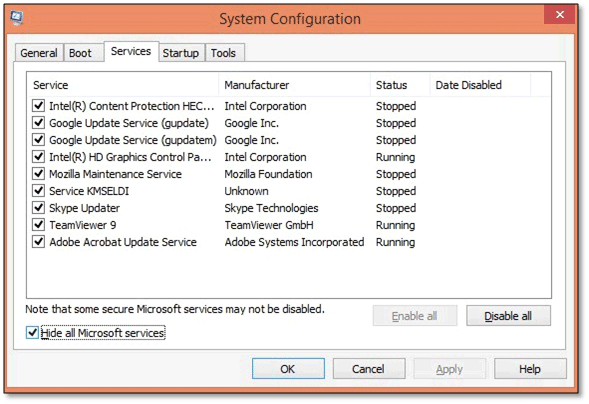
Now go to the Services tab and click on Hide all Microsoft services..
Then click on Disable All, then uncheck the Hide all Microsoft services checkbox.
Scroll down the list and make sure the Windows Installer box is checked. If not, check it.
Lastly hit a click on OK, then restart your computer.
Solution 2: Repairing registry entries
To repair registry entries first you need to restart your PC.
After that hit the Windows button from your keyboard.
You need to select Command prompt and press Ctrl+ Shit+ Enter keys.
Next hit to Yes tab.
After this a black box appear on screen.
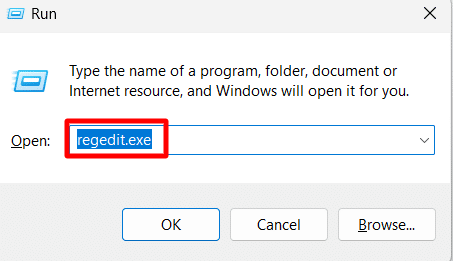
Now type the Regedit in the run command window.
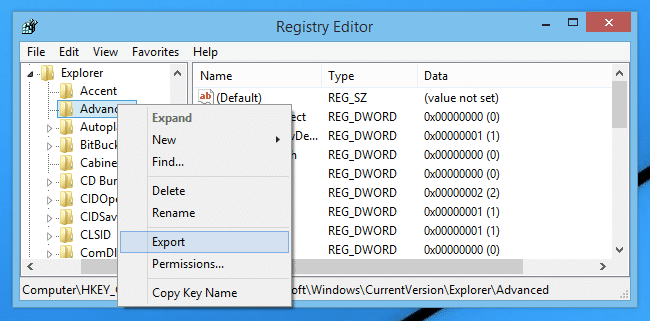
Check and select all the keys related to this QuickBooks error.
Now select the File tab then Export.
Safe the file where you want to make it secure.
Now, you need to go to the folder and give the folder a new title list.
Once done click on OK button.
After all you will find the QuickBooks backup file named reg.extension.
Solution 3: Confirm payroll services are active
Error 20102 can appear if payroll services are not activated or not linked properly.
At first, open your QuickBooks desktop.
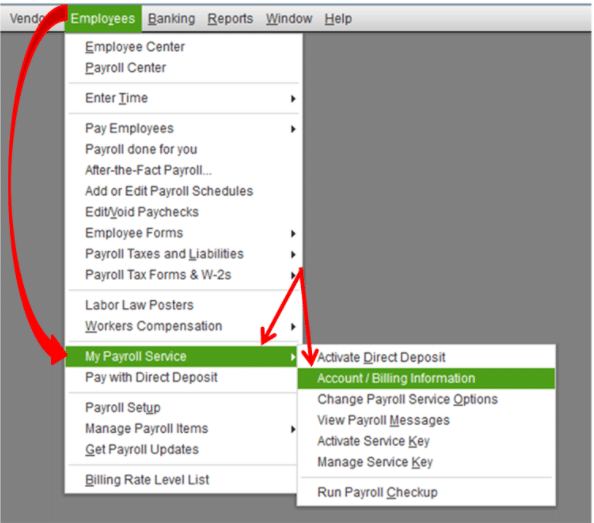
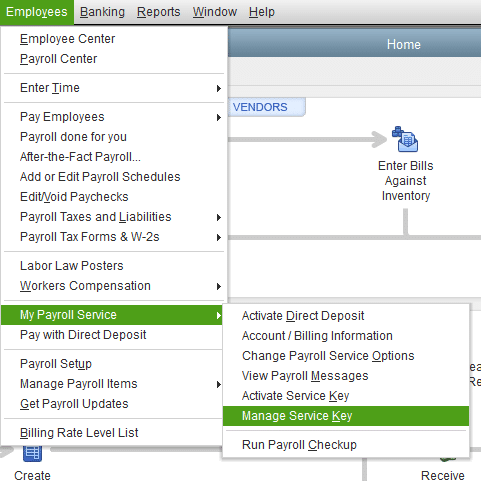
After that go to Employees tab
Select My Payroll Service and click on Account/Billing Information.
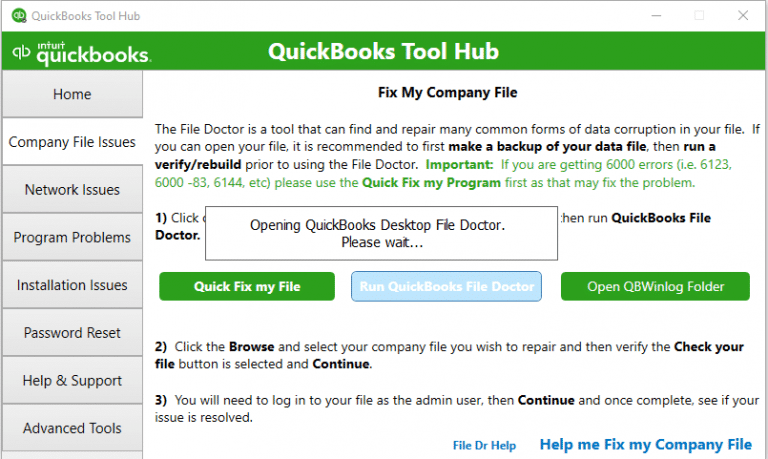
When you select File Doctor a drop-down menu will come up and you will have to select your company name. Or the name that you are using and that you want to fix at this time.
This will open the folder and you need to select the file you want and then press the "OK" button from the list.
Now, open your admin account by using your password to log in and then finally click on OK.
Solution 6: Check firewall and antivirus settings
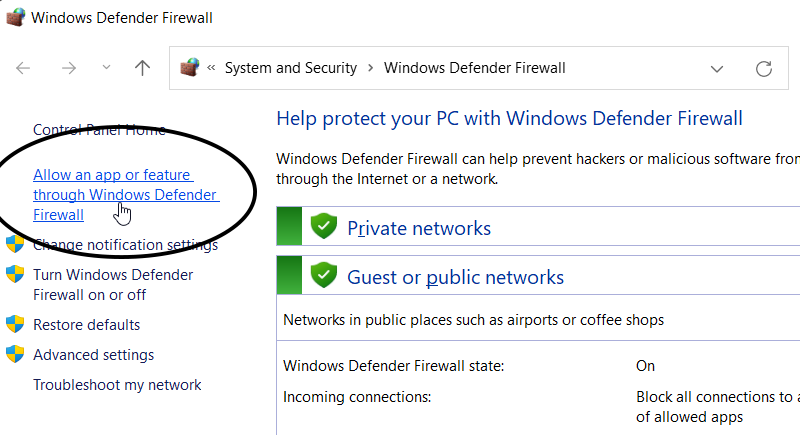
Start with pressing the Window + S keys to open the search box.
After that type "Firewall" in the search bar and select Windows Defender Firewall from the list.
Now on Windows Defender Firewall, you need to click on Allow app or feature.
Find out the QuickBooks file which is like (qbw.exe, qbupdate.exe, etc.) from the list.
Now make sure that both Private and Public checkboxes are ticked.
If you are using any 3rd party antivirus software then open its settings and add QuickBooks to the list of Exceptions.
Lastly, click on Save button and restart QuickBooks to check if the update is successful.
Conclusion
Did you find the above solutions a bit helpful in fixing the QuickBooks error code 20102? If not, then you can simply connect with XpertBooks Pro and let our accounting experts help you fix the error on your behalf.
FAQ's
What is QuickBooks error 20102?
Error 20102 pops up when your Employer Identification Number (EIN) is already in use or linked to another payroll account, stopping direct deposit payroll setup.
Does security software can causes QB error 20102?
Yes, sometimes firewall issues or antivirus settings can triggers such an errors by blocking communication with QuickBooks servers.
What are signs and symptoms of error 20102 in QuickBooks?
You will see repeated error messages, app crashes, or trouble with payroll and direct deposit features.