If a customer has overpaid, returned an item or you are issuing a goodwill adjustment, QuickBooks desktop allows you to either apply the credit to a future invoice, refund the payment or issue a credit immediately. The correct method depends on whether the customer wants their money back or prefers to use the credit later. In this article, we will be talking about the process to create a credit note or refund check in QuickBooks desktop for Windows. Thus, if you are seeking for the same process, then your search ends over here. QuickBooks makes it easy to give money back or credit to the customers. Read ahead to find out the process to giving your customer a credit or refund in QuickBooks desktop for Windows.
Steps to give the customer a credit or refund in QuickBooks desktop for Windows
The user can perform the below steps to give the customer a credit or refund in QuickBooks desktop for Windows.
Step 1: The very first step is to create a credit note
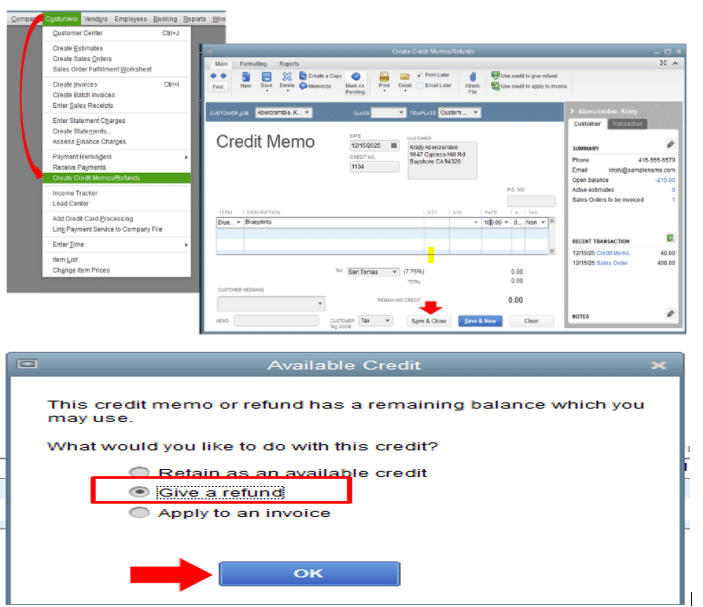
The users need to select Create credit notes/ refunds from the Customers menu.
And then, select the Customer from the customer: job drop down.
And also, enter the items that you are giving a credit for and also select Save and Close.
Step 2: Select how you wish to handle the credit
In the available credit window, select one of the following and also hit ok tab.
Retain as an available credit: QuickBooks enters a negative amount in the accounts receivable register for the credit note. The user can use this credit as payment for another transaction. In case the users chose to retain as available credit, then they will be able to see the available credits in the customer payment window.
Give a refund: The user can issue the refund in cash or a check. In case the customer used a credit card, then the steps for refunding a credit card payment can be different.
Apply to an invoice: QuickBooks accounting software opens the apply credit to invoices window. Choose an invoice you wish to apply this credit to.
Option 1: Retaining as an available credit
The user will see the receive payments window. And then would have to perform the steps below:
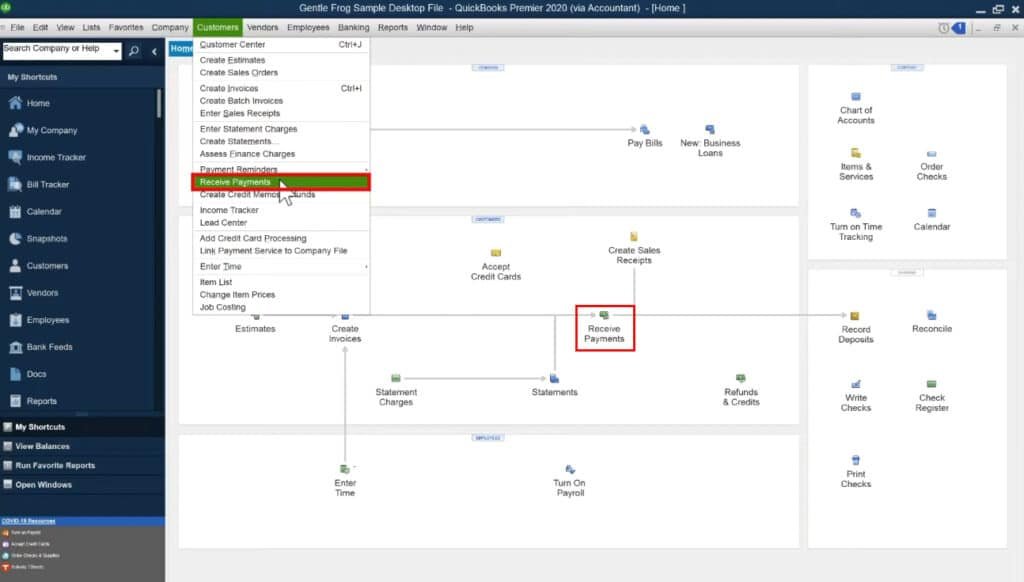
At first, the users should go for the Customers tab and then select Receive payments.
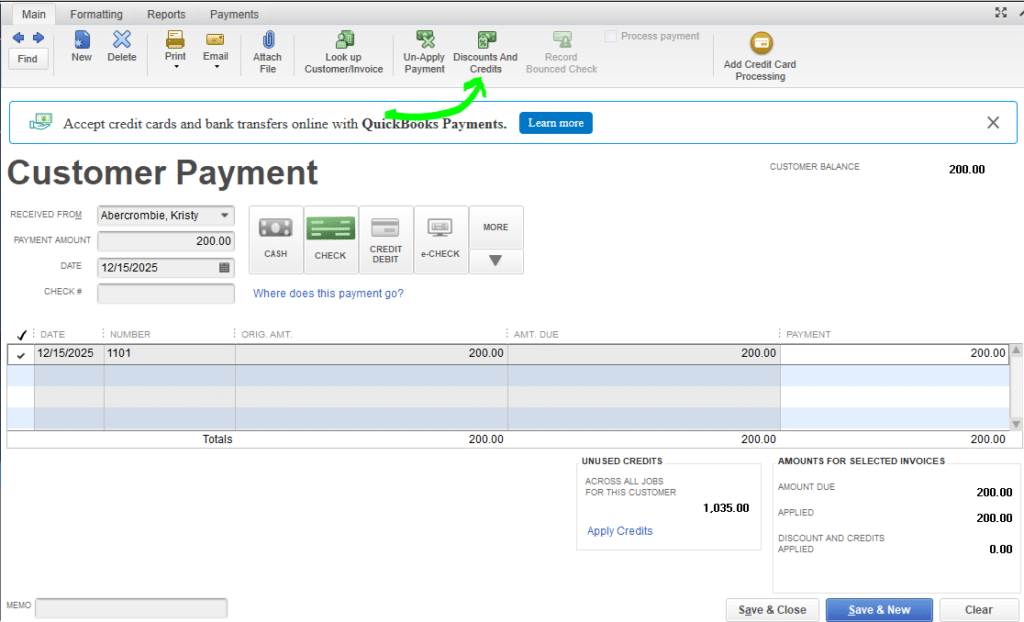
The next step is to select the Customer under the received from drop down.
After that, select the Discounts and credits icon.
Also check the credit you wish to apply and then done on the Credits tab.
The users should now select Yes tab, after they sees a prompt to confirm transfer. The amount will be applied automatically to the invoice.
The last step is to select Save and close.
Option 2: Apply a credit to an invoice
Make sure that you select Customer:job when creating the credit note. This will open the apply credit to invoice window.
The next step is to choose the Credit they wish to apply automatically and also select Done.
Option 3: Give a refund
The first step is to choose OK after the check is filled out automatically.
And then, link the check to the overpayment. And also move to the customers menu and select Receive payments.
The next step is to select Customer from the received from drop down.
And select the Discounts and credits icon.
Now, in the available credit section, select the check you created and then done.
Now, the users will see a prompt to confirm transfer.
In case you do, then choose Yes tab.
The amount will be applied automatically to the invoice.
By the end of this article, we believe that the information stated above might be of some help in giving the customer a credit or refund in QuickBooks desktop for Windows. Recording customer credits accurately helps keep your customer balances and financial records up to date. However, if you are still unable to perform the required steps or need additional technical guidance then, XpertBooks Pro is available to assist you. Our experienced accounting software specialists can help review your transaction setup and guide you through the correct troubleshooting process.
Want to explore and analyze reports out of QuickBooks in Microsoft Excel? Well, this is possible, by exporting reports as excel workbooks in QuickBooks desktop. You can save the reports as excel workbooks, CSV spreadsheets, or PDF’s. QuickBooks allows users to export almost every financial report directly into Microsoft Excel with just a few simple steps. In case you are planning to export report in QuickBooks, then make sure to scroll down carefully. The process involves certain steps, which we will be discussing later in this article.
However, if you are a newbie and don’t want to invest your time in performing the steps manually, then in that case you can speak to a professional. The steps involved in the process to export a report in QuickBooks desktop are shared below:
Steps for Exporting reports as Excel workbooks in QuickBooks
Exporting reports from QuickBooks Desktop to Excel is pretty straightforward once you know where the option lives. Here’s a clean, step-by-step way to do it:
Move to the Reports menu in QuickBooks and select Reports center.
Once the report is open and showing the correct date range:
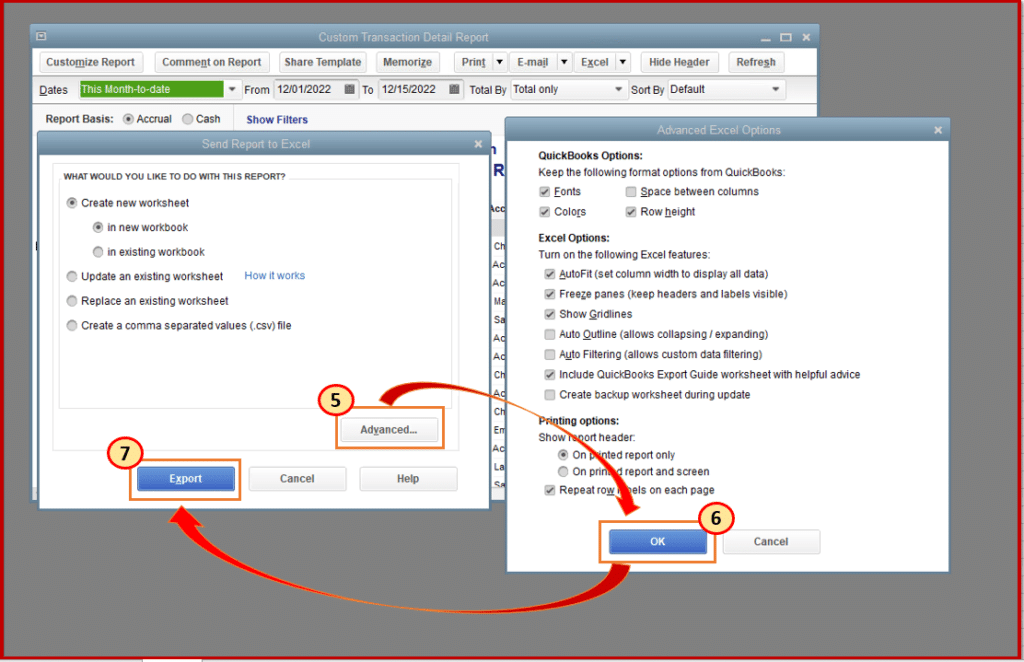
Locate the Excel button on the toolbar and select Print to save the report as a PDF.
It is required to create a new excel workbook and select Create new worksheet. If you wish to update an existing workbook with the data in the open report and select Update existing worksheet.
Also select browse and look for the workbook on the system. Keep in mind that this overwrites workbook.
In case the user wishes to format the data a specific way, then select Advanced.
Note that the reports must have less than 256 columns. In case you saw report has too many columns, and then select advanced tab. Choose and uncheck the space between columns checkbox and hit ok tab. You can save the report as a CSV instead of an excel workbook and have more columns.
Now choose OK tab when they are read to export.
To open the report in excel, select Export tab.
Steps for Exporting a Report in QuickBooks Desktop for Mac
Note that one can open the excel workbooks with apple number or Microsoft excel 2016 or later, which includes Mac office 365:
Head to the Reports menu and look for the reports to be exported.
After that select the Export.
Select file, when the file opens and select Save as to save the file.
QuickBooks software will open up excel workbooks with the default set by the user. This can be changed as:
Right click the file and select Get info.
After that from open with menu, choose Microsoft excel or Apple number.
Select Change all.
Steps for Getting Updated Reports while Working in Excel
After performing the steps above, the user can get the latest version of the report from QuickBooks being in excel. It is essential to note that the first time a report is updated from excel, you need to ensure that QuickBooks is open. This will set the preferences and permissions. The user update reports from excel even if QuickBooks is closed.
Move to QuickBooks tab in Microsoft excel. It will automatically add this the first-time report is exported.
Select Update report to get the latest version of the report from QuickBooks.
Generate Excel-based payroll reports
Excel-based payroll reports contain data that is only available in Excel. Following are the Excel-based payroll reports available in QuickBooks Desktop for Windows.
Summarize Payroll Data in Excel
Payroll by Department/Class
Certified Payroll Report
Deferred Compensation Report for 401(k) (& more)
Payroll Summary by Tax Tracking Type
Employee Time & Costs
Local Tax Summary
Employee Sick & Vacation History
Employee Direct Deposit Listing
Payroll Liability Accruals & Payments
Tax Form Worksheets
Create a Summarize Payroll Data report in Excel
The Summarize Payroll Data report has info about:
Employee Journal by Check
Deferred Compensation
YTD reports
Rates & Hours by Job
State Wage Listing
Effective Dates by Item & Employee
Quarterly Employee Summary
8846 Worksheet
Sum Up!
Exporting reports as excel workbooks in QuickBooks desktop might be possible using the steps that we have discussed earlier in this article. This process can make it easier to analyze financial data, create custom reports, and share information with your team whenever required. However, if you are still unable to export reports in QuickBooks or you need additional technical guidance, then XpertBooks Pro is available to assist you. Our experienced accounting software specialists can help review your export settings, identify the underlying cause of the issue, and guide you through the possible troubleshooting process.
Connecting your QuickBooks Payments account to QuickBooks Desktop is important if you want to accept credit card and bank payments directly within your accounting software. This process not only saves your time but also makes sure accurate financial tracking, reduces manual entry and improves cash flow management. If you are in a search of a step-by-step guide to connect QuickBooks payments account to QuickBooks desktop, then your search ends over here. This is a guide to connect an existing payments account to QuickBooks desktop, so that customers can easily pay for their invoices online.
This procedure can help, if you want to process customer payments in QuickBooks desktop. In case you sign up for QuickBooks payments from QuickBooks, then the accounts are connected automatically. However, if the user has signed up for QuickBooks payments from a different QuickBooks product, then no issues. We will help you with the process to connect the payments account so that you can process payments in QuickBooks desktop. To know further, make sure to read this article carefully till the end.
Important note
It should be noted that the one can only make use of one QuickBooks payments account for one company file at a particular time in QuickBooks desktop. The user can follow the same steps to connect the payments account to a different company file.
Benefits of Connecting QuickBooks Payments
Once connected, you unlock several advantages:
Automatic Recording
Payments are automatically recorded in your books, eliminating manual entry errors.
Faster Payments
Customers can pay directly from invoices, improving your cash flow.
Easy Reconciliation
Transactions sync seamlessly, making bank reconciliation quicker.
Professional Invoicing
Send invoices with integrated payment links for a better customer experience.
Steps to Connect QuickBooks Payments Account to QuickBooks Desktop
The user can carry out the below steps to connect the QuickBooks payments account to QuickBooks desktop. Let us check out the steps one by one:
Step 1: Connect the payments account
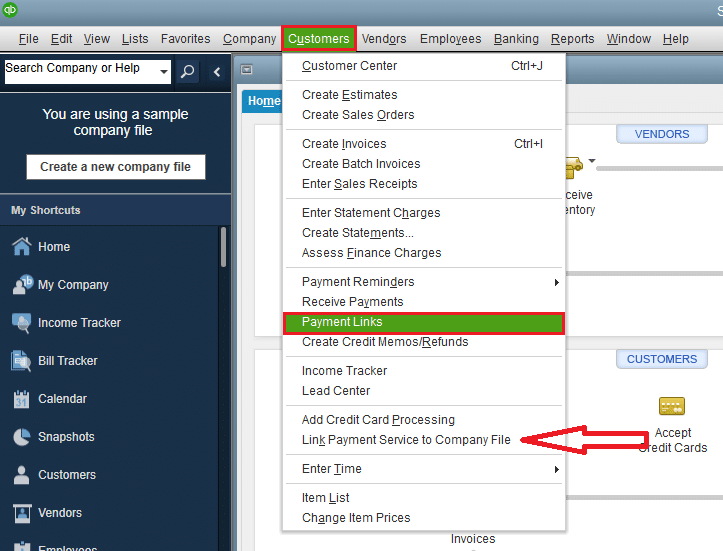
The user is supposed to move to the Customers menu in QuickBooks desktop.
And then, choose Link payment service to company file. In case the message is seen about credit card protection, then fill out the fields and choose OK tab.
After that, the user is required to enter the User ID and password, that has been used to sign up for QuickBooks payments. Also, choose sign in tab.
The next step is to select Connect. Or in case the user is transferring payments account to another company file, then choose Transfer and then click on Yes, transfer.
Once the user connects the account, then the user will see an icon on the homepage. This will tell you that you are signed in and also connected to the QuickBooks payments.
Step 2: Change the account QuickBooks puts money into
The user can keep using the same account that has been used before, in order to deposit the customer payments. The user can also change the account, by carrying out the steps below:
The first step is to sign in to QuickBooks online in a web browser. It is recommended to not to use the mobile app or GoPayments.
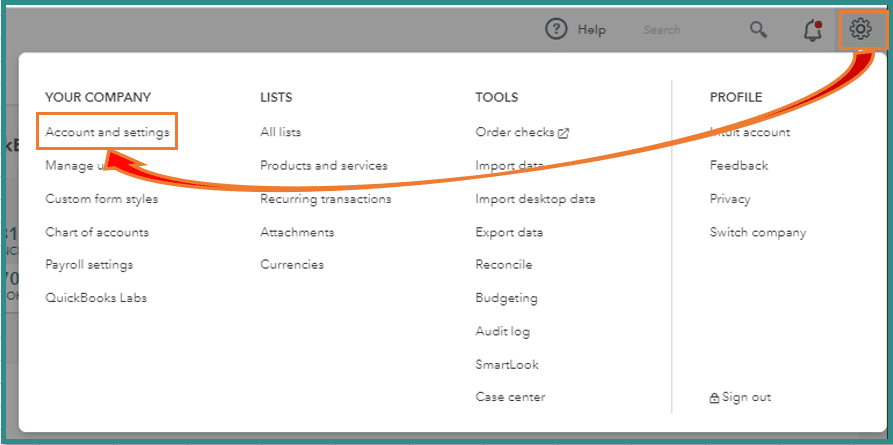
And then move to the Settings tab and choose Account and settings.
After that, the user will have to select the Payments tab. And then in the deposits section next to standard deposits, the user needs to select Change bank.
The next step is to select Add new bank account.
Followed by entering the Routing number and account number of the bank account that you want to change to.
Note: A quick tip is that the user can also log in to the bank directly to save time and data entry.
After that the user needs to select Save.
And also, review the bank account information is opted and also hit Submit tab.
QuickBooks will start depositing the customer payments from online invoices and other sources into the new account.
Step 3: Turning on payment options and online invoices
The accounts will get connected by now. And the user can turn on payment options and process payments. This can be done by carrying out the steps below:
The user can sign up or connect an existing QuickBooks payments account.
Process payments in QuickBooks desktop.
Learning about deposit times for customer payments.
Wrap Up!
Connecting your QuickBooks Payments account to QuickBooks desktop is a smart move for any business looking to streamline payment processing and accounting. The integration not only saves time but also reduces errors and improves financial visibility. By now, we believe that the information stated above might help in connecting QuickBooks payments account to QuickBooks desktop. However, if you have any query, or in case you are stuck at any point of time, then in that case, XpertBooks Pro is available to assist you. Our accounting professionals will ensure to provide you with immediate technical assistance.
Importing credit card transactions into QuickBooks Desktop is one of the best ways to keep your books accurate without spending hours on manual data entry. If you want to import your credit card transactions into QuickBooks, then we have got you covered, this article will brief you with the entire process to import credit card transactions in QuickBooks. QuickBooks offers a great feature which helps in saving a lot of time as well as efforts.
One can easily download the business credit card transactions into QuickBooks. And after downloading the transactions successfully, one can also manage the transactions. To know more about importing credit card transactions into QuickBooks, make sure to read this article till the end.
Important point to remember
One can take into consideration the following points before performing the steps for importing credit card transactions into QuickBooks.
The most important point is you might see a column to add QuickBooks account number while downloading a file from credit card company. In case you have an account number, then it is suggested to provide the lowest sub account number.
Also, in case the users downloads transaction of more than 90 days, then they needs to import the transaction in excel format.
Another important thing is that to import credit card transactions into QuickBooks online, you will have to enter credit manually.
Or if there is a pay column in the file which gets downloaded from the credit card company containing extra details like merchant id, then one can change the column to match it with the vendor name.
Along with that there is no compulsion to add a new value to import file. There is an option to give a default value when importing credit card transactions into QuickBooks desktop.
How beneficial it is to connect credit card account to QuickBooks?
Credit card accounts should be connected to QuickBooks, due to the following perks namely:
When one downloads the transactions in QuickBooks, then it saves a lot of time.
Moreover, it is also possible to categorize the transactions when adding them to QuickBooks.
In case you do not have any business bank account, then you can get a separate bank account for your business to join QuickBooks. This helps in segregating business and personal activities.
Steps to import credit card transactions into QuickBooks online with CSV file
In order to import credit card transactions into QuickBooks online using CSV file, the below steps can be performed:
First step is to select Transaction and Banking.
After that upload the file or transactions by clicking on Upload a file option.
Next step is to select the QuickBooks account you wish to link with the credit card account.
Now Add account from the drop down menu, in case you don’t have an account in QuickBooks.
Followed by filling up the required fields to set up the account.
Moving ahead, you are required to Map QuickBooks online fields to the bank account.
And perform the steps to map QuickBooks online.
Choose the Date column and also the Date format.
After that, move to the description and click on the File.
In the next step, you will Positive and negative number in a single column.
Where, you are supposed to select column with Negative number.
Followed by ticking the Transactions that are to be imported into QuickBooks and choose Next.
Once done with that the software will confirm the transaction.
Where, you should click on yes to Confirm.
End the process after the transactions gets downloaded.
Steps to import credit card transactions into QuickBooks online
Herein, you will have to carry out the following steps:
First of all, select the Banking center.
And then, login the Business and credit card account.
The next step is to select the Credit card account.
You will see all the accounts you have at the bank. You are supposed to place a checkmark for each account that they wants to connect to QuickBooks.
Followed by entering the Bank account name.
You are then required to select QuickBooks account where the bank account is linked. In case you are not having any setup in QuickBooks, then it is suggested to select Add account from the drop down.
Followed by selecting the right Date range.
Now, click on Connect.
And the transactions would now get downloaded.
After that review the downloaded transactions.
Herein, you should see the Credit card account balance in the blinking center.
In case you want to track other credit card account in QuickBooks, then it is suggested to click on the add account tab and move back to step 1.
Tips for Accurate Imports
Always download transactions in the correct date range
Avoid importing duplicate entries
Reconcile your account after import
Backup your company file before importing
Use consistent naming for vendors and categories
Summing Up!
With this we come to the end of this post, where we expect that the above discussed steps would be more than enough to import credit card transactions into QuickBooks. Once the import is complete, it is a good practice to review the imported transactions and verify that they have been categorized correctly. However, if you get stuck at any point of time or need additional technical guidance, XpertBooks Pro is available to assist you. Our professionals will perform the necessary actions on your behalf.
Converting from QuickBooks desktop to QuickBooks online and stumbled upon any type of error? Well, need not to worry anymore, as here we are with this article to provide you with detailed information related to fixing errors when converting from QuickBooks desktop to online. QuickBooks conversion issues mainly occur due of damaged company files, large company files or internet connectivity issues. Once the error encounter, the migration process may fail completely or transfer incomplete data to QuickBooks Online.
QuickBooks online software comes with way more features and functionalities, which makes it compelling for the users to switch to QuickBooks online. Any kind of error in converting can lead to further inconvenience. To know more about fixing errors when converting from QuickBooks desktop to online, make sure to read this article carefully till the end.
Important points to remember
Before proceeding further, the user is required to keep in mind the following pointers:
First update the QuickBooks desktop completely if it remains incomplete, then it is dangerous to import data as there are chances to a permanent data loss.
It is important to store the data file in QuickBooks desktop and maintain the transactions on both sets of books until you decide QBO is right for the business.
Also, it is important to ensure that you know the limitations of importing and then go for the right option.
Methods to fix the issues when converting from QuickBooks desktop to online
The user can perform the required to steps for the respected errors that can be seen when trying to resolve the errors that can appear when converting from QuickBooks desktop to online:
Error 1: Couldn’t connect to the database or could not load the database
Solution 1: Logging with admin credentials
These types of errors can be resolved by logging in with admin credentials:
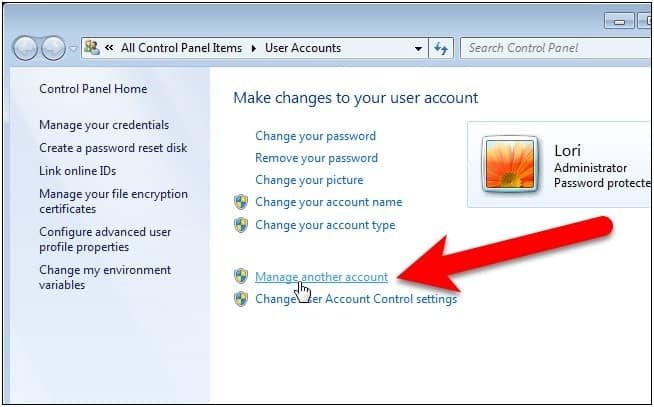
The very first step is to visit the run window.
And then open control panel and select view tab from the drop down lost and select the small icons.
After that, select the user accounts tab.
And also select manage another account option.
The last step is to ensure that you have logged in as admin.
Solution 2: Checking out possible data issue
The user needs to first move to the file menu and then choose company operations.
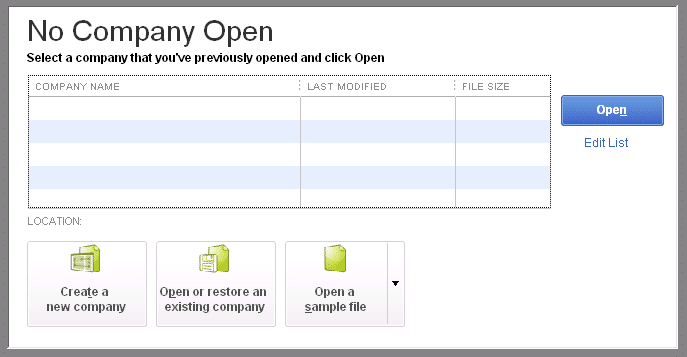
After that the user needs to choose the create a new company and move to the next tab. Give this file a unique and different name.
In case the error doesn’t return in the test company file, and also open the original companies file directly:
The user is then required to select file menu and company operations.
After that select restore from backup and click on next tab.
And also select browse to an alternate backup file and select browse.
Now, move to the company name.
And also select the file qbpos.db and open it.
The last step is to register a new, unique name for the company file and then go for ok tab.
Error 2: We can’t export the data. It may be on a network drive
The user will see this issue if QuickBooks desktop company is located on a drive other than their local c-drive or it's open in multi-user mode.
This can be resolved by pressing F2 key or Ctrl + 1 keys, to open the product information window and then check the file size.
The user is then required to close the QuickBooks desktop, and then copy the company file to C:\drive.
The next step is to open the company file in QuickBooks desktop.
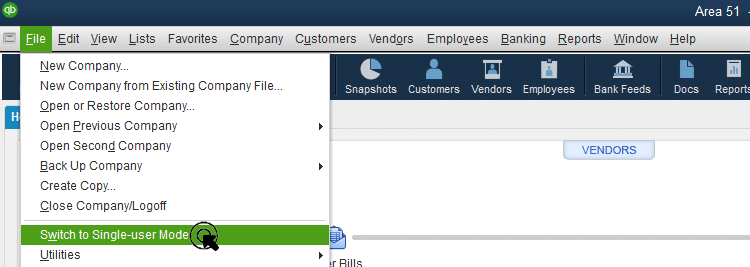
Also, select the switch to single user mode, from the file menu.
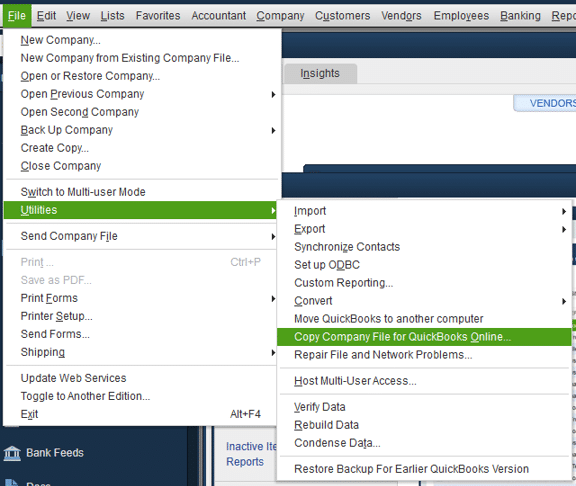
End the process by exporting again and then from the file menu, the user has to pick the utilities tab, and also select the copy company file for QuickBooks online.
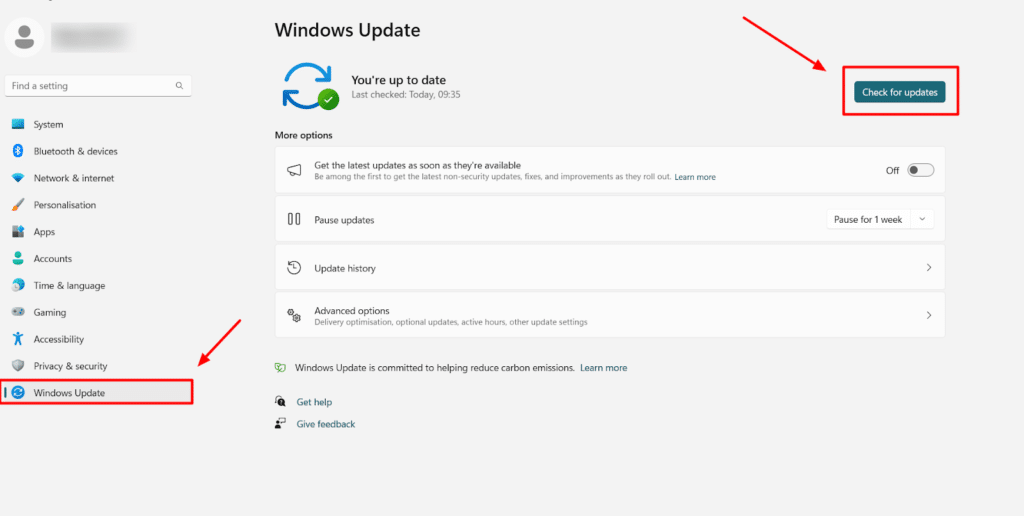
The very first step is to select the check for QuickBooks updates option from the QuickBooks menu.
Further, go for install updates.
And by the end, reboot the software.
Error 4: Problem in checking the company for import eligibility
This sort of error could be seen if the user is not the master admin, company admin or accountant user in QuickBooks online company file. Or if there is any issue with QuickBooks online payroll account services. The user can perform the below steps to fix this issue:
The user is recommended to ask the master admin to grant admin permissions, or have a company admin to perform the export process.
The next step is to ensure to login the online company before importing.
If the error continues, it is suggested to create a new online account.
Error 5: Exporting QBDT data to QBO
At times when the path of the company file is more than 4 folders deep, then this type of error could be witnessed. Just as in case of the file path C:\My Stuff\QuickBooks files\My Company\2016\Work Files\data.qbw. This can be resolved by performing the steps below:
The very first step is to press F2 or Ctrl + 1 keys in order to open the product information window and then verify the company file location.
The next step is to close the QuickBooks desktop.
Furthermore, the user should copy the company file to any folder in the C:\drive.
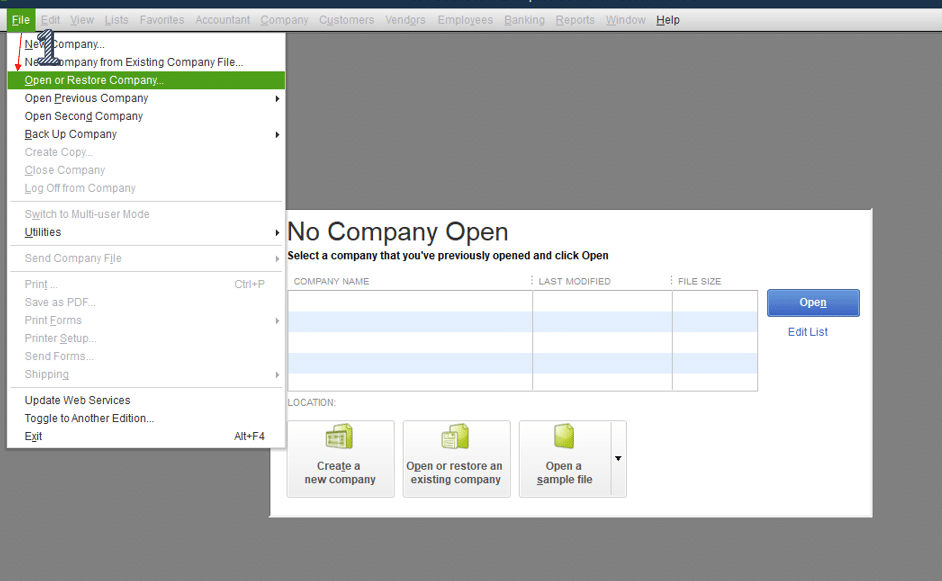
Also, open the QuickBooks desktop, and move to the file menu and choose the open or restore company.
End the process by opening the saved file from the new location, and then try to import the file once again.
Error 6: Please delete all employees already entered in QuickBooks Online
While transitioning data, QuickBooks Online can't replace employees as they're intricately tied to payroll items, year-to-date history, and other aspects of the payroll setup.
Solution:
QBO prohibits the deletion of employees with paychecks or pay history. In order to transfer your data, you'll have to create a new QuickBooks online company without a payroll setup to move your complete data.
Error 7: Your file is too big to export
Your QuickBooks Desktop file cannot have more targets than the following limits:
Once you have performed the above stated procedures, it is most probable to fix the issues successfully and convert from QuickBooks to online without any sort of further technical glitch. However, If you encounter any issues during the conversion process or need additional technical guidance, XpertBooks Pro is available to assist you. Our experienced accounting software specialists can help review your migration, identify any conversion related issues, and guide you through the possible troubleshooting process.