You created your 1099s in QuickBooks online or QuickBooks desktop, and are unable to spot any of the contractors or there is any incorrect amount, then you have landed on the right place. Today’s article will guide you through the process to fix missing contractors or wrong amounts on 1099s. There can be certain steps to fix missing contractors or incorrect amounts on 1099s, which are discussed later in this article. Thus, we would recommend you to keep reading to elevate the understanding of those fixes.
Additionally, if you want our QuickBooks professionals to the mend the error on your behalf. You can have a conversation with our accounting consultants directly. We are a team of independent accounting professionals, who work round the clock to provide best possible accounting services.
Steps to be followed to fix missing contractors or wrong amounts on 1099s
As mentioned earlier, there are certain steps that you can follow to get rid of missing contractors or wrong amounts on 1099s. These steps include the following:
Step 1: Ensuring that the contractor is active and set up for 1099 tracking
In case a 1099 contractor is missing from the list, at the time when you start to create the 1099s, then it could be if they are not active or marked as eligible for a 1099. You can check on that as follows:
QuickBooks online
In case you are in middle of crafting 1099s, on the review your contractor’s information windows, then it is recommended to choose the add from vendor list tab and also select the appropriate vendor.
In case you are not creating 1099s, then you can change your status by carrying the below steps:
First of all, you need to choose the Expenses tab and then Vendors or payroll. After that choose Contractors.
The next step is to choose the Contractor you want to convert and then click on Edit tab.
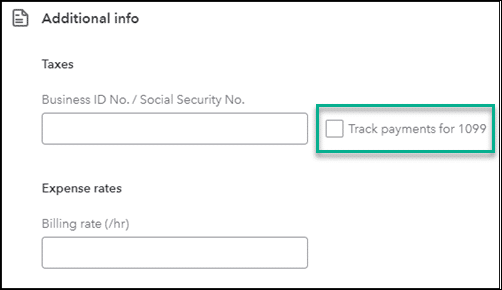
Lastly, you should mark the Track payments for 1099 checkbox and then choose Save tab.
QuickBooks desktop
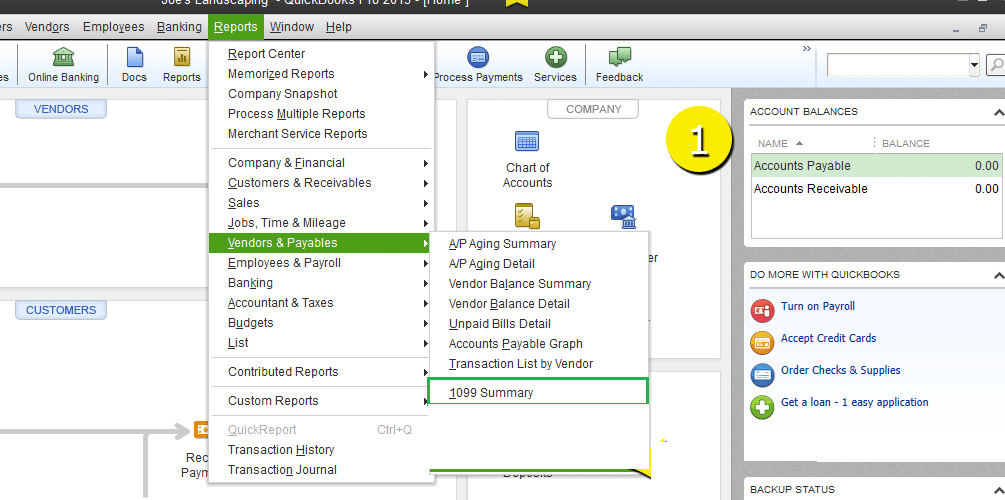
Initially, you are supposed to move to the Reports tab and then, choose Vendors and payables.
After that, choose 1099 summary.
And also, select All vendors in the 1099s options dropdown menu.
In case you identifies any missing vendor, then it is recommended to make them a 1099 vendor.
This can be done by moving to the Vendors menu and then selecting Vendor center.
After that, double clicking the Vendor’s name.
And also, clicking on the Tax settings tab.
Followed by, selecting Vendor eligible for 1099 box to place a check mark.
Once done with that, you need to enter the Vendor’s tax ID in the Vendor tax ID field.
And then, hit OK tab.
The last step here is to repeat the steps 1 and 2. Followed by selecting the 1099 Vendors in the 1099 options drop-down menu.
Step 2: Ensuring that the payments to this contractor meet the threshold
It should be noted that the contractors whom you paid $600 and above cash threshold get a 1099. You can spot the contractors who doesn’t meet the threshold. Also, it should be taken into consideration that credit card payments are not included. And these payments will be reported by the financial institution and should not be included in the company’s 1099 values.
QuickBooks online
If you are a QuickBooks online user, then you need to continue with the steps below:
At first, choose the Expenses tab and then go for Vendors or payroll and then click on Contractors.
After that, choose the Prepare 1099 and then hit Continue tab until you get to the window called “check that the payments add up”.
The next step is to choose the arrow next to the filter tab at the top of the table and then change the type of contractors to 1099 Contractors below threshold.
QuickBooks desktop
For QuickBooks desktop, you need to navigate to Reports tab, and then click on Vendors and payables.
After that, move to the 1099 summary.
Followed by selecting Ignore thresholds in the 1099 options dropdown menu.
In the next step, if you spot the vendor, then this means that they have not met the threshold.
Whereas, if this 1099 vendor using 1099 accounts, then you need to enter more transactions or change the thresholds.
For this, you are supposed to move to Edit tab and then choose Preferences.
After that, choose Tax: 1099 on the preferences window. Also, choose the Company preferences tab.
Once done with that, go for the link “Click here” next to if you want to map your accounts to boxes on form 1099 MISC.
And then, the QuickBooks 1099 wizard page will come up. In the map accounts step, you need to choose Show IRS 1099-MISC filing thresholds link.
Followed by double clicking the thresholds column for the appropriate box in the 1099 MISC IRS.
The point to be noted here is that the screen will display “Your settings do not match the current IRS thresholds message in red”. In such a case, you need to select Reset to IRS thresholds, in order to follow the IRS-mandated threshold and then add more transactions.
Lastly, it is recommended to hit Save and Close tabs.
Step 3: Ensuring you are paying contractors from the right expense account
At the time of creating 1099s, the QuickBooks accounting software uses the expense accounts that has been mapped to report 1099 transactions. In case the amounts are off, you might want to review the contractor payment transactions and accounts related to them. You can carry out the steps below accordingly:
QuickBooks online
QuickBooks online users need to choose Reports tab.
Followed by typing Transaction list in the search bar, and also opting for Transaction list by vendor.
The next step is to select Customize tab.
And also, setting the report period to Last year.
Once done with that, you need to move to the Rows/columns section. And then, select the Change columns link and then put a checkmark on the Split tab.
Moving ahead, you need to move to Filter section.
After that, you will have to check the vendor box from the drop-down. And also selecting 1099 vendors who are in question.
The next step is to select run Report tab.
After that, you are recommended to look under the splits column for what accounts the vendor’s transactions were tied to. In case you spot the word SPLIT, then it is recommended to choose the transaction to see the details on what accounts were affected. In case this is a bill payment, access the bill to see what expense accounts were affected.
QuickBooks desktop
QuickBooks desktop users needs to first move to the Reports tab and then go for Vendor and payables.
After that choose 1099 summary.
And then, in the 1099 options dropdown menu, you need to choose All allowed accounts.
In case your find the missing vendor, then it is recommended to spot the account and make it a 1099 account.
This can be done by clicking twice the amount in the total column for the vendor.
And then in the 1099 detail report, you will have to make note of the accounts in the account column.
In order to show the transactions on 1099 reports and forms, the steps below should be carried out:
At first, move to Edit tab and also click on Preferences.
After that, select Tax: 1099 from the preferences window. Followed by selecting the Company preferences tab.
The next step is to select the link click here, which is next to If you want to map your accounts to boxes on form 1099 MISC.
Moving ahead, you will QuickBooks 1099 wizard page. And you will be directed to Map accounts. This window will display all the accounts used for payments to 1099 vendors.
After that select one of the 1099 MISC boxes from the apply payments to this 1099 box drop-down. And also note that contractor payments go to BOX 7.
The next step in this process is to close 1099 detail report.
And lastly, choose the second 1099 options drop-down and also select only 1099 accounts.
Towards the end, we expect that the information shared in above might help in fixing missing contractors or wrong amounts on 1099s. Reviewing your vendor setup, tax mappings, and 1099 preferences carefully can often help prevent similar issues in the future. However, in case error continues to trouble you even after carrying out the steps above, then in that scenario, XpertBooks Pro is available to assist you. Our technical specialists will guide you through the relevant measures to be taken to get rid of these errors instantly.
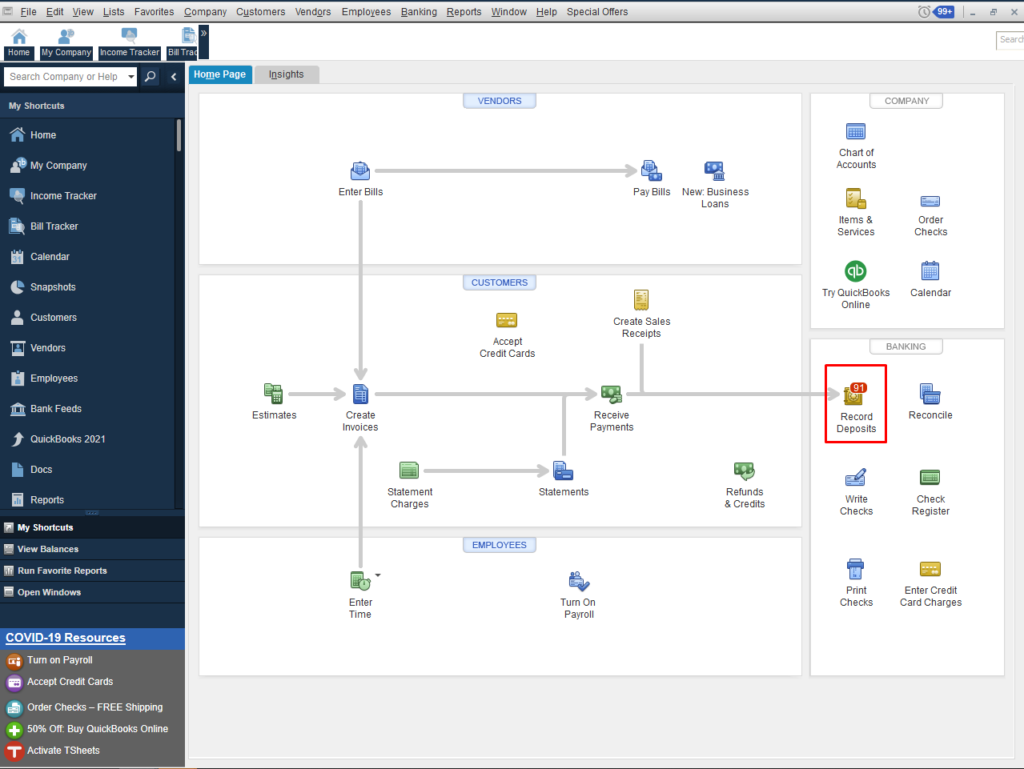
At the time of depositing in a bank, a user usually deposit payments from multiple sources at the same time. The bank records everything that is deposited as a single record. In case the user enters these payments as personal record in QuickBooks, then they do not meet the deposit. For such a scenario, QuickBooks carries its unique way of merging everything for the user, so that the users records match with the real-life bank deposit. The user should keep the transactions that the user has added to the undefined fund account. After recording a bank deposit to combine them.
In this article, we will be discussing the steps to record deposits in QuickBooks desktop. Thus, if you are interested in recording and making bank deposits in QuickBooks desktop, then make sure to read this article ahead.
Recording and making banking deposits in QuickBooks can be possible by performing the steps discussed in above. We hope the steps discussed in this guide helped you successfully record your deposits and keep your banking records accurate and up to date. However, if you continue to experience difficulties while recording bank deposits or need additional technical guidance, XpertBooks Pro is available to assist you. Our accounting consultants is readily available round the clock and will be happy to assist you.
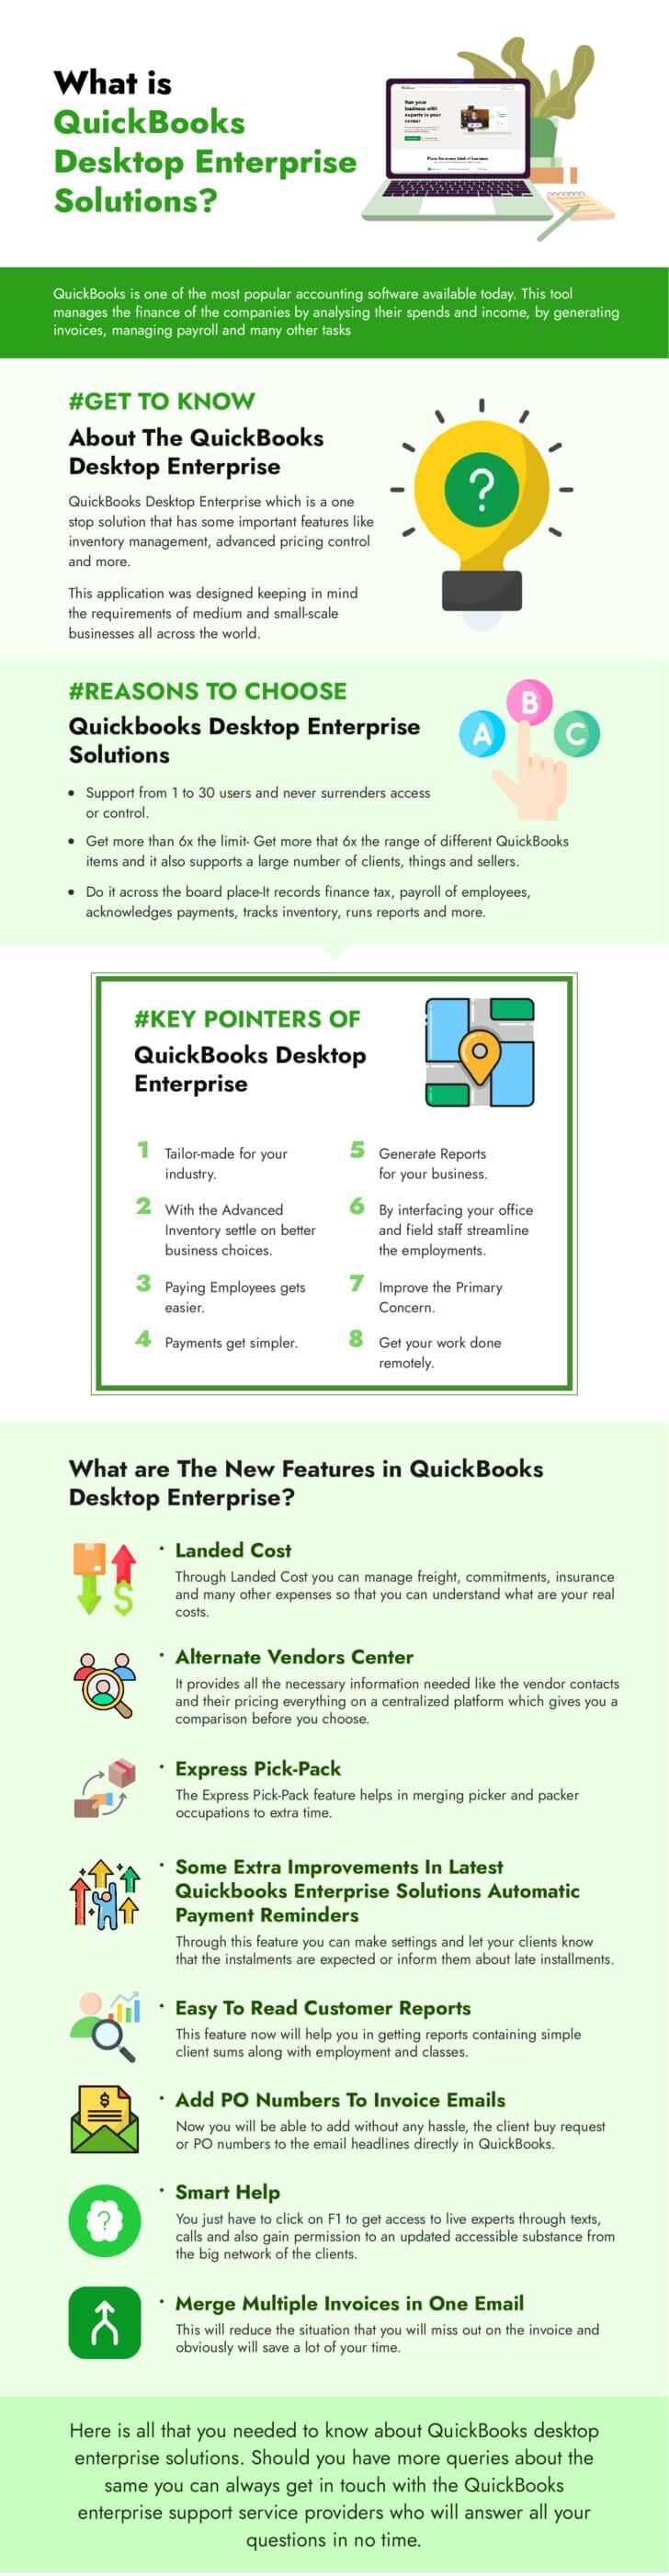
QuickBooks desktop enterprise is one of the most popular accounting software available today. In fact, it is one of the most reliable applications that small and medium sized businesses highly depend on. This tool manages the finance of the companies by analyzing their spends and income, by generating invoices, managing payroll and many other tasks. Each year a new version of the software is launched with better features. In this blog we will discuss QuickBooks desktop enterprise solutions which is a one stop solution that has some important features like inventory management, advanced pricing control and more. This software was designed keeping in mind the requirements of medium and small-scale businesses all across the world. It is a very flexible application as it adjusts to the way you run your business.
Recently the QuickBooks Desktop Enterprise 2024 version was launched with new and improved features. But before we understand what’s new and what has improved in this version, it is important to know why you should use QuickBooks desktop enterprise solutions.
Reasons to choose QuickBooks desktop enterprise solutions
Support from 1 to 30 users and never surrenders access or control.
Get more than 6x the limit- Get more that 6x the range of different QuickBooks items and it also supports a large number of clients, things and sellers.
Do it across the board place-It records finance tax, payroll of employees, acknowledges payments, tracks inventory, runs reports and more.
Key Pointers of QuickBooks Desktop Enterprise
Source - https://www.chetu.com/
Tailor-made for your industry
QuickBooks Desktop Enterprise is specifically structured and designed for your industry. Industry launches give exact highlights like redid graphs, reports focusing on the business type you are running and many more.
With the Advanced Inventory settle on better business choices
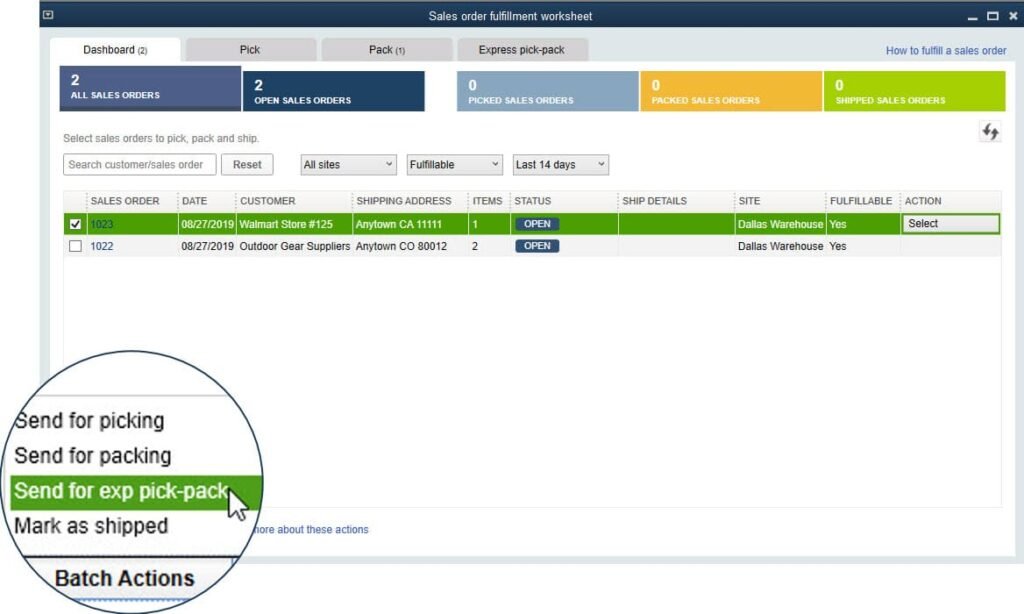
The progressed Inventory has features that you have to keep on adjusting at regularly, reorder, and satisfy the requirements of clients which includes Pack and ship, Enhanced Pick, Express Pick-Pack, versatile stock scanner tag scanning, Landed cost bookkeeping, cycle count etc.
Paying Employees gets easier
With the help of QuickBooks Desktop Enhanced Payroll you will be able to create many checks, utilize free direct store, keep a track of the finance charges with no month to month expenses. When any kind of assessment opportunity comes by you will be ready with the core aspects.
Payments get simpler
A great thing about QuickBooks payments that you can easily acknowledge Mastercard’s, get paid by savvy solicitations, keep a track of the instalments and more.
Generate Reports for your business
With the Advanced Reporting feature, you can easily generate reports whenever you require them. The formats are simple which are perfectly suited for all industries.
Improve the Primary Concern
The Progressed Pricing permits you to control, change and robotize the values directly through QuickBooks internally. You will be able to modify your costs to keep your primary concern properly developing. All you have to do is to set the value principles and Advanced Pricing will do the figurines.
By interfacing your office and field staff streamline the employments
The Intuit Field Service Management streamlines your office as well as administration specialists so that you can plan out more employment within the organization and make the payments quicker. This feature helps you understand and update who is doing what and where with proper reports from the field, work planning, on the spot invoicing and more.
Get your work done remotely
With the help of QuickBooks Desktop Enterprise with hosting, everything is in the cloud which makes your business operations a lot easier as you can work from any place, anytime and you can access it from any device be it MAC, PC, or tablets.
QuickBooks Desktop Enterprise Solutions Pricing
Plan name
Price
Features
Silver
Starts at $1,410/year for one user.
Available in industry-specific editions; includes inventory management, advanced reporting, job costing, priority customer service and more.
Gold
Starts at $1,830/year for one user.
All Silver features, plus payroll.
Platinum
Starts at $2,250/year for one user.
All Gold features, plus advanced inventory, advanced pricing rules and workflow approvals.
Diamond
Starts at $4,400/year for one user (only offered as a monthly subscription).
All Platinum features, plus Assisted Payroll to handle federal and state payroll taxes filings for $1/employee each pay period. Users can also add a Salesforce CRM connector for $150/month and QuickBooks Time Elite for $5/employee each month.
What are the new features in QuickBooks Desktop Enterprise?
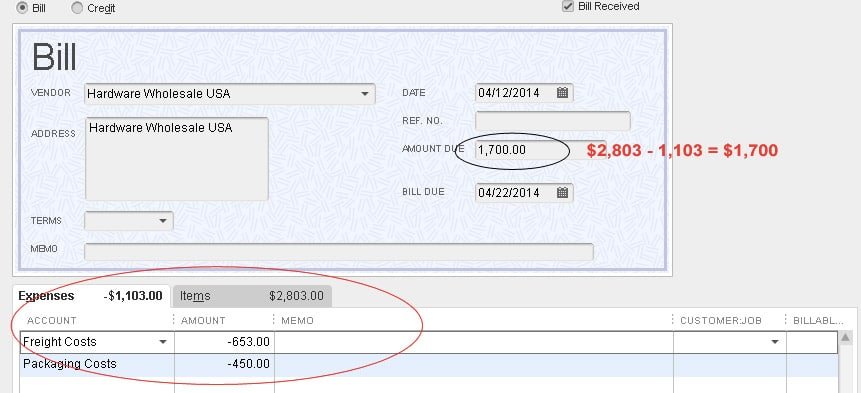
Landed Cost
Through Landed Cost you can manage freight, commitments, insurance and many other expenses so that you can understand what are your real costs. This will save a lot of your time and make your tasks hassle free.
Alternate Vendors Center
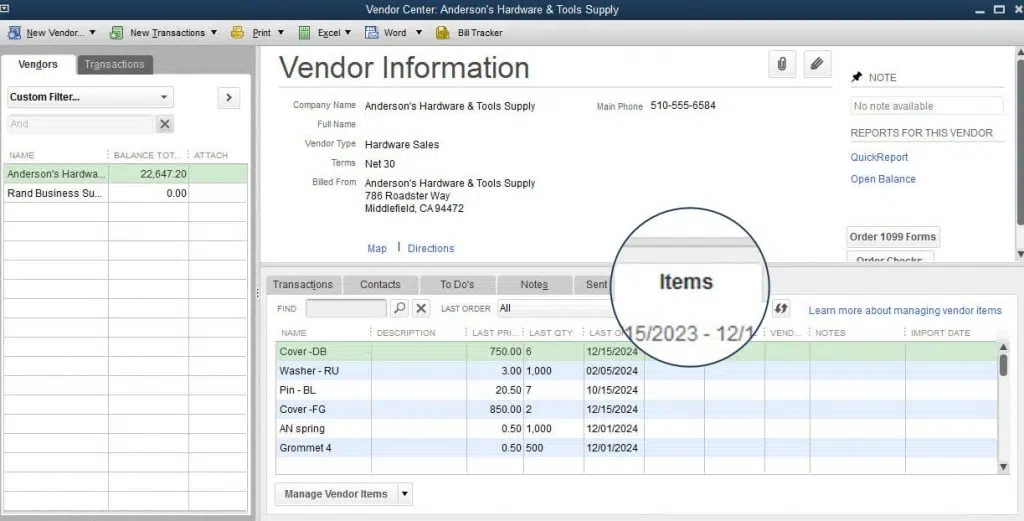
The Alternate Vendors centre actually will provide you with all the necessary information needed like the vendor contacts and their pricing everything on a centralized platform which gives you a comparison before you choose. The best thing is that this feature will help you in the process of making purchase orders for your business as all the vendor details will be automatically added.
Express Pick-Pack
The Express Pick-Pack feature helps in merging picker and packer occupations to extra time. In fact, the Enhanced Pick, Pack and Ship feature permits you to control the entire arrangements demand fulfilment procedure from only one dashboard.
Some Extra Improvements in latest QuickBooks Enterprise solutions
Automatic Payment Reminders
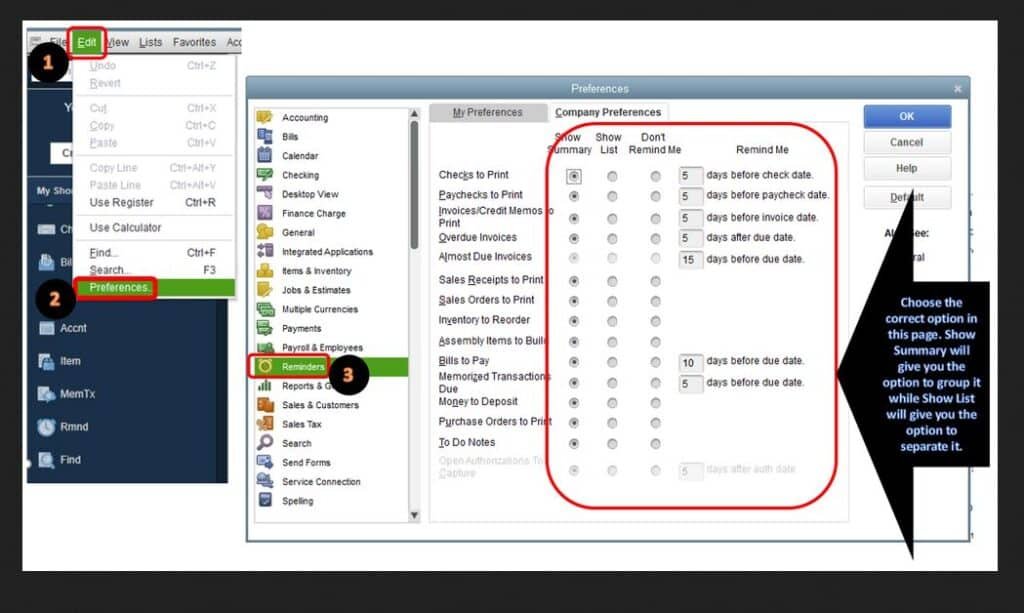
Through this feature you can make settings and let your clients know that the instalments are expected or inform them about late instalments. You can also make changes in the updates for explicit clients so as to maintain a solid business connection.
Easy to read Customer Reports
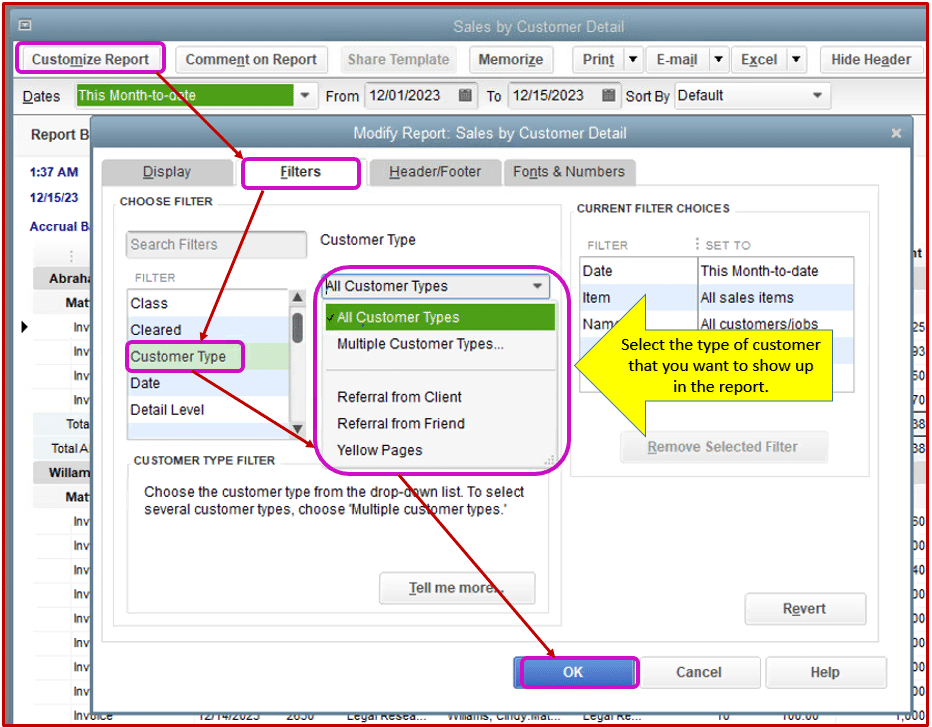
This feature now will help you in getting reports containing simple client sums along with employment and classes. It has saved a lot of time in finding fares or long reports as you can just see client details that you need.
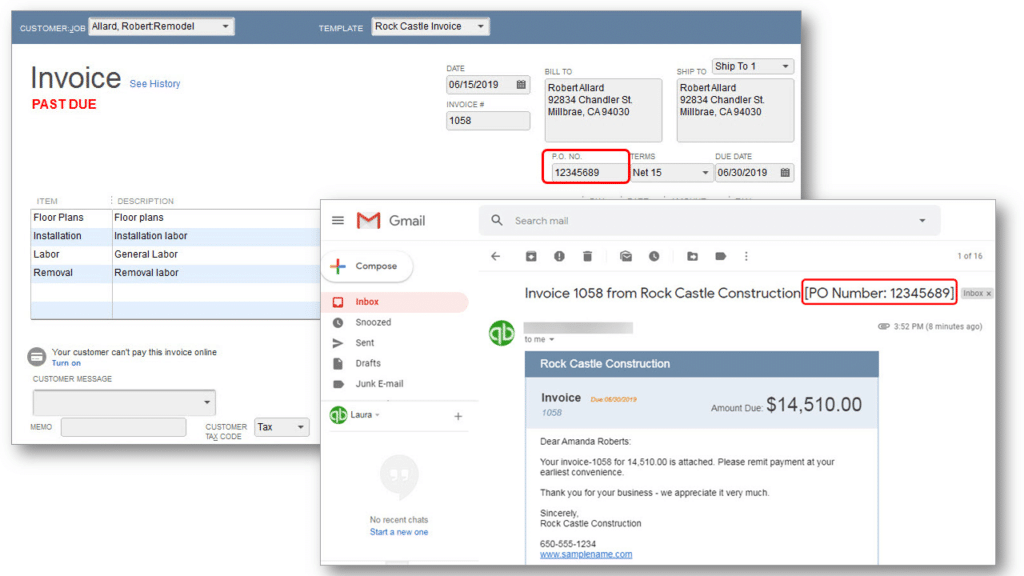
Add PO numbers to Invoice Emails
Now you will be able to add without any hassle, the client buy request or PO numbers to the email headlines directly in QuickBooks. You can also easily search for the receipt through the PO numbers and this will save a lot of your time.
Smart Help
Now getting help for any queries regarding QuickBooks Desktop Enterprise gets easier. You just have to click on F1 to get access to live experts through texts, calls and also gain permission to an updated accessible substance from the big network of the clients.
Merge Multiple Invoices in One Email
You can now combine different invoices in one mail and this makes it simpler for the clients to pay. This will reduce the situation that you will miss out on the invoice and obviously will save a lot of your time. We have discussed in detail about all the key new features as well as the improved ones in QuickBooks Desktop Enterprise. However, there are few extra features added as well.
Designed for your industry
Advanced Inventory with Enhanced Pick, Pack, and Ship
Here is all that you needed to know about QuickBooks desktop enterprise solutions. Should you have more queries about the same, you can always get in touch with someone who is expert in QuickBooks software.
A firewall is an essential application which keeps the system safe from virus or malware attacks. At times, the firewall blocks some QuickBooks company files to access the internet. QuickBooks desktop requires specific firewall ports to communicate properly in multi-user mode. You simply will have to configure QuickBooks firewall ports or update the firewall to the latest version. If you are looking for the process to add QuickBooks firewall ports manually then, we have a solution for you. You can go through this article carefully and perform the steps listed in here. To know more, read this article carefully, or connect with an accounting expert.
Steps to Add and Configure QuickBooks firewall ports manually in Windows
In order to configure and add the QuickBooks firewall manually, you can perform the below steps.
Identify your QuickBooks desktop version
Different QuickBooks desktop versions uses different firewall ports. And before adding the ports, you need to first identify the QuickBooks version installed on your system.
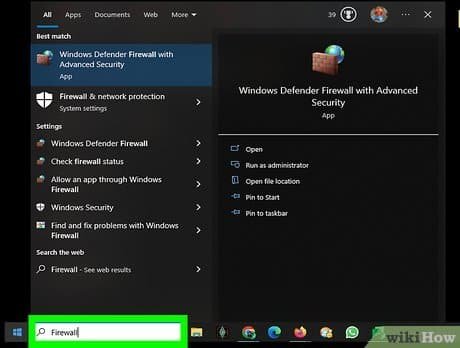
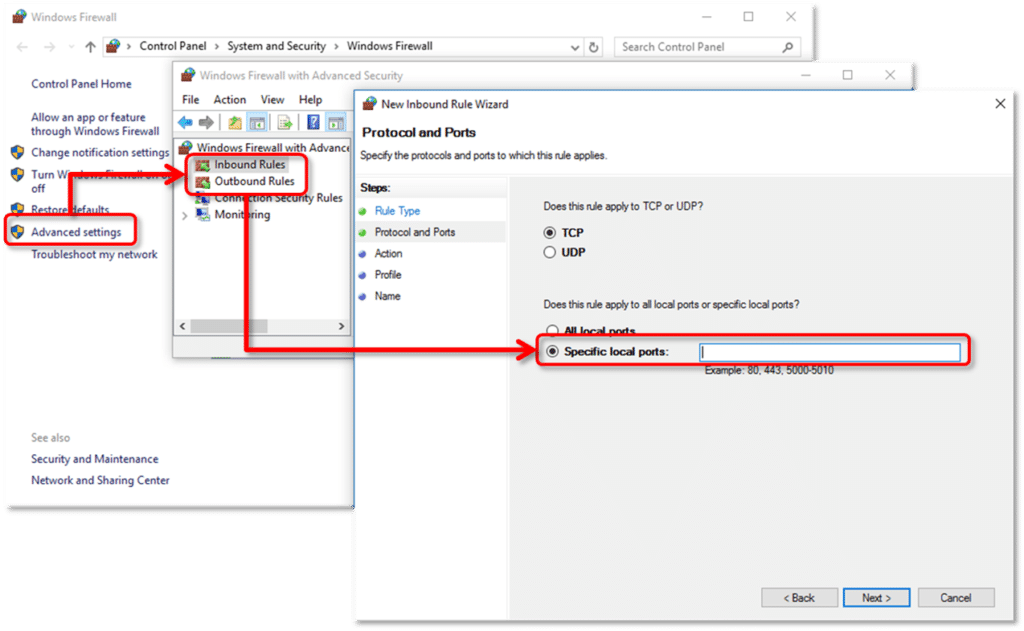
And then enter Windows firewall into the search and open the Windows firewall.
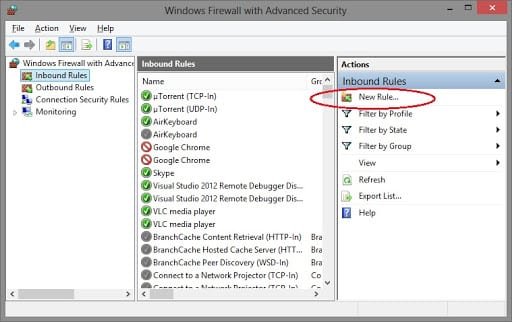
The next step is to select Advanced settings.
And also, right click the Inbound rules.
Later on, create outbound rules. The user is suggested to select New rule.
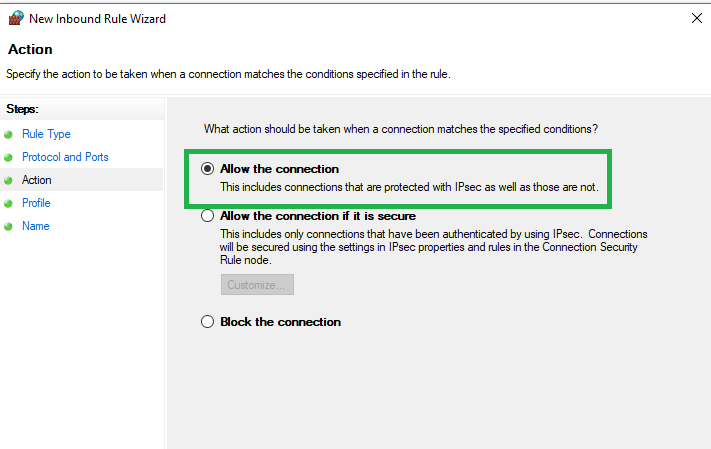
Now choose the Port and also hit the Next tab.
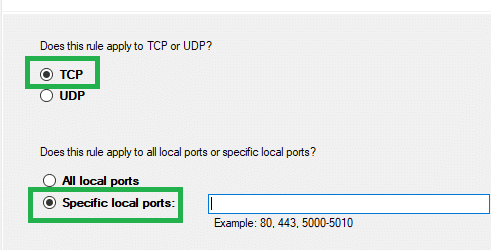
Moving ahead, ensure that the TCP is selected.
Enter the specific ports needed for your QuickBooks version in the specific local ports:
QuickBooks desktop 2024: 8019, XXXXX
QuickBooks desktop 2023: 8019, XXXXX
QuickBooks desktop 2022: 8019, XXXXX
QuickBooks Desktop 2021: 8019, XXXXX
QuickBooks desktop 2018: 8019, 56728, 55378-55382
QuickBooks desktop 2017: 8019, 56727, 55373-55377
It should be noted that the user is supposed to keep a note that QuickBooks desktop 2020, 2019, and the versions to be introduced make use of dynamic ports. The dynamic ports are specific firewall ports assigned at the time of installation. Using this, it is ensured that the QuickBooks desktop gets exclusive use of the given port. For QuickBooks desktop 2019 and the later versions, the port format is as follows: 8019, XXXXX. In this XXXXX is the dynamic port number.
To get the dynamic port number, perform the below steps:
The very first step is to open the Windows start tab.
Is it possible for configuring third party antivirus/firewall programs?
It should be noted that you would have to perform the solution if the QuickBooks firewall configuration is unable to rectify the issue.
Intuit is unable to provide configuration steps due to numerous antivirus/firewall programs are present nowadays. It is suggested to refer to the software documentation or the website.
In case you are still facing such an error while opening the file over a network, then try adding the directories to the third party antivirus program given below:
This brings us to the end of this guide, where we hope that the information shared in above might be of some help in adding QuickBooks desktop firewall ports manually. However, if you continue to experience connectivity issues after completing the recommended steps, additional troubleshooting may be required based on your Windows firewall or network configuration. XpertBooks Pro is an independent third-party service provider offering quick technical assistance for accounting software related issues. Our experienced professionals can help analyze your system configuration and guide you through the proper troubleshooting process.
Talking about the undeposited funds account, it holds the customer payments in QuickBooks till the user deposit them at the bank. After the users gets the deposit slip, they can simply combine these payments into a single record, in order to ensure that the QuickBooks software matches the bank records. Below we have discussed the complete steps that can be performed to put payments into the undeposited funds account in QuickBooks before combining them. Read ahead and learn the process in detail.
Steps to deposit payments into the undeposited funds account in QuickBooks desktop
The user can put payments into undeposited funds account in QuickBooks desktop before combining them:
Step 1: Putting payments into the undeposited funds account
Payments processed with QuickBooks payments:
In case the process invoice payments through QuickBooks payments for desktop, QuickBooks takes care of everything for you. The user doesn’t need to combine payments or move then to an account.
Invoice payments you process outside of QuickBooks
When the user follows the workflow to receive payment for an invoice, QuickBooks automatically puts them into undeposited funds.
Sales receipt for payments you process outside of QuickBooks
It should be noted that QuickBooks by default puts sales receipt payments into the undeposited funds account. The user needs to simply create a sales receipt and QuickBooks handles the other things.
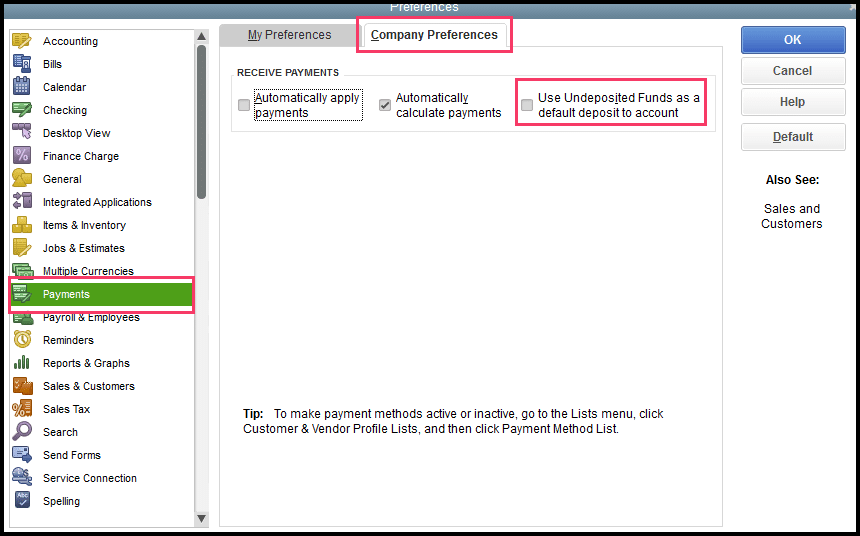
Also users would rather have to select which account the user put payments into.
The very first step is to move to the Edit menu and also select Preferences.
After that, choose Payments from the list and then move to the Company preferences tab.
The next step is to choose and uncheck the Use undeposited funds as a default deposit to account checkbox.
The last step is to select OK tab.
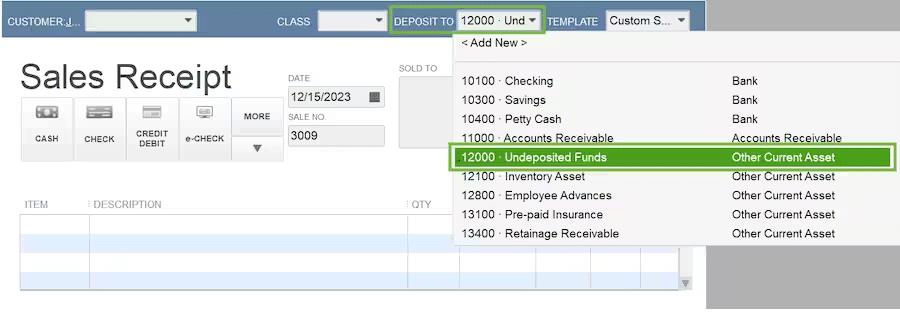
The user can also select an undeposited funds or another account each time the user creates a sales receipt.
The first step is to choose Create sales receipt on the homepage.
After that, choose the Customer from the customer drop-down menu.
And then, select Undeposited funds from the deposit to drop down.
The next step is to fill out the rest of the form.
The last step is to select Save and close or Save and New.
It is suggested to always review the deposit to field so that you know where the payments are going.
In case the bank records a single payment as its own deposit, then there is no need to combine it with others in QuickBooks. Else, the user can put the payment directly into an account and skip undeposited funds.
With the help of deposit slip, the user can record a bank deposit and combine the payments in QuickBooks. All payments in the undeposited funds account automatically appear in the bank deposit window. The user needs to use the deposit slip to decide how to combine the payments.
Review the undeposited funds account
It is often suggested to check the undeposited funds account on a regular basis and clear out any payments waiting to be moved.
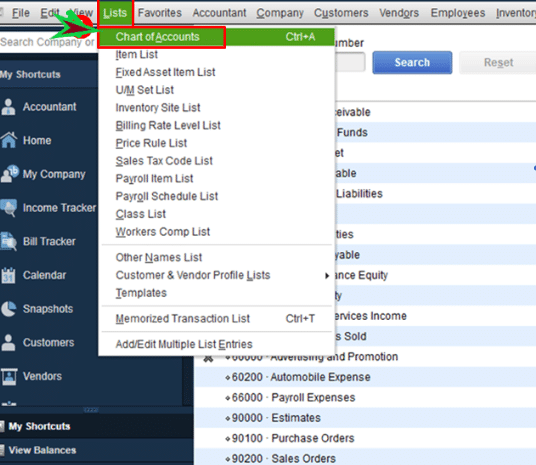
The very first step is to select Chart of accounts from the Lists menu.
And then, right click the Undeposited funds and choose QuickReport: Undeposited funds.
From the dates drop-down menu and also select All tab.
After that choose Customize report.
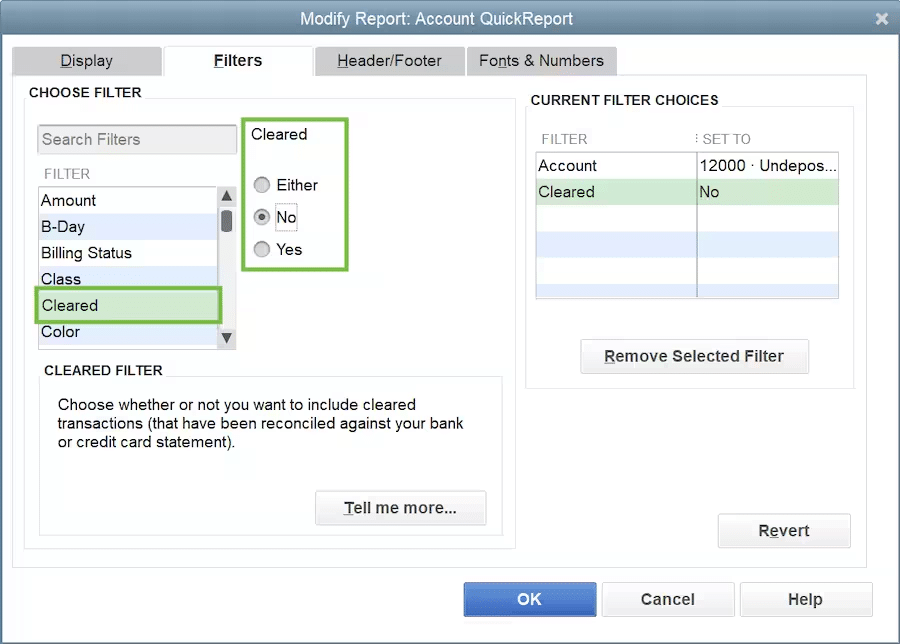
In the net step, choose the Filters tab. And also, scroll down the filter list and choose Cleared.
The last step is to select No in the cleared section and also select OK.
The report lists any transactions still in the undeposited funds account. To add these payments to deposit and follow the step 2 for making a bank deposit.
Depositing payments into the undeposited funds account in QuickBooks becomes much easier, once the user is good with the steps that are to be performed. We hope the steps discussed in this guide helped the user to record their payments accurately and manage your deposits with confidence. However, if the user still have questions about the process or encounter any difficulties while recording deposits, XpertBooks Pro is available to assist. We are a team of technically sound accounting professionals who will surely come up with the most effective solution steps for you.