QuickBooks Desktop offers diversified accounting services to its users. With the aid of this accounting program, small and medium businesses have successfully been able to scale their business. This accounting marvel has reached its zenith beyond any doubt. Moreover, how far the software is good to use but users have been experiencing certain technical issues in recent times though. Some of these issues are easily rectifiable, but others need a technical hand. One latest entrant to this list of issues involves potential data issues in QuickBooks desktop. These type of issues involves different types of error messages that pop-ups on the screen. Users also witness a sudden unusual behavior of QuickBooks.
Potential Data issues are common and can be pretty easily fixed if you have basic knowledge of the inbuilt troubleshooting tools in QuickBooks, including the rebuild and verify data tool. Read this full blog to know how to resolve potential data issues in QuickBooks desktop in one go.
Common Potential Data Issues in QuickBooks Desktop
QuickBooks users can observe a number of unrecoverable company data issues. These include:
Strategies to Resolve Potential Data Issues in QuickBooks Desktop
User can come across any of the company data issues in QuickBooks Desktop. These issues can be fixed by implementing some common troubleshooting solutions discussed below:
Strategy 1: Use Rebuild and Verify Tool in QuickBooks
QuickBooks Desktop is equipped with a comprehensive tool to fix assorted issues in QuickBooks, the Verify and Rebuild Data Tool. The recently encountered potential data issues have been effectively fixed by the use of this tool. Notably, this tool fixes different types of “Data Integrity” issues in the company file. The procedure to use this tool is:
Step 1: First run the Rebuild Tool
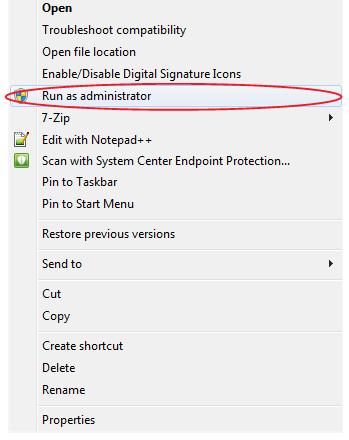
Make sure to run QuickBooks as administrator while closing all the backend programs.
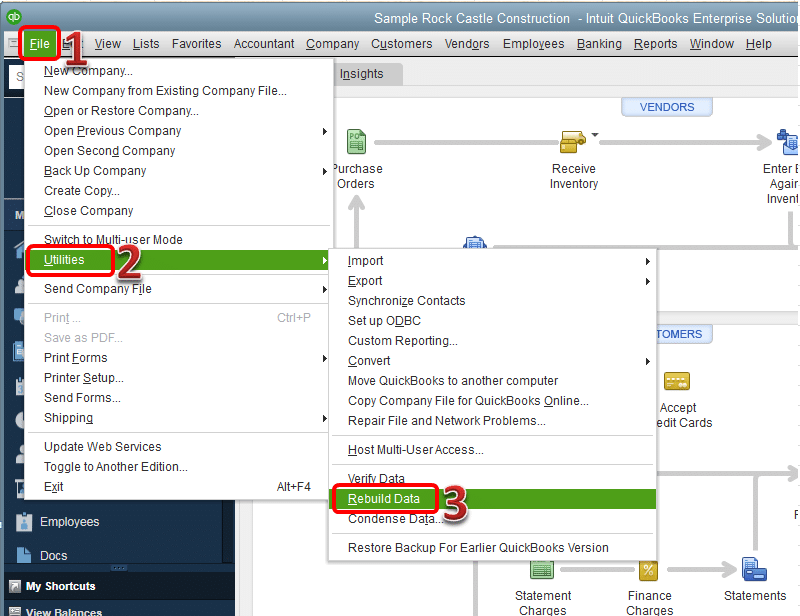
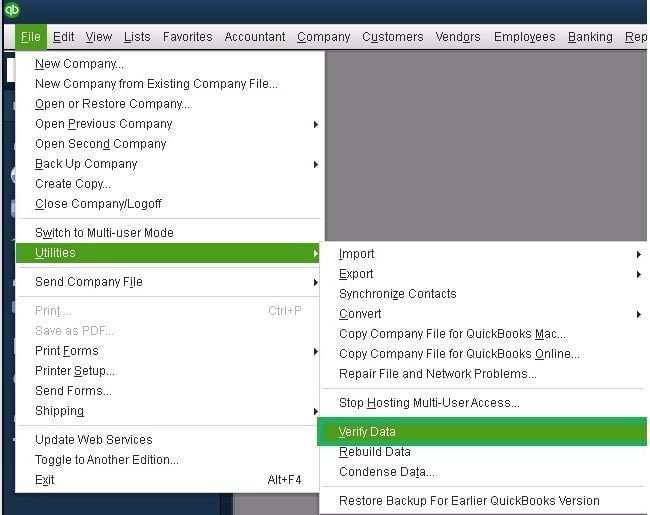
Next, go to the File menu, and then to click on Utilities option.
Moving ahead, you can find the Verify and Rebuild options. You first need to choose the Rebuild data option.
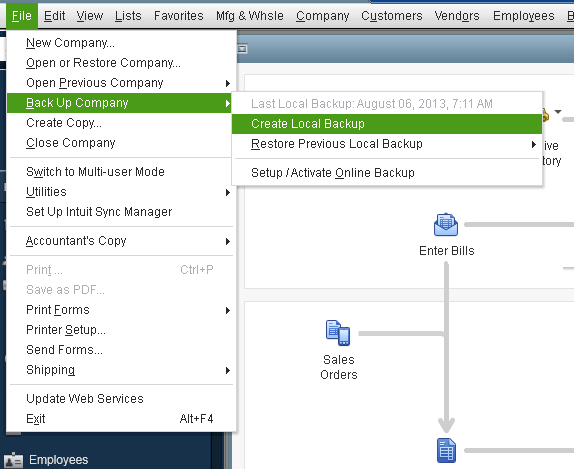
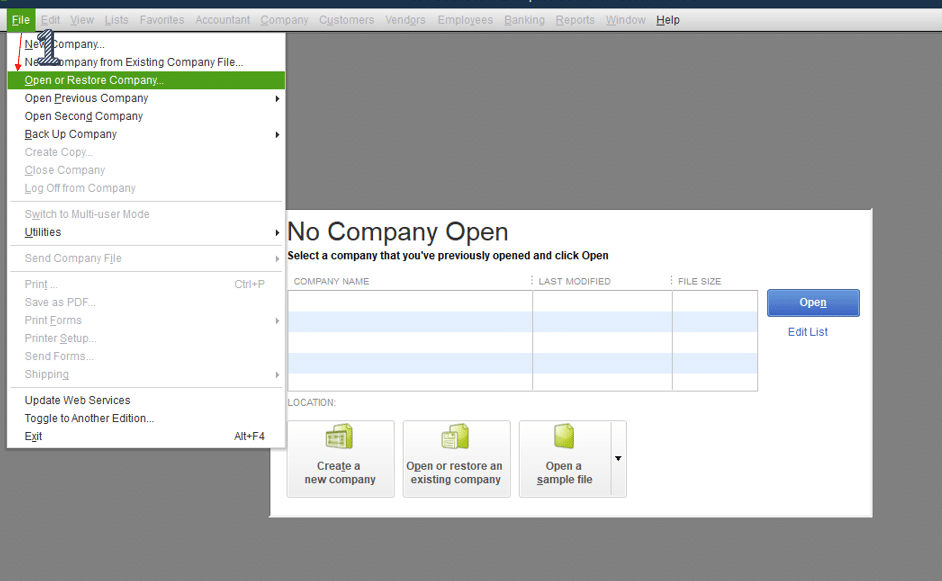
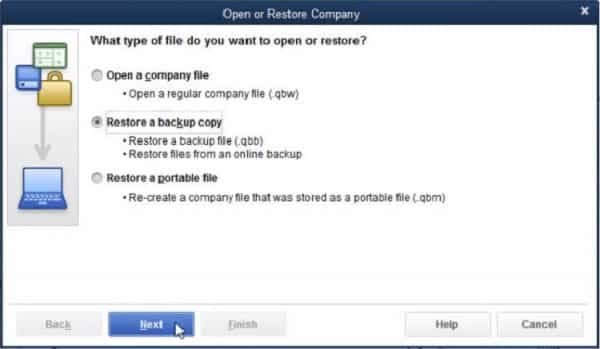
Once the backup process will finish, again go to File menu > Utilities and then tap on Rebuild data.
Later on, you need to choose the company file and after that start the Rebuild operation.
The system may show “QuickBooks not responding” error at this stage, but a moving cursor indicates that the operation is going unhindered. You need to wait till the rebuild process complete.
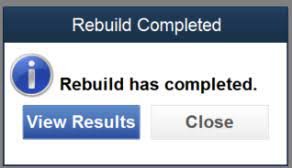
Once the rebuild done, a message will appear on the screen that “Rebuild has completed”.
You need to click on Ok.
Step 2: Now run the Verify Tool
With the QuickBooks Window open, you need to move to File menu, then hit a click on Utilities option.
Followed by hit a click on Verify Data option.
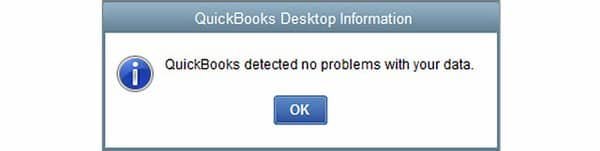
The operation will take a while to complete. The process should end with a message “QuickBooks detected no problem with your data”.
Now click on the Ok button.
On the other hand, if the Verify tool identifies any issues, you should need to rebuild the file again or you can view the sources of the error in the QBlog file.
It is recommended that try to repeat the rebuild process a couple of times again.
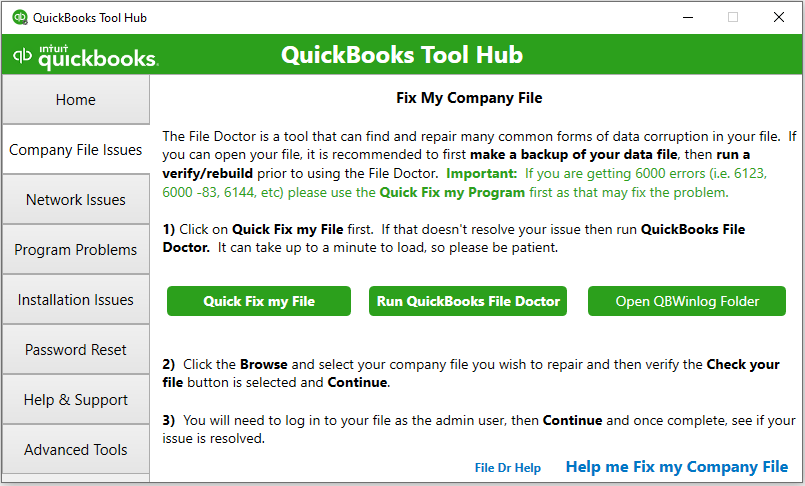
If after following the verify and rebuild process you think your file needs a trip to the ER? then you can try the QuickBooks File Doctor tool to fix potential data issues in QuickBooks. This tool is included in QuickBooks Tool Hub, a tool which is downloadable from the Intuit website.
Initially, you need to download QuickBooks Tool Hub first, directly from Intuit official website.
After that install the tool and run it on your system.
Moving ahead, go to Company Issues tab and click on Run QuickBooks File Doctor.
You can then choose the affected company file by clicking on Browse option and press CTRL + A keys to spot the issue you are trying to fix.
Now start the scan and check the company file for data and network issues. Wait for it to finish.
This article tried to explain all the aspects of the potential data issues in QuickBooks desktop, the causes, some common errors, and the common strategies to troubleshoot these data issues. We hope the information shared above helps you better understand these issues and resolve them efficiently. However, If you continue to experience data related problems or require additional technical guidance, XpertBooks Pro is available to assist you. Our experienced accounting software specialists can help you to understand the causes of the issue and guide you through the quick troubleshooting methods without affecting your operations and data.
Talking about accounts payable, it is basically a record of outstanding bills for the business. It is basically used by the users to track the money they owe to the vendors, suppliers or service providers for products or services purchased on credit. When the user enters a bill, then QuickBooks will add accounts payable to the chart of accounts. And when the user enters or pays the bill, then the software records the transaction to the accounts payable account. Now coming to the account’s payable workflows, there are two accounts payable workflows that are available in QuickBooks desktop. For recording the accounts payable transactions, select the workflow that best suits the business and follow the steps for creating each of the transaction. To know more about accounts payable workflows in QuickBooks desktop, make sure that you go through this post till the end.
What is Accounts Payable workflows in QuickBooks Desktop?
There are 2 Accounts Payable workflows available in QuickBooks desktop.
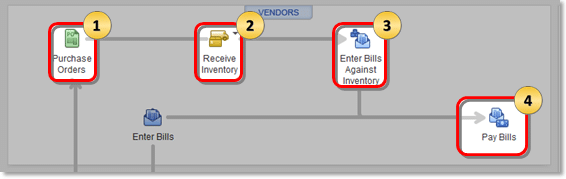
Workflow 1: Paying bills that have a purchase order
The user can use this workflow, in case the business tracks the goods and services that are ordered. Also, note that the purchase orders are only available in QuickBooks desktop pro, premier and enterprise. Below are the steps pay bills that have a purchase order. Let us have a look:
Step 1: Create a purchase order
In case the user hasn’t already, they should turn on the purchase order.
Move to the Vendors and then click on Create and purchase orders option.
After that select the Vendor for which you would like to create the purchase orders and move inside the vendor drop-down menu.
Then hit a click on Add new option to add a new vendor.
And then fill out the fields left, and manually add the items you are willing to order.
To finish the process, hit a click on the Save and Close option.
Step 2: Receive the inventory
Inventory can be received with or without in QuickBooks desktop. The user is eligible to receive inventory with or without a bill after you record a purchase order. Either the user is working for with or without a bill in QuickBooks desktop for Windows and Mac, then you would have to follow the separate steps in case you want to successfully receive the inventory.
Step 3: Enter the bills against the inventory
From the home page click on the Enter bills against inventory.
The perform the steps below on the select item receive window:
Pick the Correct vendor name from the vendor drop down menu.
And then select the Use item receipt date for the bill date checkbox, if you are willing to keep the original inventory availability date.
Hit a click on the Item receipt corresponding to the bill.
Now click on OK tab and all the items receipts are converted into a bill through QuickBooks.
Step 4: Pay your bills
In the very first step, go to the Vendors menu and then choose Pay Bills option.
After that choose the Correct accounts payable account from the dropdown list.
Once done, choose the Checkboxes of the bills they want to pay from the table.
Now set any Discount or Credit that they want to apply on the bills.
Discount - The users need to choose it, if the vendor gave them a discount for this transaction.
Credit - The users need to select this, if they received a credit from the vendor side.
In the next step enter the Date when they paid the bill.
And then choose the Payment method in:
Check
Credit Card
Online Bill Payment
Online Bank Payment
Cash, Debit or ATM card, Paypal, or EFT
Later head towards choose Pay Selected Bill option.
Hit a click on Done, or choose Pay More Bills option if the user have other bills to pay.
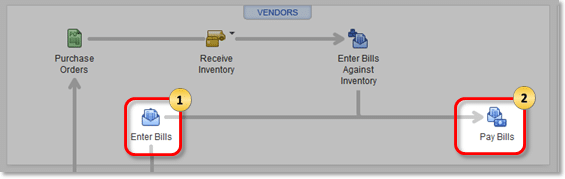
Workflow 2: Paying bills that don’t have a purchase order
The user can make use of this workflow, in case the business doesn’t track the goods and services that are ordered. The steps below can be followed for paying bills that don’t have a purchase order.
Step 1: First enter the bills
You should click on the Enter bills on the home page.
And then pick the Vendor
Also select the Date.
The user should also select the appropriate tab from:
Expense
Items
After that select the Expense account or the Item.
And manually Enter the amount.
Select the Customer job and also put a checkmark in the billable column, in case you wish to track billable expenses.
The last step is to click on Save and close option to end it.
Step 2: Pay the bill
In the QuickBooks accounting software, after recording what you owe, you can easily use pay bills to settle the payables for multiple vendors. The user is eligible to apply corresponding discounts and credits for every payment that is made. The user can make your payments through the cash, debit card, or ATM card, paypal, EFL, direct deposit, credit card, and online bank payment.
Winding Up!
We hope this guide provided you with a clear understanding of how accounts payable workflows function in QuickBooks desktop and helped you complete the setup successfully. However, for some reason if the user is unable to set up accounts payable or encounter any difficulties during the setup process, then XpertBooks Pro is available to assist you. Our experienced accounting software specialists can help evaluate your setup and guide you through the possible troubleshooting process.
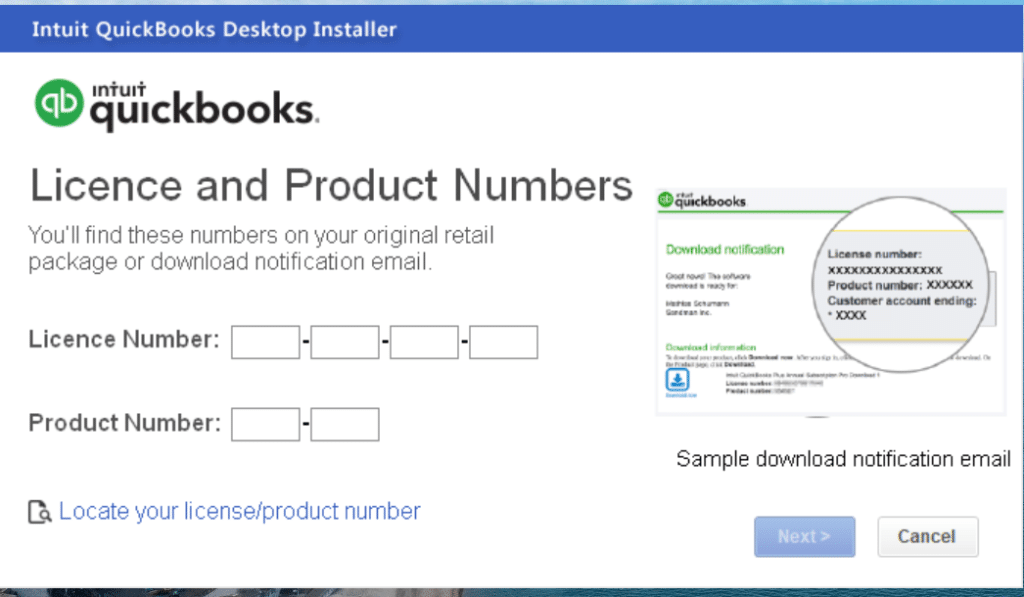
Do you want to change QuickBooks desktop license number or product code? If yes, then this post is just for you. When we activate a new QuickBooks subscription or register QuickBooks, each time we need to enter the product and license number. But some times the license and product code not working issue might appear on the screen. In such situations, the user will have to change the product and license number. It is not requisite to uninstall the QuickBooks desktop, you can even change or update the license information directly from inside the software without uninstalling or re-installing the entire QuickBooks software.
If you are looking for the process to change a QuickBooks desktop license number or product code, then we have come up with this article, where we will be discussing in detail the process to change the license number or product code. Make sure to read this post till the end. Or contact our team of accounting consultants right away. Our professionals will ensure to provide you with immediate technical assistance.
Steps for Changing a QuickBooks desktop license number or product code
Checkout these steps for changing QuickBooks desktop license number or product code:
Method 1: Change QuickBooks Desktop License Number
The user can change QuickBooks desktop license number without uninstalling and reinstalling the application. We have stated below the steps for both Windows and Mac. Read ahead carefully, and implement accordingly:
Steps for changing the QuickBooks desktop License Number
On QuickBooks desktop for Windows:
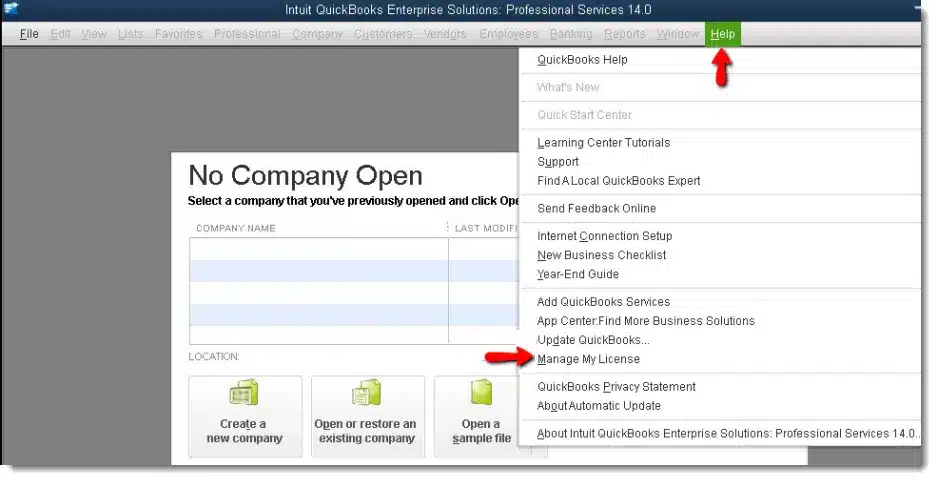
Open your QuickBooks desktop first and then navigate to the QuickBooks help menu.
After that, choose Manage my license from the options and also go for Change my license number.
The next step is to Enter the new license number and choose next then Finish tab.
On QuickBooks desktop for Mac:
If you are a QuickBooks desktop for mac user, then in that case you need to select Manage my license from the QuickBooks menu and then Deauthorize this computer.
The next step is to select Deauthorize and quit, when you get the prompt.
The user is required to re-open QuickBooks and follow the registrations process. This will let you enter a different license.
Method 2: Change QuickBooks product code info
This process is only for Windows user, so opt for the steps accordingly.
Steps for changing QuickBooks desktop product code information
Following are the quick steps to change product code in QuickBooks desktop for Window's:
Solution 1: Manually editing the Qbregistration.dat (for QuickBooks enterprise)
In case you have QuickBooks enterprise installed in five or less than five systems, then it is suggested to follow the re-install process above. In case you use enterprise in more than five computers, then it can be time consuming to reinstall. Also, the user can update the product code is by editing a file called qbregistration.dat. This file has product codes for all installed QuickBooks software.
It should be noted that, if you don’t feel comfortable following these steps, then it is highly recommended that you reach out to an IT professional:
Step 1: The user should open qbregistration.dat file through QuickBooks
The very first step is to open QuickBooks.
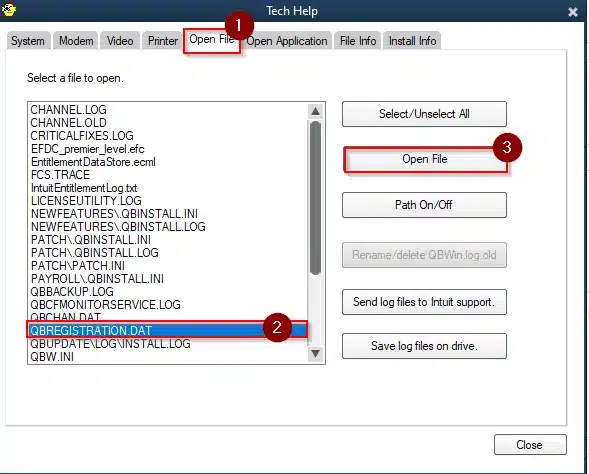
And then, press F2 and then F3 key to open the tech help window.
Also, choose QBREGISTRATION.DAT on the open file tab, and also choose open file. And then the file will open in Notepad.
The user should create a backup of the qbregistration.dat file. QuickBooks won’t open right if there are any types in the file. This step is extremely important.
It is suggested to select Save as from the notepad file menu and then select desktop in the save as window.
And then choose Save.
Also, close the File.
The next step is to re-open the file from the Tech help window.
The last step is to close QuickBooks, but keep the qbregistration.dat file open in notepad.
Step 2: Editing the qbregistration.dat file
In this, the user is supposed to select the Edit opt and then replace or press Ctrl + H keys in qbregistration.dat file.
The user is then required to type in the Old product number in the find what field and then replace it with the new one in the replace with field. The user is also suggested to use format XXX-XXX when entering the Product number.
Also, choose the Replace all tab.
And select File and hit Save tab and also Close the file.
Step 3: Checking the product code
For this, the user should open QuickBooks.
And then press F2 key to display the Product information window.
Also, check the Product number field to ensure that the product code is now updates.
In case the product number didn’t change, then reboot the system. Or if you still see the old product code after a reboot, then follow the reinstall process.
Solution 2: Uninstall and then reinstall QuickBooks
In case the business runs Pro, premier, or enterprise in five or fewer systems, then the best way is to change the product code is to reinstall the software
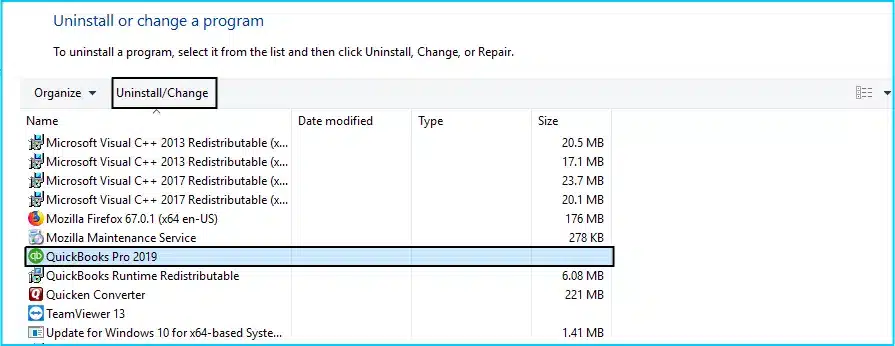
The user is recommended to Uninstall and reinstall QuickBooks.
By the end of this post, it is believed that the above stated set of steps would be more than enough to change a QuickBooks desktop license number or product code. However, if you are facing any sort of error in changing a QB license number or product code, then in that case consult a professional at XpertBooks Pro to identify the root cause and resolve the issue quickly. We will ensure to resolve all your queries in the best possible way.
QuickBooks desktop enterprise lets you to customize the access for different user roles. In this way, the user will be only able to access what they need to do their job in QuickBooks. The user can also invite users that don’t regularly work in QuickBooks, like a payroll manager or payroll processor, to create an Intuit account so they can use services like payroll or QuickBooks time. To know more about creating and managing roles in QuickBooks desktop enterprise, make sure to read this article till the end. Or if you don’t want to manually create and manage roles, then contact to our accounting consultants who can help you to diagnose complex problems and guide you toward an appropriate resolution.
Important Note: The user should aware of that only admins can create & manage users in QuickBooks. Also, make sure that the user has signed in as the admin user of the company file.
Steps on How to Add and Invite QuickBooks Users to a Role
Steps to Add a QuickBooks user
In case you have the users that work regularly in QuickBooks, then adding or inviting them to a specific role is suggested. The steps below can work:
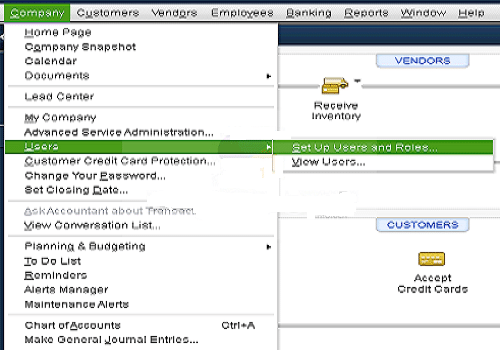
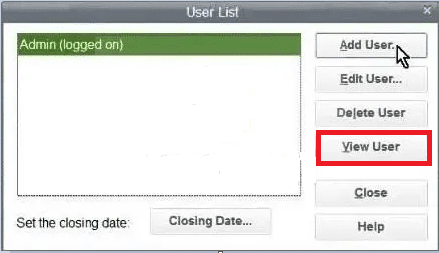
First step is to move to the Company menu and then the Users tab and also select the Setup users and roles.
And then, enter the Admin password and choose OK tab.
The next step is to select New tab from the User list tab.
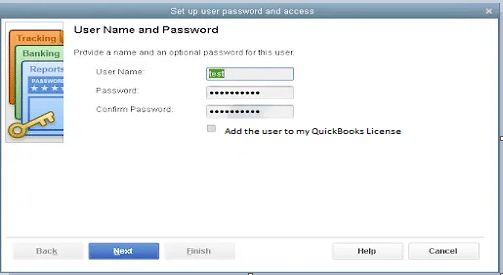
And also Enter a user name and an optional password.
The user will have to select the users role then select Add from the available roles.
Enter the user’s email address and then hit OK tab.
The last step is to select OK tab from the confirmation window.
Certain roles will require a user’s intuit account linked. This will include accountant, external accountant, finance, full access, payroll manager, payroll processor, and view only roles. These roles will show ^ next to the role name. When the user checks their mail and see the invite, they would have to select accept invite, then sign in using their Intuit ID.
Steps to Invite intuit account users and their roles
In case you have users that don’t work in QuickBooks on a regular basis, then it is suggested to use services like payroll, workforce, QuickBooks time or capital, you can invite them to create an intuit account. Then, they will be assigned a basic user role. The user is required to perform the steps below:
Move to the Company menu and then select Users and also choose Intuit account user management.
Next step is to select Add user from the Users tab. You need to enter a valid first name, last name and email id.
After that, enter the User’s name and user’s email and choose the role from available roles and choose Add.
The user will then have to choose Add user.
And also, hit OK tab.
Later on go to Roles and select Role for the user. Also, select View role description option to see available roles and their descriptions.
In the next step, hit a click on Send invitation option to notify the user.
After the above step, now QuickBooks will display a message of the Invite status with the roles assigned and the company file name.
Now the user need to click on OK button to dismiss the message.
The user needs to check their email for invite email and choose accept invite. Also, sign in using their email or user ID.
The user can select from the fourteen predefined roles. These cover common roles for most businesses. The roles are indicated with an asterisk, this signifies that they have unrestricted access to see all transaction in the account. The user can also customize predefined roles so that the user start with some existing permissions. The user is required to follow the steps listed below:
At first, the user needs to move to the Company menu and then select Users tab.
After that select Set-up users and roles.
Moving ahead, here the user need to enter the Admin password, then tap on OK.
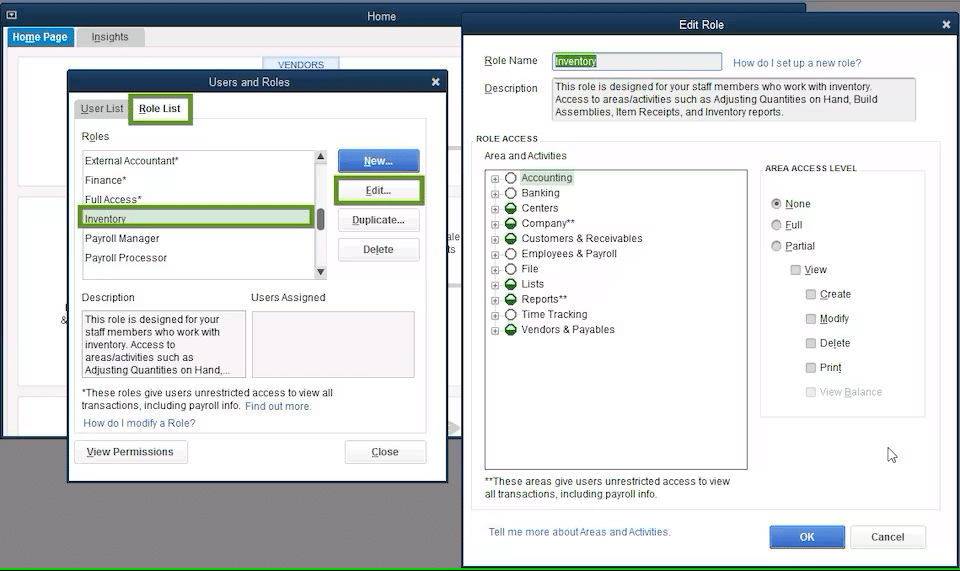
Next, choose the Role list tab.
In the next step, select a role and select Edit to review its permissions.
The user is then required select an Area of the accounts in the area and activities. In case the user wishes, they can choose none, full, or partial to set the access level.
Then at last select OK to save.
Steps to create a new custom role
The user can create brand new roles by performing the steps below:
The very first step is to move to Company menu and select Users tab.
After that choose Setup users and roles and then you need to enter the Admin password and click on OK.
The next step is to select the Role list tab, and choose New.
Later on, give the role a name and description.
The user is then required to select an area of the accounts in the Area and activities section. Review each area and choose None, full, or partial to set the role’s permissions.
The last step is to select OK to save the changes, once you set permissions for each area.
Steps to review roles and permissions
In case the user need to view all roles and their permissions, then they can run a Permission Access by Roles report. Checkout the following steps:
The user is supposed to head to the Company menu and select Users.
After that choose Setup users and roles.
Later on, enter Admin password and the tap on OK button.
Once done with that, choose the Role list tab and select View permissions.
The last step is to select the Roles that the user wishes to review and then select Display tab.
We believe that reading the above article can be of some help in to create and manage roles in QuickBooks desktop enterprise. However, if you have any query, then reach out to our XpertBooks Pro team right away and let them perform the required procedure for you. We are an independent third party service provider offering technical assistance for accounting software related issues. Our experienced professionals can help diagnose complex problems and guide you toward an appropriate resolution.
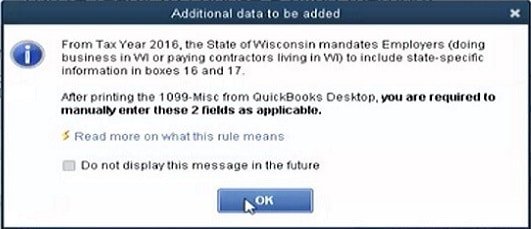
At the time of filing the 1099 payments, especially at the year end, the user will have to print out the copies of the 1099 and 1096 for each vendor or contractor. Thus, it is important for the user to learn the process to print 1099 forms in QuickBooks desktop. This way the user can file their taxes as well. In case the user isn’t paying for e-file with Intuit, then the user will want to print out copies for filing to the IRS of all contractor payments. Form 1099 is basically printed two or three to an 8x11 inch sheet. In case at least one form on the page is completed properly, the user must submit the entire page.
The user must send the forms to IRS in a flat mailing. The user can also check out the general instructions for certain information returns. It should be noted that the form 1096 is only needed when the user print and mail, not when the user e-file. If you are interested in knowing the processes to print 1099 forms in QuickBooks desktop, then make sure to read this post carefully till the end.
Different 1099 - MISC copies for
Copy A:
This is for recording purposes only. And is required for manual filing only. However, manual filing is not supported by this service
Employer copy to file withs state when applicable
For employer records
Contractor copy to be filed with state
Copy B:
For contractor’s records
Envelope that should be used to submit form 1099
Intuit usually offers 1099 forms with size 8 1/2" x 11" that includes the compatible double window envelopes with size 5 5/8'' x 8 3/4". The user can order them and find out what QuickBooks versions they are compatible with here.
Methods to Print 1099 Forms in QuickBooks Desktop and Online
Below are some of the quick steps to print 1099 and 1096 forms in QuickBooks desktop:
Steps to print the 1099 forms in QuickBooks desktop for Windows
At first, purchase the 1099 kit by mid January so you can print.
And then verify all 1099 information by viewing the 099 reports.
Now load enough blank 1099 MISC forms in the printer as you load the letterheads. Start by loading all of the Copy 1 forms. After you have printed all of the copy 1 forms for each vendor, and then load and print the Copy 2 forms.
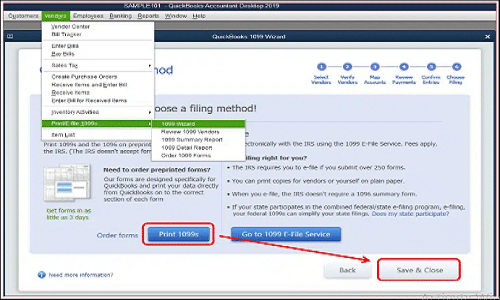
Next step is to select print forms and then select 1099s/1096, from the file menu.
And select Get started in the 1099 wizard that opens select get started.
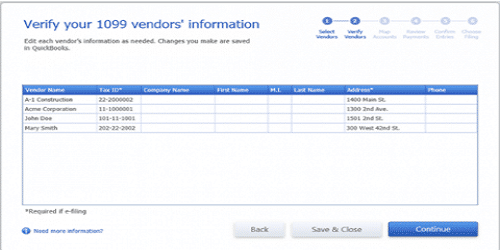
Now select 1099 vendors and select continue, and then verify 1099 vendors information and hit continue again.
Map the accounts and edit thresholds if required, and hit continue.
Then review payments for exclusions. View reports to show your included 1099 payments or excluded payments. When you’re done, hit continue.
Once done with that, confirm the 1099 entries after adjustments, if it is correct, then hit continue.
In the select a filing method screen, select the print 1099s tab.
Specify the date range for the forms then choose Ok.
Now print the date range for the forms then select ok tab.
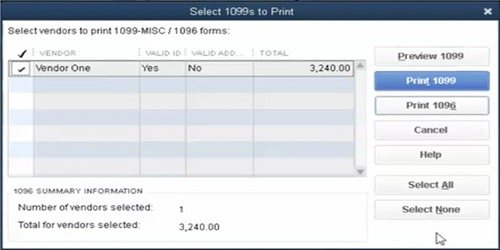
And also select all vendors you wish to print and select the Print 1099s tab.
The last step is to confirm the printer settings then select print.
How to print your 1099 forms in QuickBooks online?
In order to print the 1099 forms, the steps below would work:
Purchase the 1099 kit by mid January so that the user can print.
After that prepare 1099s in QuickBooks.
After it completes, select the print and mail option.
The next step is to check if the forms align properly by selecting print sample on blank paper. In case it doesn’t look good, then close the page and move the steps ahead. If it works, then select print twice.
In case the alignment is incorrect, select No, it doesn’t line up.
Align the form using the horizontal and vertical field. After it is done, select the print another sample on blank paper
Next step is to select print and then print again.
Lastly, mail the copies to the contractors by IRS delivery deadline.
Realign the printer, so the number print in their correct area
The user will have to realign the printer, with the help of the steps below:
At first, select the expenses and vendors tab.
After that select prepare 1099s.
Once done, select let’s get started/continue your 1099s.
Next step is to review or enter the company name and address and the tax ID and also select next.
Now select the box for payment types made and the expense account used for these payments, then hit next.
The user will have to review the contractor’s information and choose next.
In the check that the payments add up page, select finish preparing 1099s.
Now select I’ll file myself.
And move through the steps in the select a form type and print a sample page and select the suitable option.
After that move to the steps in the select a form type and print page and hit next.
The last step is to select done to complete printing.
How to print the 1099/1096 forms in QuickBooks desktop for Mac?
Also, verify all 1099 information by viewing the 1099 reports.
The user needs to load enough blank 1099 MISC forms in the printer as you load the letterheads. The user needs to start by loading all of the copy 1 forms. After the user has printed all of the copy 1 forms for each vendor, then load and print the copy 2 forms.
Once done with that, the user needs to select print forms and select 1099s/1096 from the file menu.
Also, follow the 1099 wizard, select the get started tab.
And also, select the 1099 vendors and select next.
Moreover, map the accounts and edit thresholds if needed, and select next.
The next step is to select to view reports to show the included 1099 payments or excluded payments. When you are done, select next.
Now, confirm the 1099 entries after adjustments, and select next.
Also, select print 1099s tab.
And print a test form before printing final forms.
Moreover, select all vendors you wish to print 1099s for and select the print 1099 tab.
Lastly, confirm the printer settings and select Print.
To wrap up!
We conclude the article over here, with the hope that the information shared in above might help in printing 1099 and 1096 forms in QuickBooks desktop. However, if you have any query regarding printing 1099 forms, then in that case you can contact to someone who is expert in handling the accounting tasks. We, XpertBooks Pro are a team of technically sound accounting software specialists, who work round the clock to provide the best possible accounting services.